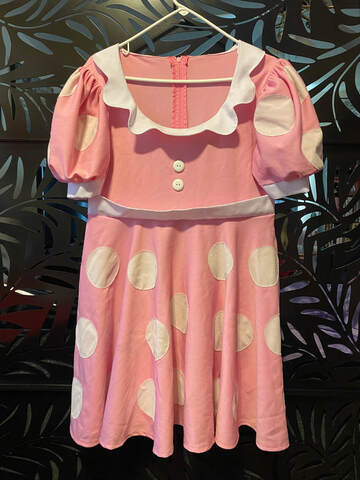
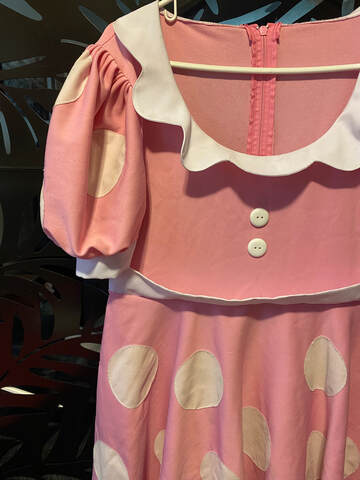
The Deconstruction and Reconstruction of a Costume: Creating a Dress Replica for Minnie Mouse4/13/2023 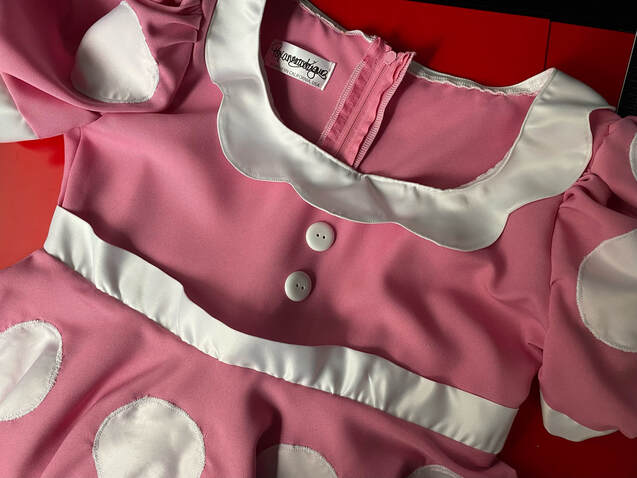 Minnie Mouse Dress Replica by Roxanne Rodriguez Rangel, 2023. Today I would love to share with you a recent project that I completed for a very special client… the fashionably famous, Mrs. Minnie Mouse! The Old Dress
The Minnie Mouse character at Princess Party People, had a lovely pink polka dot dress that had become too dingy and worn out for her to make appearances in. The dress was perfect in size and in color, but the fabric needed retiring. I was hired by the Princess Party People team to make a dress replica. The original dress was dropped off by their staff, and I then recreated a new dress, mimicking the old dress as precisely as possible! Here is a behind the scenes look at the process: Deconstruction 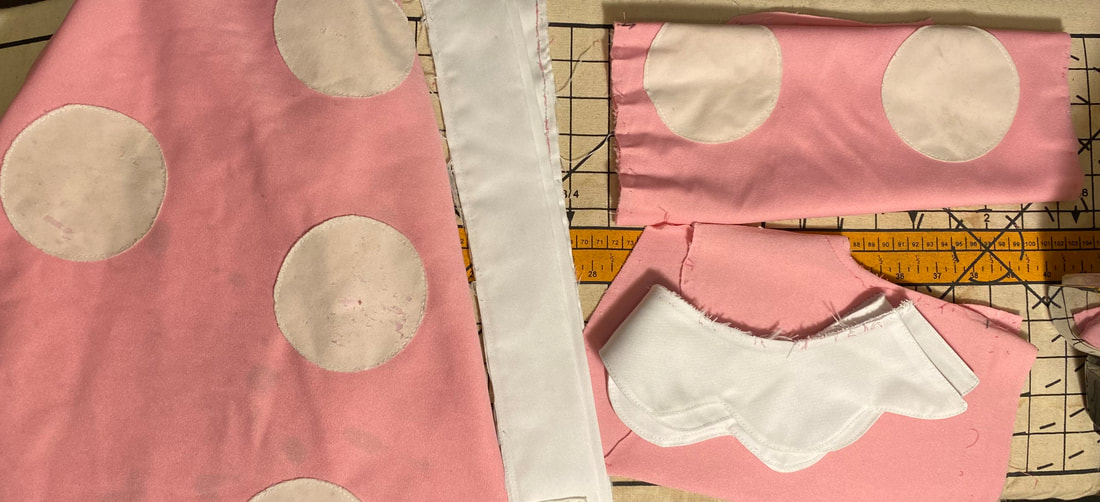 Deconstruction of a Costume: Pieces of the Old Minnie Mouse Dress To recreate a new dress using an existing dress as a template, I first deconstruct the old dress seam by seam. As I remove each portion, I make written notes and technical sketches in my workbook. These notes will be very helpful to me when I reconstruct the new dress! 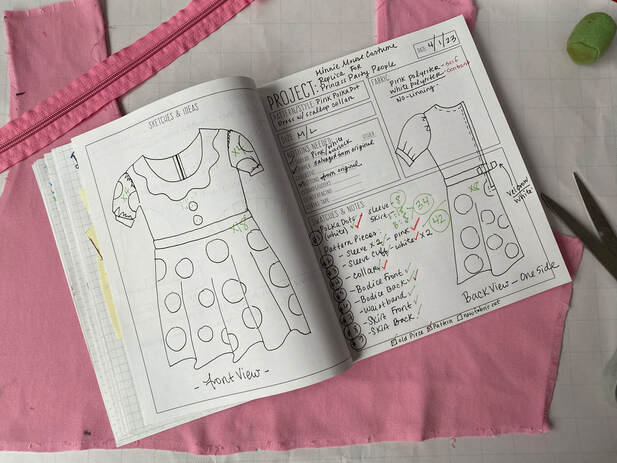 My Sewing Projects Planner is a great notebook to compile all of my notes and technical sketches. Pattern Drafting After the old dress is deconstructed, I trace the old fabric pieces onto paper for the pattern rough draft. I use rulers and measurements to create straight lines, crisp edges, and symmetry. Once the paper patterns are drafted, I can cut out the new material. 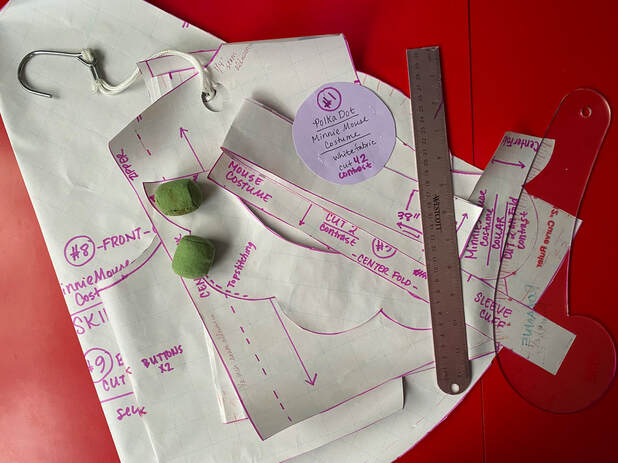 Drafted Patterns are the final outcome of tracing the old dress fabric onto paper. I then use rulers to straighten lines and curves, as well as to verify symmetry. 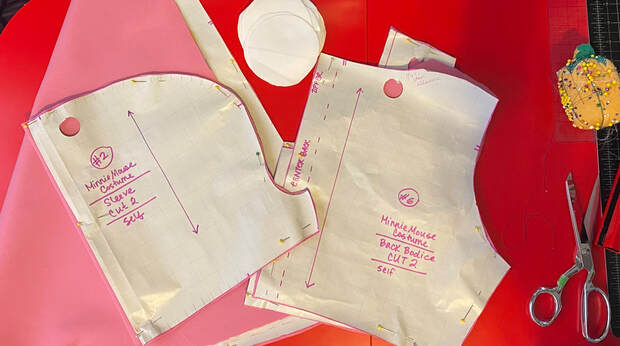 The new fabric is cut using the newly drafted paper pattern. Reconstruction 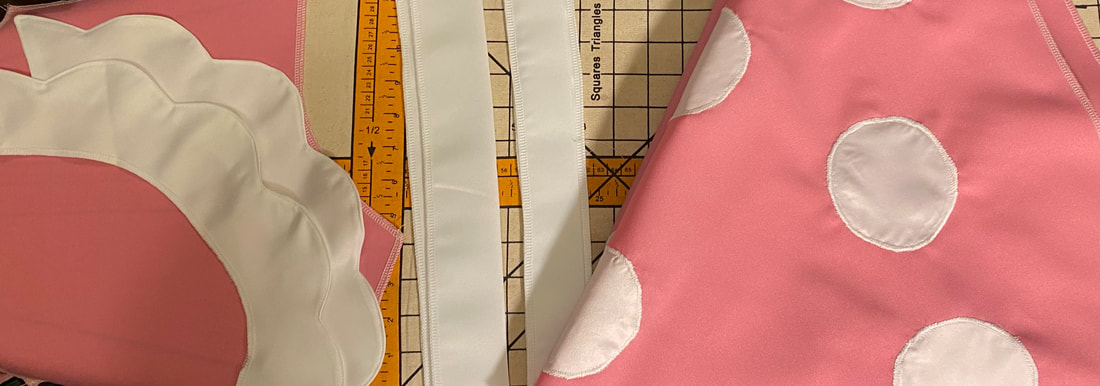 The new fabric: cut and prepped. Ready for assembly! Here are a few photos of the old dress pieces next to the new pieces as I begin the reconstruction portion of this project: 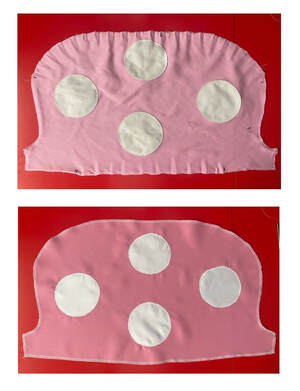 A sleeve of odd proportions! 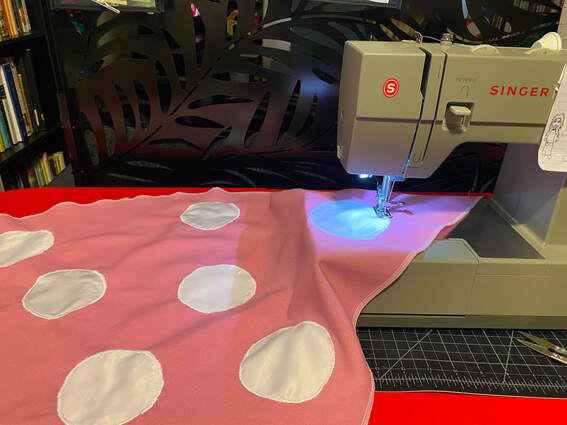 Polka Dots and Satin Stitching! The New Dress Like a puzzle nearing completion, the new Minnie Mouse dress begins to take shape. Before long, an old, tired dress is replaced by a new ready-to-mingle version!  The NEW Minnie Mouse Dress! 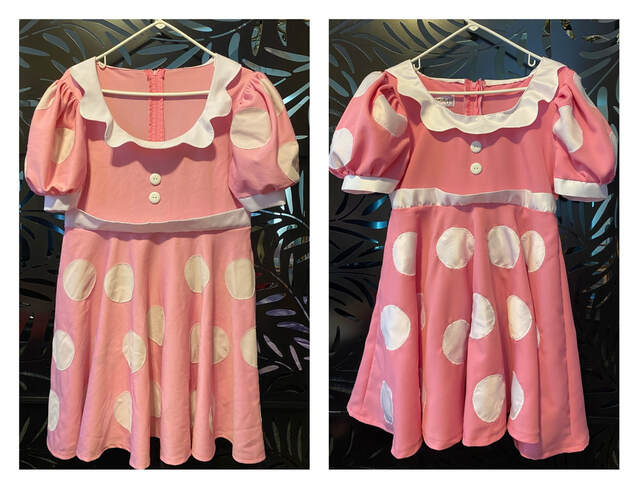 The Old Minnie Mouse Dress (pictured left) and The New Minnie Mouse Dress (pictured right). These types of projects are very fun for me, as I love using a variety of my skills when I am working! If you have any older clothes or costumes you would like to have reconstructed, send me a message with your ideas! You can read more about past costume projects of mine by clicking any of the article links below! Thank you for reading! Have a great day!  Contact Princess Party People to book your favorite character at your next event! Related Links:
1 Comment
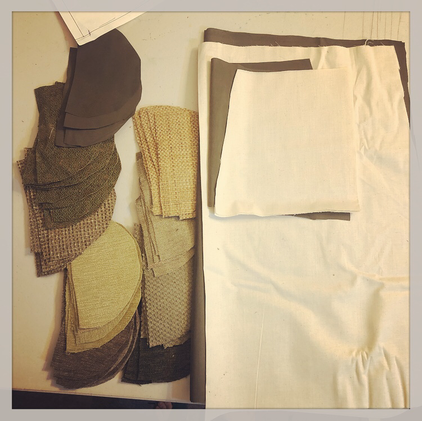
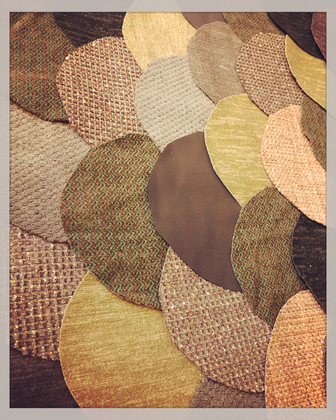
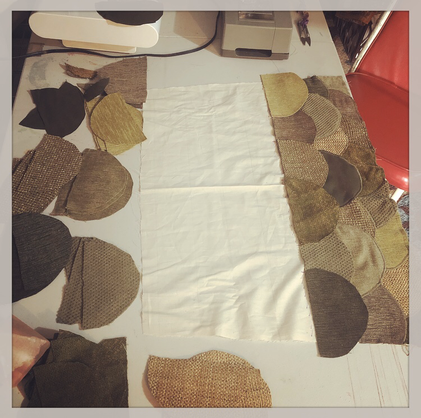
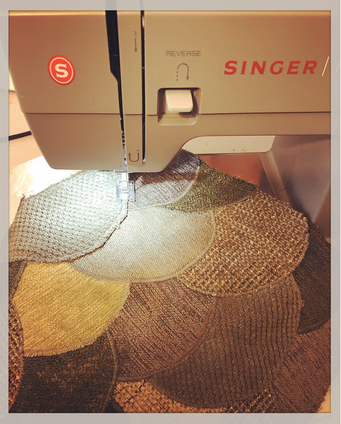
This week I finished a personal project for myself: A Heavy Duty Work Apron made with tons of applique and constructed primarily out of Upholstery Fabric Swatches! 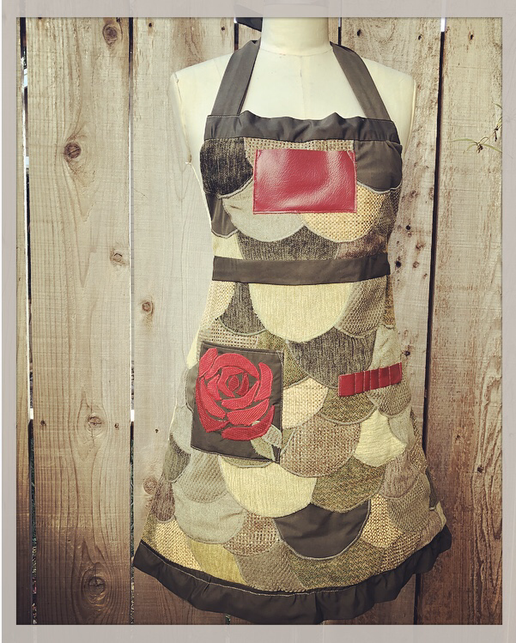 My finished Heavy Duty Work Apron! A while back, one of my friends, who is a retired Interior Designer, dropped off a huge box of large upholstery fabric swatches that she used in the past to show to her clients. Since she no longer needed the fabric swatches, she thought that I might have use for them sewing. I have used a few swatches here and there, but when I started a recent Upholstery Project, I thought how cool would it be to make a heavy duty apron for my upholstery work out of some of this upholstery fabric! While conceptualizing my new work apron, I wanted to create something functional, fashionable, yet heavy duty, for cleaning, removing, and re-upholstering, the old boat seat pieces that I am currently working on... I used an adorable kitchen apron that I have owned for years as inspiration for the work apron pattern... My Concept After making an apron pattern by tracing the dimensions of my existing kitchen apron, I then pulled out my large bin of upholstery fabric swatches. I decided to stick with earth toned colors for my textile design, and I choose several hues of green to work with. Because these swatches are not very large, I knew I would have to work with several to create my apron. I didn't want my design to look like quilted squared patchwork, I wanted to transform these swatches as much as possible, so I decided to create a new textile by piecing together large scallop shapes cut out of the various greenish colors I had chosen. I also had to use a few brown swatches to create enough scallops for the entire front layer of the apron. I used a lovely waterproof forrest green fabric as the lining, and for the straps, trim, belt and ruffle. 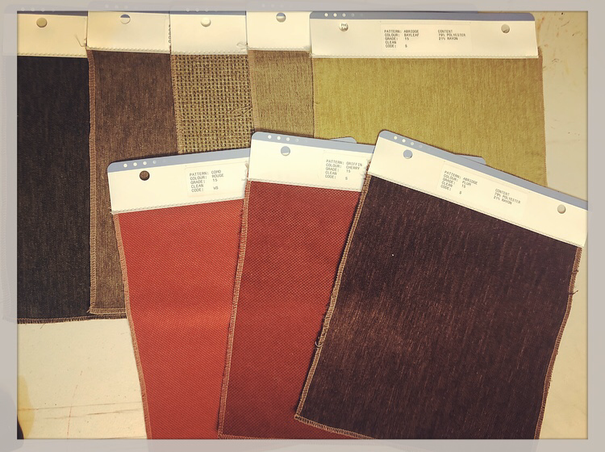 These are a few of the Upholstery Fabric Swatches that I used to create my Heavy Duty (yet fashionable) Work Apron. I literally have hundreds of these things! Using my New Sewing Project Journal, that I absolutely love, I began to draw out a quick illustration with construction notes, as well as a hand-drawn rose applique design that I would create on my apron's pocket by using red upholstery fabric swatches. While rummaging through my swatches I found a tiny swatch of 100% Leather also in red! I used the leather swatch for the apron pocket and a utility/pencil holder!  My new Sewing Project Journal! After my concept was decided upon, I began to cut out my pattern and upholstery scallop pieces. I sewed my scallops onto a muslin layer for stabilization, and then I used my Satin Stitch Presser Foot to secure each piece with Satin Stitching! Work In Progress... Check out these Designer Workroom Photos:
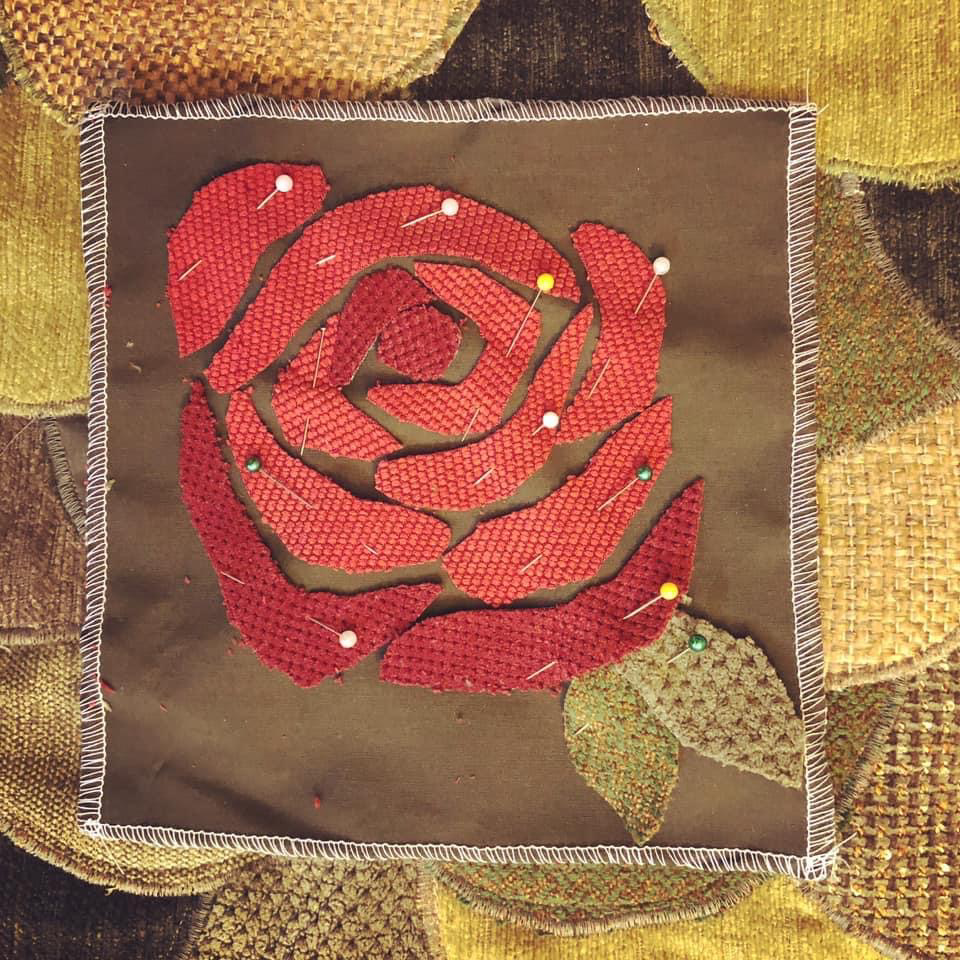 Work In Progress: Rose Appliqué on Pocket... I am having fun using the Satin Stitch Technique that I began to practice just a few weeks ago. After sewing on all the upholstery scallops, I then added the pocket details, the lining, the bottom ruffle, the waistband, the trim, and then the neck ties! Whew! All of these details were a lot of work! 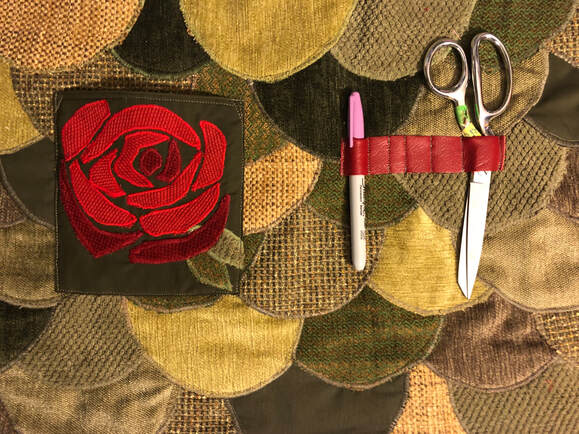 Finished Rose Applique Pocket and Utility Holder My NEW Work Apron is Ready!
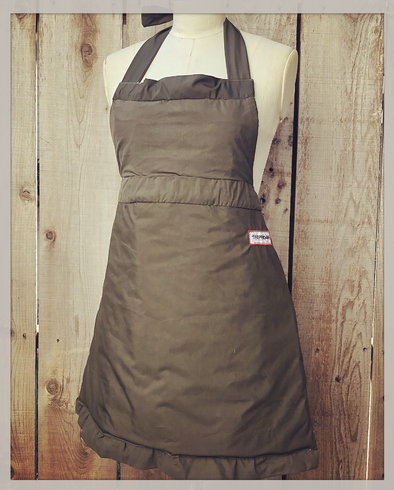
Finally, after a few weeks from starting this project (I only worked on it when taking a break from my other projects), my Heavy Duty Work Apron is complete! I have so much fun creating projects for myself, especially projects that I can add even more creativity too, such as this one!  This is me, Roxanne, wearing my new Heavy Duty Work Apron at work! I love it! I’m looking forward to sharing with you even more upcoming projects! I have many concepts in mind, and I can’t wait to get started on them! Until then... 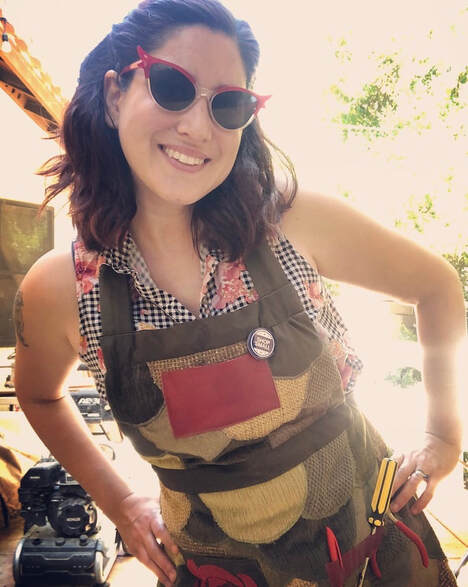 I’m loving my new Heavy Duty Work Apron! Thank you for reading! Have a great day! Related Links:
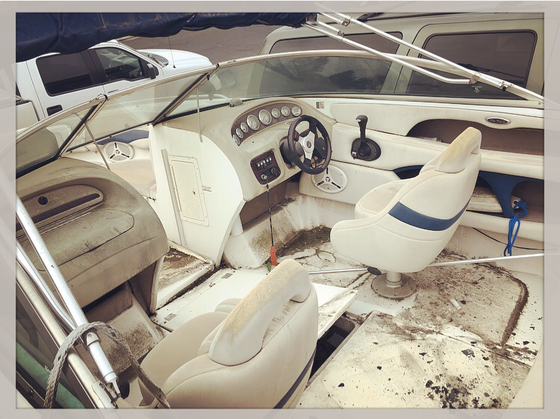
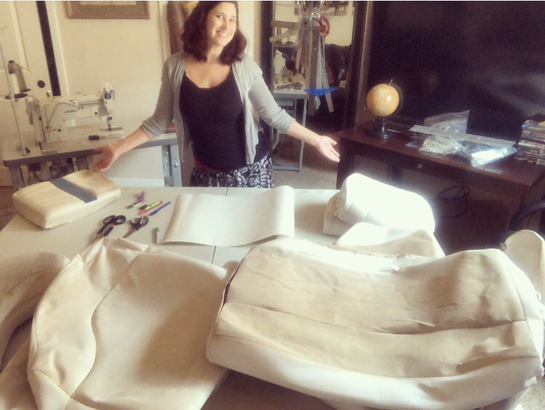 This is me, Roxanne, working on reupholstery as part of a boat restoration project! This month, after being temporary laid off from my Saturday Job, as an Alteration Specialist for the retail store, The Buckle, I began to use my Saturday Work Day (outside of the home) to start a large reupholstery project! I am working Saturday’s for my Dad, helping him with his boat restoration! I have never done this type of work on such a large scale before, so I’m really excited for the opportunity and experience. When my Dad offered me this job, and I accepted, he purchased a brand-new industrial Juki Sewing Machine, designed specifically for upholstery! My Dad set up a Sewing Workroom for me in his house, and every week, I work there!  My Dad's NEW Juki! This is the boat that I am working on prior to any repairs: 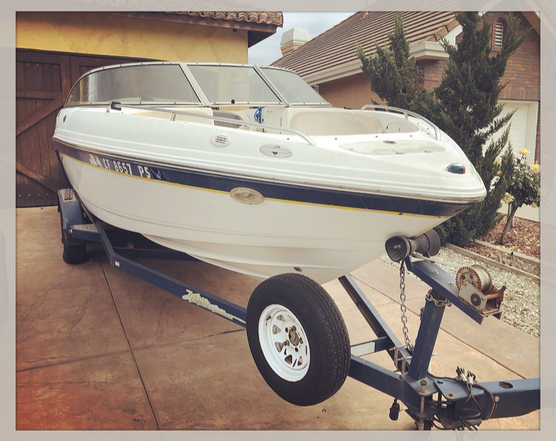 My Dad's Boat. It is a 2001 Model, we have had some great summers with this boat! Sadly, this lovely boat was left out in the elements, uncovered, for a few years. The upholstery and interior have been severely damaged. On my first day of work, my Dad pressure washed the interior, then began removing piece by piece of the seats, cushions, and side panels...
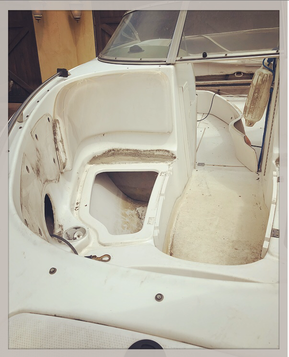
I began my upholstery task by taking each seat section and cleaning them as thoroughly as possible. I then began to remove the old upholstery, in preparation for my next step: Pattern Drafting!
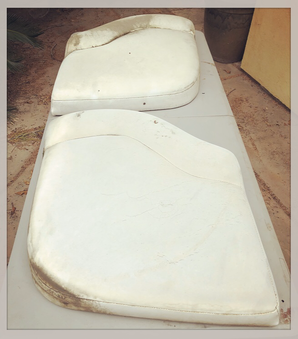
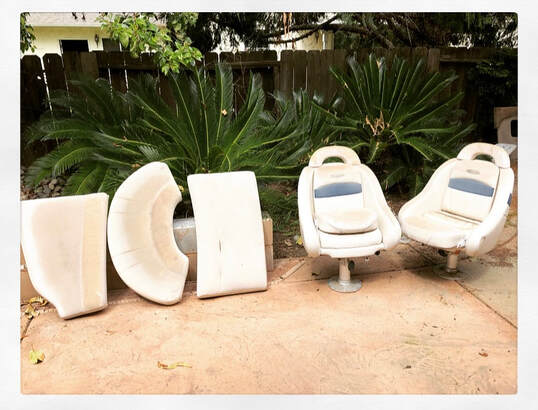
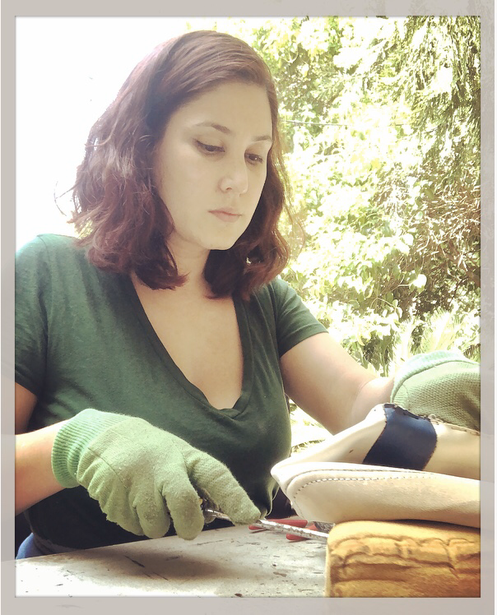 This is me, removing many many staples, so that I can remove the upholstery from the seats and panels 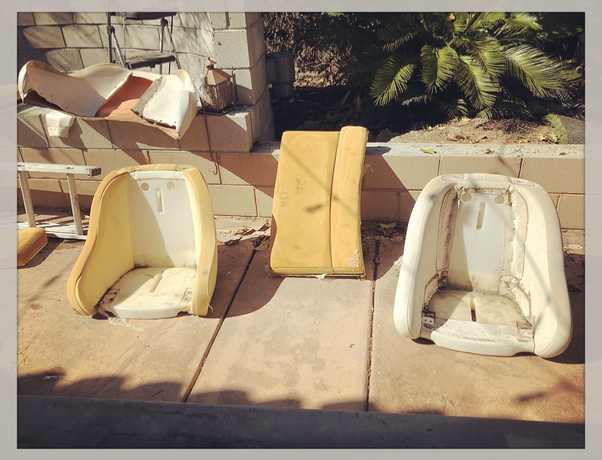 Progress! After cleaning and removing the old upholstery, I then took apart each individual upholstery piece by piece, such as I did here with this Captain Chair Backrest, I drew a rough technical sketch with any notes I might want to remember when reassembling the new upholstery pieces later. All hardware that has been removed is also labeled and bagged for re-attachment later. Each section of each fabric piece is marked, and labeled ready to be reproduced! 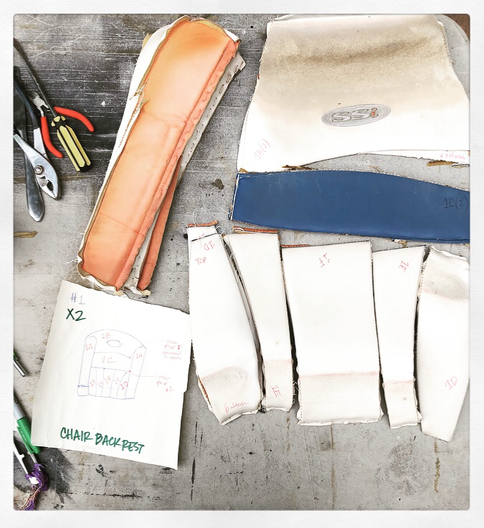 Pattern Drafting Prep for Reproduction of Upholstery Pieces! As you can imagine cleaning and taking apart each boat piece is taking some time to complete. Next Saturday I will start drafting the patterns! Then I will sew together the new upholstery! I will keep you updated on my progress!  Thank you for reading! Related Links:
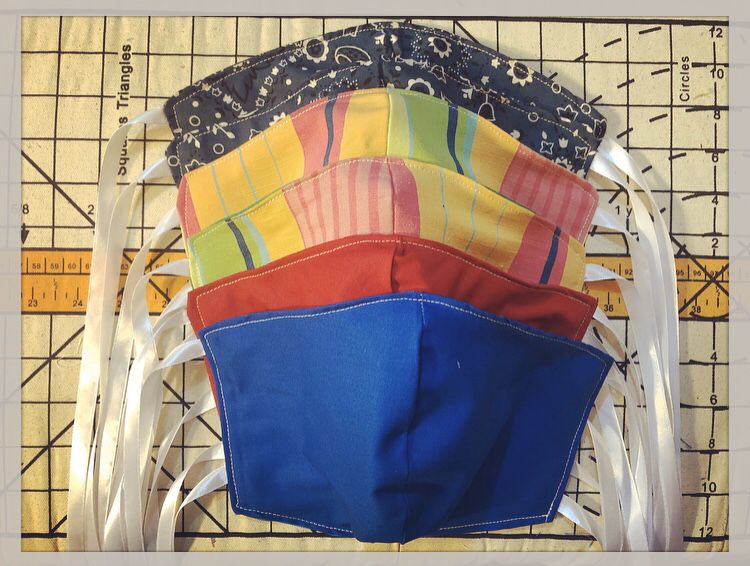
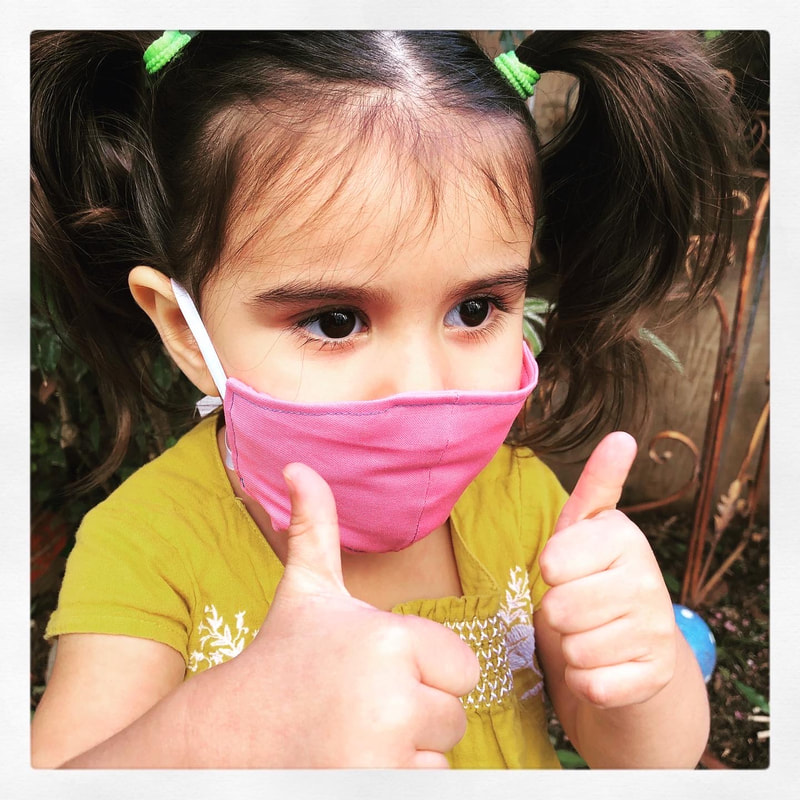
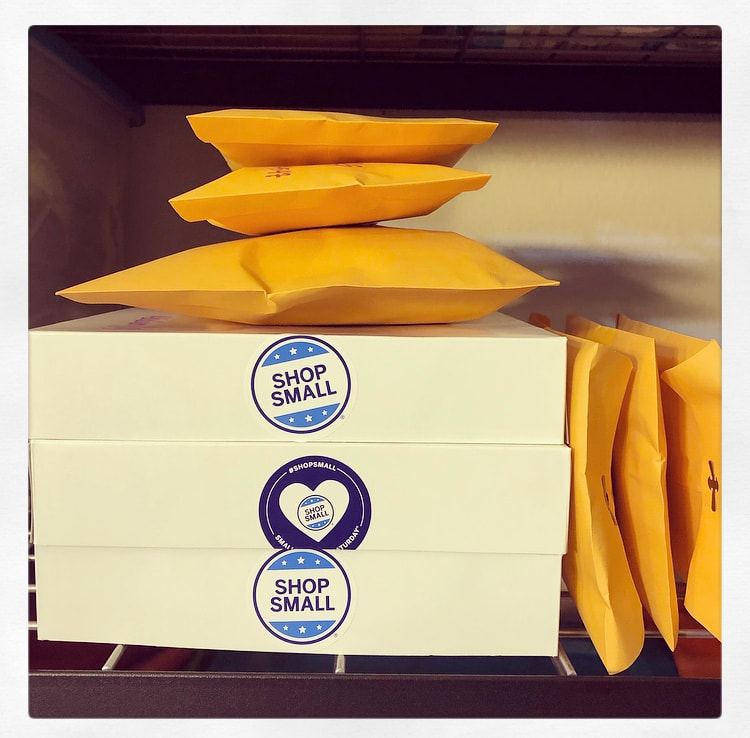
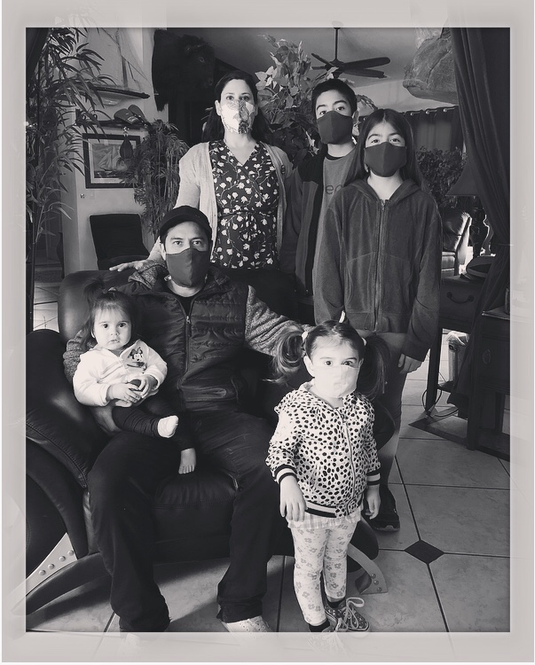 My FaceMask Wearing Family Portrait- The Rangel Family- Coronavirus Pandemic 2020 (My one year old baby wouldn't keep a mask on long enough for a photo!) Last week, my sister Desiree, tagged me in a Facebook Post that was created by her friend who works at UCSF. The post was searching for people who can sew in hopes that they could make Homemade FaceMasks for Hospital workers, who are running low on their supply. Currently, most of the world is on some sort of Shelter In Place or Home Quarantine requirements, due to the recent outbreak of the COVID-19 virus. Oddly, this is tale we’ve seen or heard so many times in futuristic, science fiction, or horror films, and novels... Schools and places of worship have shut down, more businesses continue to close, and home goods and groceries are flying off the shelves quicker than they can be re-stocked! For many of us, this is a surreal experience... Sadly, the shortage of supplies, especially Face Masks for Hospital workers, is all too real. In intense times as these, it is important that we continue to come together as a community, and do our part to help others when able. As a person who can sew, I decided to help these Front-Line Medical Workers as much as I can, by sewing Fabric N95 Style Facemasks to donate to those in need of them. My sister, Desiree, donated material, and ribbon, and I completed the sewing on 24 Face-Masks as a donation to the hospital at UCSF! 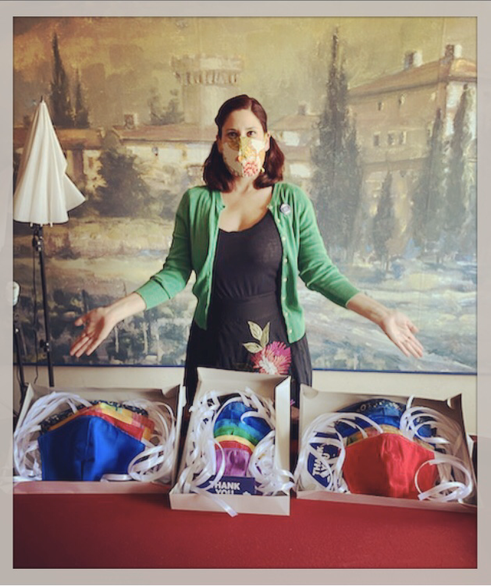 This is me, Roxanne, and my 24 FaceMasks that myself and my sister, Desiree, sent to UCSF for front line hospital workers.
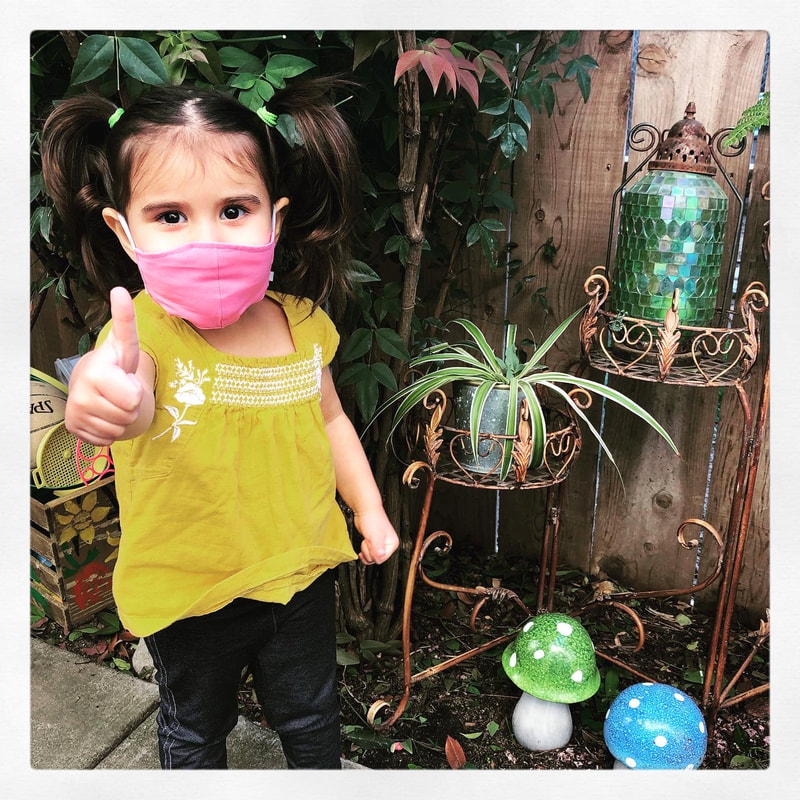
Mask Making
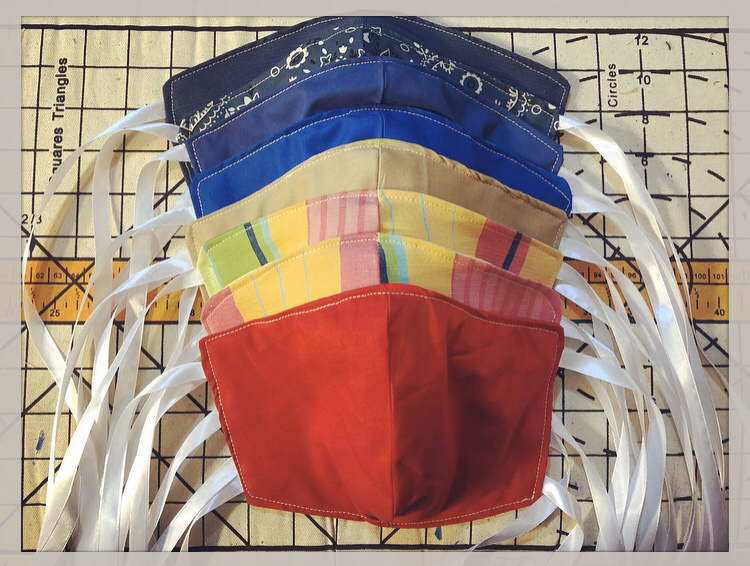
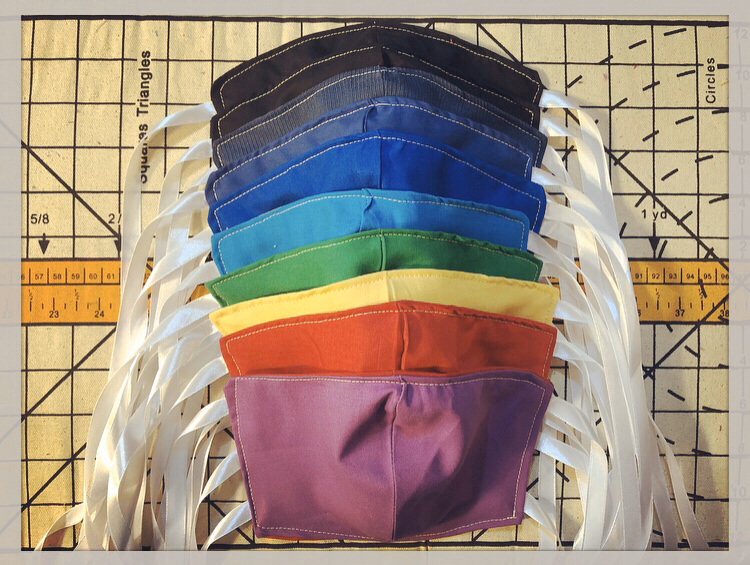
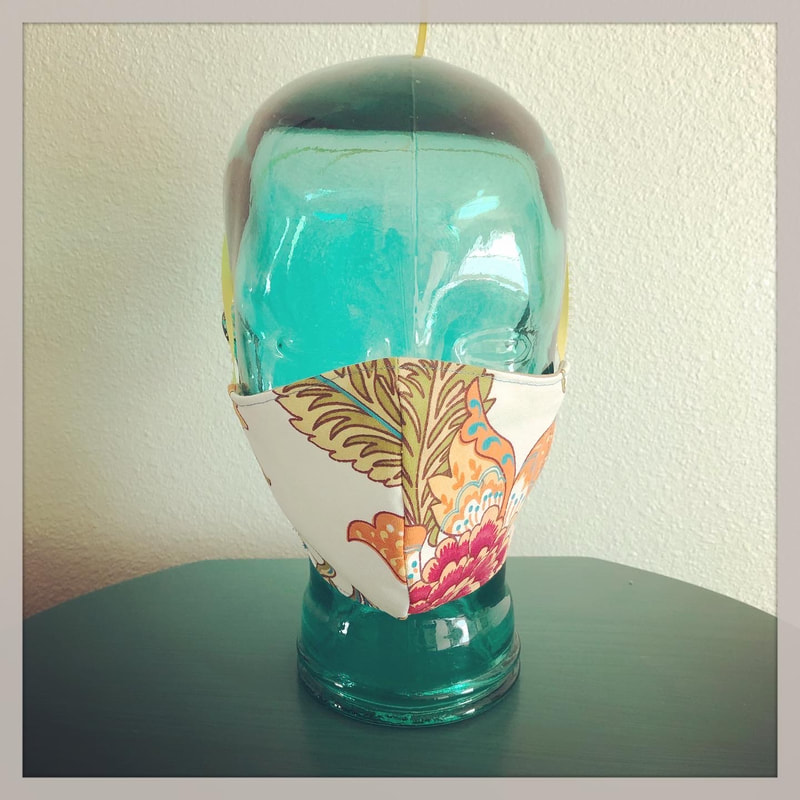
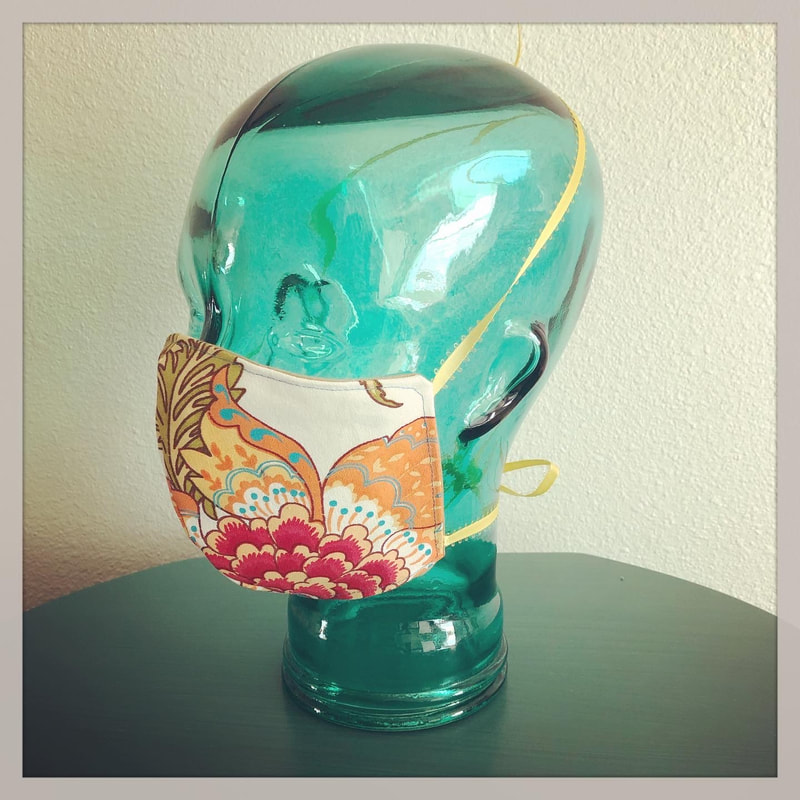
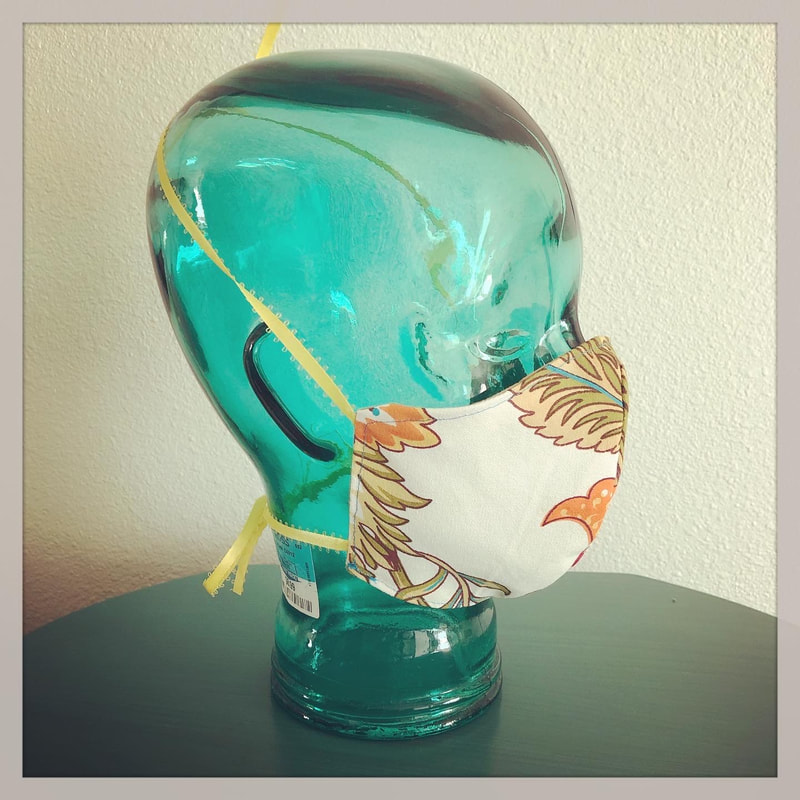
It's hard to believe that just a month ago, Face Masks were something I never would have imagined I would be producing in large quantities today. Just one month ago, I was consulting with one of my clients about creating a custom ball gown, for a now cancelled formal event. I was preparing an upcoming fashion collection for the now cancelled Oakland Fashion Week 2020. I was working Saturdays as an Alteration Specialist for the retailer, The Buckle, which is now temporarily closed... but then I posted a few photos of FaceMask Making... since then, I have received numerous messages, phone calls, and text messages, asking if I make FaceMasks, and if I sell them! The overwhelming need of the community has been keeping my sewing machine running non-stop! 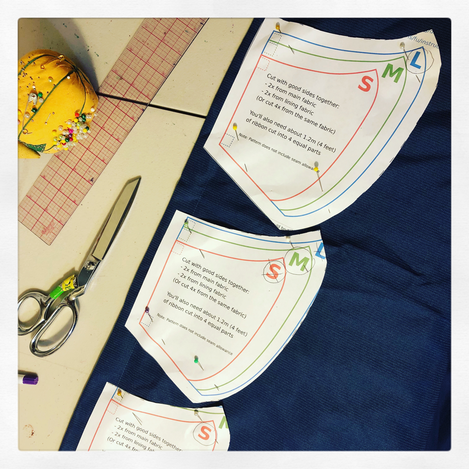 Work in Progress: Making Homemade N95 Facemasks As the past week continued, I have sold many FaceMasks! I have at least a dozen orders prepped and ready to be made as the next few days unfold. Everyday I have received more orders! Check out a few photos of some of my completed orders: 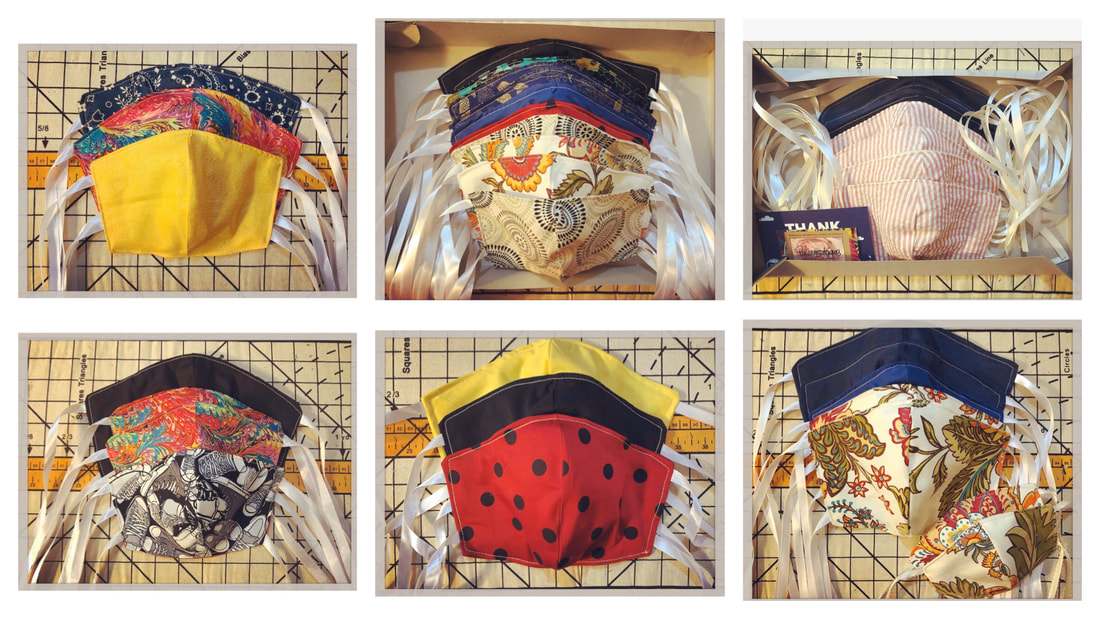 A few orders of FaceMasks that I made and delivered this week... Do Homemade Face-Masks Work? Over the past week, I have seen and read many articles and links posted on social media and news pages about the effectiveness of Fabric FaceMasks. Some of these articles will tell you that Fabric Face Masks are at least 50% effective against creating a barrier of germ protection, while other published statistics quote higher or lower effectiveness depending on the material used, and the amount of layers of fabric. Most Fabric Mask Making tutorials, or patterns, recommend use of 100% woven cotton. Other articles encourage everyone to wear FaceMasks, reasoning that wearing them protects others from your germs. If everyone in the community is wearing FaceMasks when conducting "Essential" business out in public, than it could, possibly, drastically reduce the spread of the virus. Regardless of what you might believe regarding the use of FaceMasks, I believe FaceMasks made of fabric is better than nothing. Some counties across the US are now requiring the use of FaceMasks when out in public.  This is my husband, who is an "Essential Employee" Here he is wearing the FaceMask that I made for him. I have made FaceMasks for a few of his co-workers, as well as many other "Essential Employees", such as those who work in grocery stores. #SewingTogether I follow many fellow Fashion Designers and creators on all the social media platforms... over the past week my newsfeed is post after post of photos and videos of everyone who can sew creating FaceMasks of various styles. It is amazing! I love that we have many talented and skilled persons who can sew right here in the US! I also love the support of the community in shopping from their local FaceMask Maker! In addition to the individual Mask Makers, there have been some big names who have began producing FaceMasks, such as Fashion Designer, Christian Siriano, as well as Nordstrom! How inspiring! Although these times are unexpected and kinda crazy, I strongly feel that this is the beginning of a new Zeitgeist: bringing Production back to the The United States! 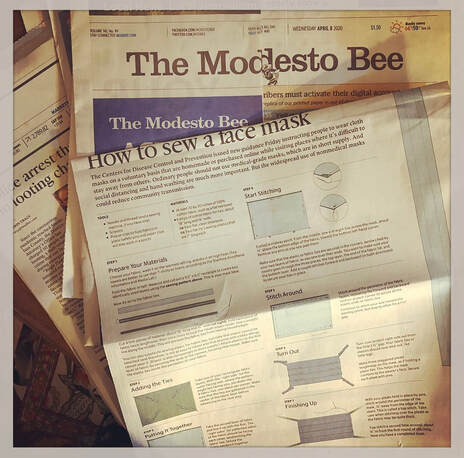 A full sewing pattern of a Pleated FaceMask as well as Sewing Instructions were printed in The Modesto Bee this week. If you are interested in joining the Sewing Production of FaceMasks too, You can Download this Free PDF Pattern for a Fabric N-95 Type Face-Mask HERE. HERE are the Pattern Sewing Instructions. If you would rather donate material to be sewn into FaceMasks, I am accepting donations of fabric, ribbon, or elastic, and thread. All donated materials will be used to sew donated masks that will be given to our front line workers locally. You can contact me many ways, so check my Contact Page, and send me a message in whichever way is most convenient to you! Sewing and Shipping
Each day I am working to finish my FaceMasks Orders, and am completing them in the order received. I am trying to get them out as quickly as possible, but because I am only one person, my production is limited. Every day, I am sending out the orders finished the day before. It has been crazy how many orders I have shipped out or delivered in just one week! I expect that in the following weeks I may even see a surge in orders, as more people need them.
I wanted to write this Blog Post as a continual series of articles documenting my FaceMask Making Memoirs! I expect that FaceMask Making will continue to be needed in the upcoming weeks or even months ahead, and this platform is a great way for me to combine my photos and experiences together for your reading pleasure! I appreciate all of your support! Whether you have purchased a FaceMask from me, or just shared a FaceMask Making Post that I have published, you all give me the energy I need to keep on keeping on! If you need me, I will be right here, at my sewing machine!  Thank you all for your support in my Face-Mask Production! Thank You for reading my Blog!  Some Face-Mask humor for my Movie Lovin’ Readers! Related Links:
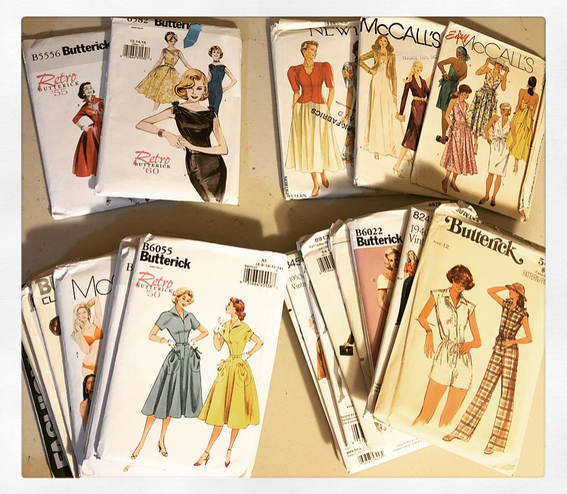 Just some of the many Commercial Sewing Patterns that I have acquired over the years. I have at least a hundred! As a busy mother of four, working mostly from home, I try to keep myself, my home, and my work space as organized as possible. By staying organized, and having a place for everything, I am able to save time finding exactly what I need when I need it, as well as not having to remember where every individual thing is: it is where it should be. Often, my friends or family ask me for tips on keeping their sewing space, or crafting area, organized and tidy. Today, I would like to share with you a few ways that I organize my Commercial, or store bought, Sewing Patterns. My organization tips in this regard, are sure to make finding the perfect pattern within your collection, or locating a specific design detail, very fast and with ease! Take a look at this charming Vintage Cardboard Sewing Pattern Holder of mine! It is great for storing my unused Commercial Sewing Patterns.
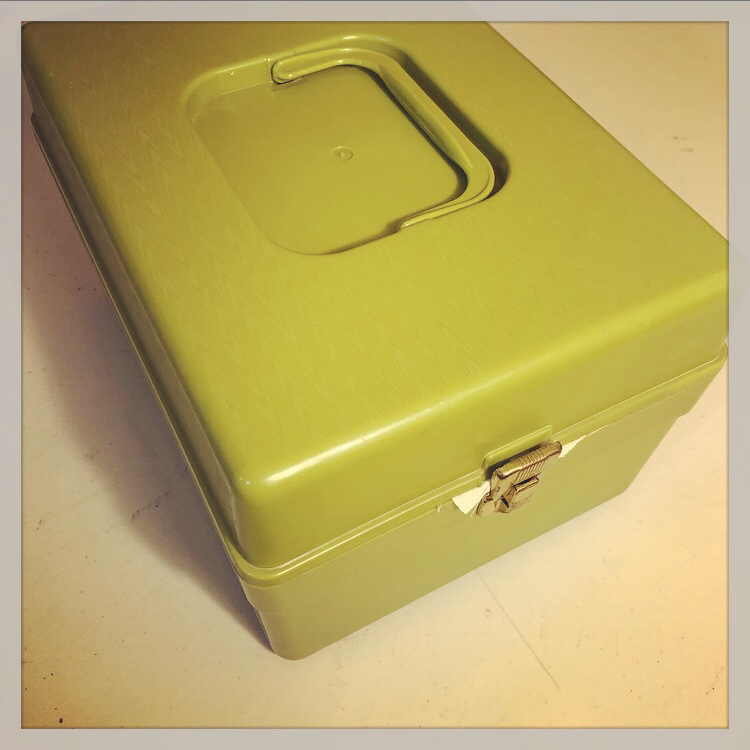
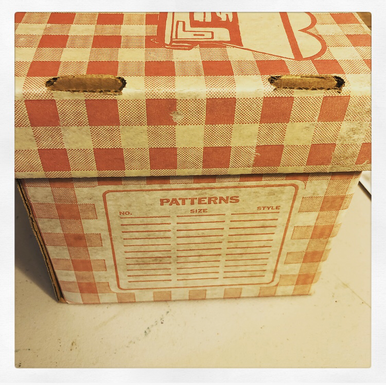 My Vintage Cardboard Sewing Pattern Holder This is my second Vintage Sewing Pattern Box, made in durable plastic:
When I began learning to sew, I began to accumulate Commercial, or store-bought Sewing Patterns for use in my sewing projects. I bought two Sewing Pattern Boxes over time, that I used to store them in, but I found that once I used a Commercial Pattern, it was hard to fold them back up and stuff them back into the pattern envelope it originally came so neatly folded in. If you also sew, you most likely know exactly what I mean... The delicate tissue that the patterns are printed on, can be challenging to fold as flat as they once were, especially after being cut and used! I found myself wrinkling or damaging my patterns! 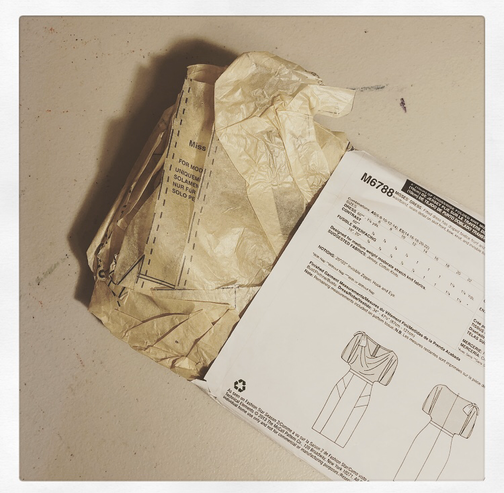 Stuffing a used Sewing Pattern back into its original envelope proved to be less desirable than I would have liked, so I store my used sewing patterns a different way... As I began attending Pattern Drafting classes in Fashion Design School, I learned a far more organized approach to storing patterns, and found that this proved useful in archiving my growing collection of Commercial Sewing Patterns. Although I draft, and drape, my own patterns for my original designs, when I am creating specific garments for clients, or for myself, I sometimes am able to use Commercial Patterns, and may modify them occasionally to fit my purpose, or my client's size. As a Fashion Design Professor once told me, "There is no need to reinvent the wheel!", and if I am making a garment that already exists as a pattern, why not save time and use the pattern available? This is a Pattern Drafting Binder from my Fashion Design School days! I started this binder while taking a Pattern Drafting Course in College. My Professor had us store our drafted patterns in plastic sheet protectors, neatly organized in a binder. Pictured here are Collar Variations I drafted back in college. It is easy to see what patterns I have on hand, and it is easy to access them this way! 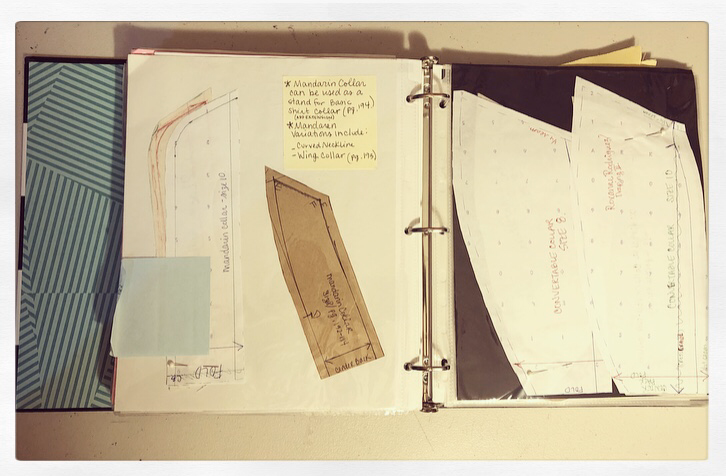 My Pattern Drafting Binder from College. The pages shown here are sheet protectors holding Collar Variations I had drafted. After taking this Pattern Drafting class, I found that by continuing to store pattern pieces in sheet protectors held within sturdy binders, I was able to keep my used Commercial Sewing Patterns very organized. Here are some of my Commercial Sewing Pattern Binders, organized by clothing category: 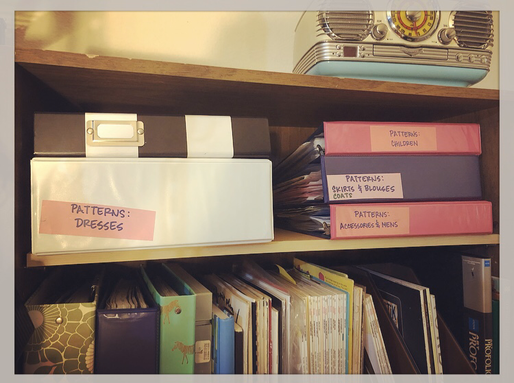 My Commercial Sewing Pattern Binders, organized by clothing category in my Sewing Workroom. In addition to my Pattern Binders, I store my hand-drafted patterns on a garment rack, organized by clothing category in my Sewing Workroom. 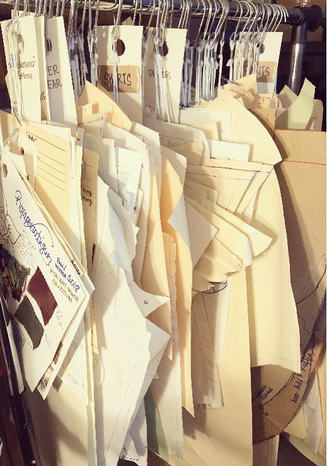 A Rolling Rack in my Sewing Workroom that holds my hand-drafted sewing patterns: organized by clothing category. Now, check out how I organize my Commercial Sewing Patterns once I use them... First, I open the pattern and cut out all the pattern pieces. Yep, all of them. Although this is a bit time consuming, depending on how many variations there are in the pattern packet, it is well worth spending the time, when going back to use the pattern in the future. The following photo is of Simplicity Sewing Pattern, #8250, a 1950’s Vintage Reproduction of a Lined Bolero, and a Skirt. As you can see, this single pattern packet contains three separate patterns: Style A, a Pocketed Skirt, Style B, a Skirt without pockets, and Style C, a Lined Bolero. 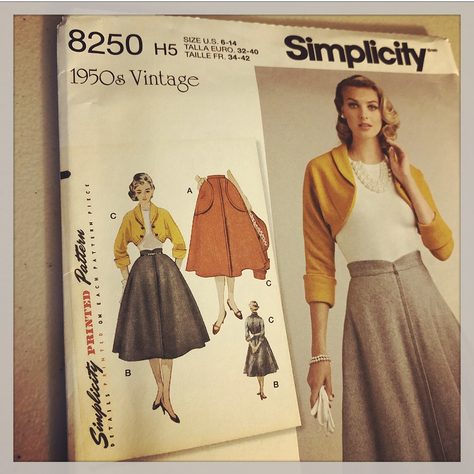 Simplicity Sewing Pattern #8250, A 1950's Vintage Reproduction of a Lined Bolero and Skirt. When I begin to cut out the pattern pieces, I separate the pattern pieces into piles. I make a pile for Style A pattern pieces, a separate pile for Style B pattern pieces, and a separate pile for Style C pattern pieces. In this case, the skirt pattern is the same for both Style A as well as for Style B. The only difference is extra pattern pieces for the pockets. I make a separate pile for pocket pattern pieces. 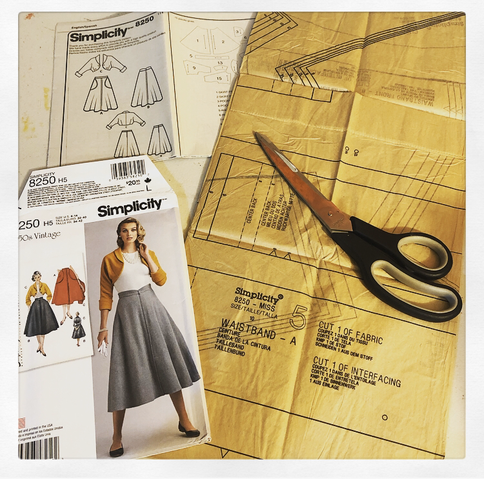 Removing the contents of a Commercial Pattern Packet: Pattern Packet Envelope with Illustrations and Notion Instructions, Pattern Instructions, and multiple Paper Patterns printed on large tissue paper. Once I have all my pattern pieces cut out and organized in separate piles, I place each pattern pile into its own plastic sheet protector. I place the Sewing Pattern Envelope, as well as all Sewing Instructions into its own sheet protector. Most patterns will use 5 sheet protectors or more. I then place the filled sheet protectors, in order, into my pattern binder. I currently, have, and use, several binders. I have a binder for Women’s Dresses, Women’s Separates, Children’s Clothes & Children's Projects, Accessories, and Men’s Clothing. Check out my Pattern Binder for Women’s Dresses. Here I have turned to the page that features Butterick Pattern #B5813, a “Retro 1956” Dress Reproduction Pattern. The pattern envelope illustrates three separate styles. Behind the pattern envelope I have stored the pattern instructions: 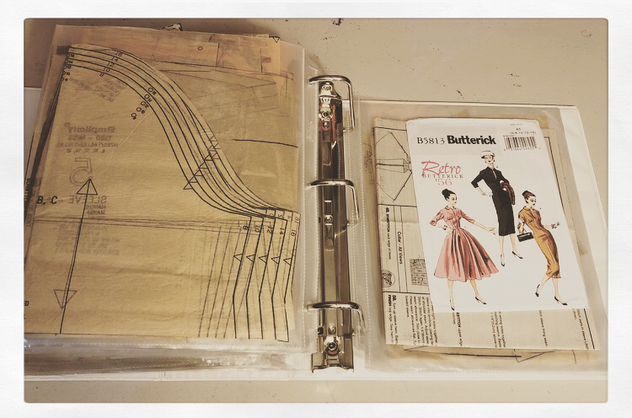 My large binder containing Women's Dress Sewing Patterns. Here I have turned to the page featuring Butterick Pattern #B5813, a “Retro 1956” Dress Reproduction Pattern. The following page in my Pattern Binder, is a sheet protector carrying all of the pattern pieces for Skirt C: 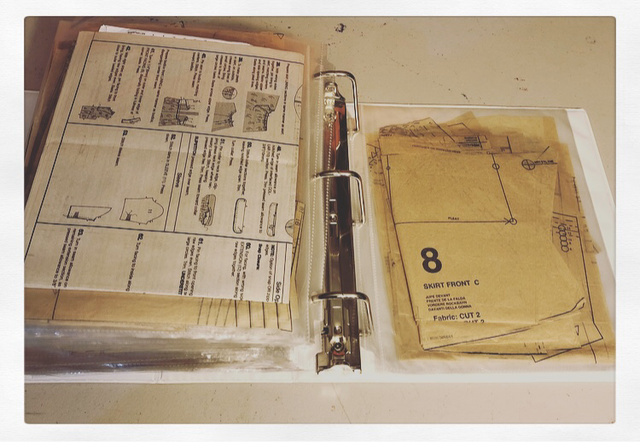 Next, I have the bodice pattern pieces for Styles A, B, and C. These are the same pattern pieces for each style. Only the skirts are different on these three pattern styles. 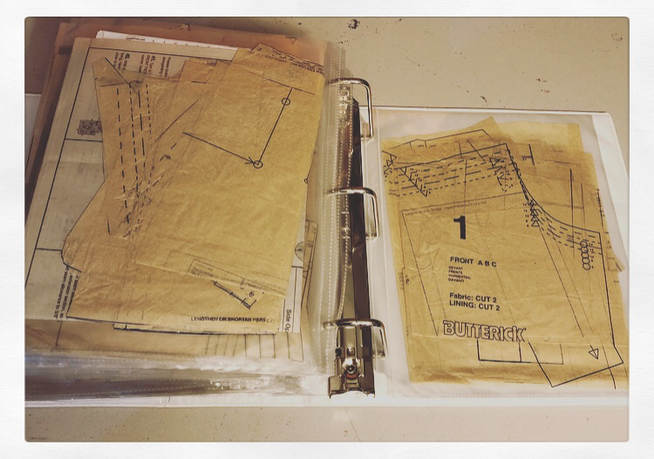 The next sheet protector holds the pattern pieces for the collar. Although this is the same collar for all three dresses, I keep this design detail separate, so I can easily pull out the collar pattern for other projects if needed. I often do this with sleeve pattern pieces as well. 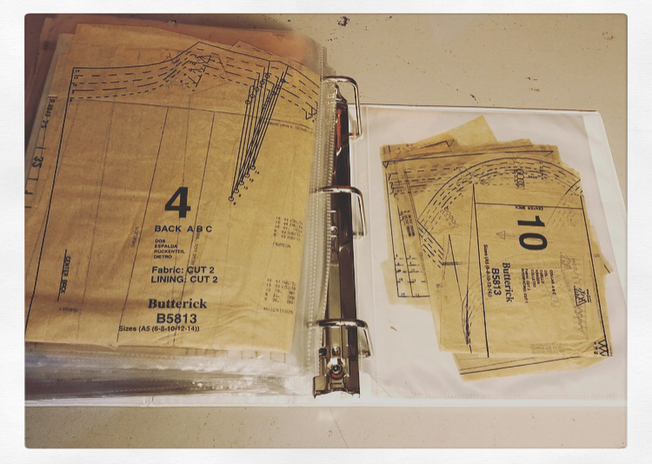 Next, I have the Side Front pieces for Style A and Style B... 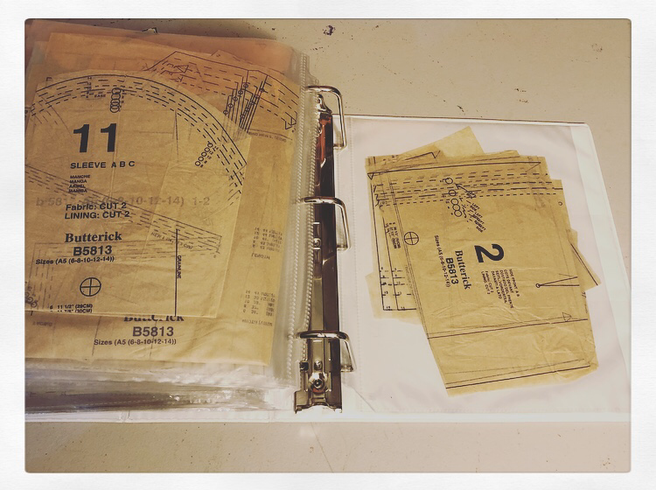 Lastly, I have the Front Band pattern pieces for Style B, and the Belt pattern pieces for Style C. 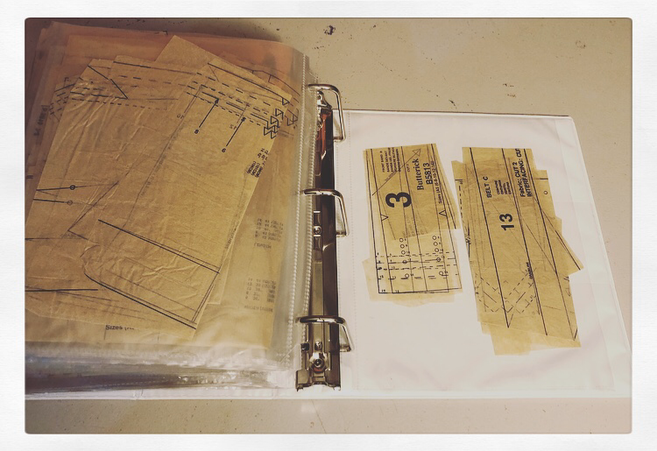 I have found that by separating each section of the pattern, it's various styles, and its unique design details this way, I can easily find the pattern pieces that I need for any project idea. For example, I may want to make only a skirt, but by using a specific dress pattern. If that is the case, I flip to the page of the sewing pattern desired, and then I turn the page to the skirt pattern pieces. I don't have to rummage through a folded wad of tissue paper stuffed into the pattern envelope to find the pattern pieces that I need! If I want to make a "Frankenstein" Creation of a dress, I can easily choose a bodice from one pattern, a skirt from another, a collar from another, and so on. This organization technique makes my imagination run wild with possibilities! I can only hope that eventually all of my hundred-plus Commercial Sewing Patterns will be archived this way! For now, I only add them to the binder as they are used. Do you find this Sewing Pattern organization method helpful? I hope that you do! Please leave me a comment and do tell how you currently organize your sewing patterns. Do you have a better way? I hope you enjoyed stepping into my Sewing Workroom and seeing how I use my Commercial Sewing Patterns. 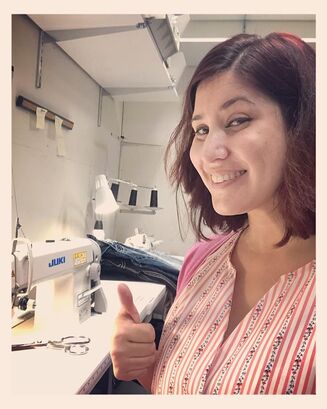 This is me, Roxanne! Thank you for reading my Blog! Related Links:
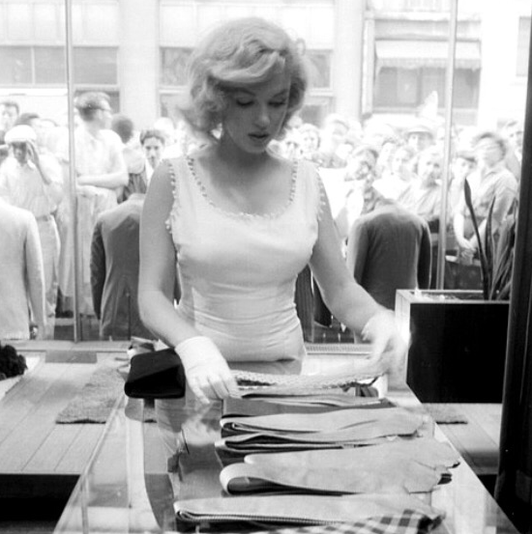 Photo of Marilyn Monroe, by Sam Shawn 1957. I have been shopping at many second hand stores, and vintage boutiques for as long as I can remember. When I was a small child, or perhaps even an infant, my Mother and I would visit local thrift shops to find great quality clothing at discount prices. As I grew into adolescence, my love for "thrifting" only increased. I recall a trip to my Grandparent's hometown of Laredo, Texas, where when asked where I would like to go, I replied, "The local Thrift Shops!" My older aunts were surprised that I was perfectly content purchasing a few second-hand blouses and cassettes, when most teenagers my age were seeking name brand garments at the local mall. My Step-Mother, Kathy, also shares my love of thrift store shopping. Kathy, has an eye for designer handbags, shoes, and clothing, and can often find amazing designer labels for insanely low prices. When I was about 16 years old, my parents, my sister, and I, were invited to a formal event in San Francisco. It was the winter season, and my Step-Mother suggested we purchase a fancy coat to go along with my formal gown. The three of us, My Step-Mother, sister, and I, visited a few local second-hand boutiques, before finding a lovely black coat, that appeared to be genuine Fur. Due to the price and feel of the garment, my Step-Mom was pretty certain it was indeed real Fur. 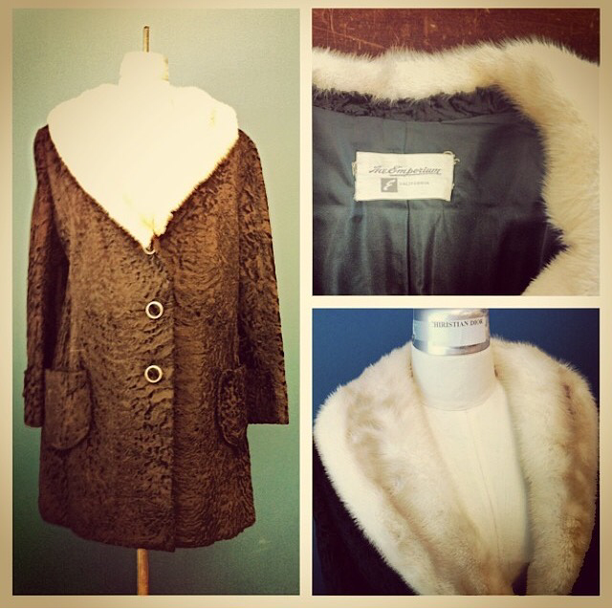 This is a vintage Fur Coat that my Step Mother purchased for me from a second-hand shop 19 years ago, when I was a teenager. We figured at the time that it was real fur, but I was able to verify this with the Burn Test Method of identifying fabric. I kept this coat, hanging in my closet, along side all of the other coats I have accumulated over the years, but honestly, never had a reason to wear it again. Wearing real Fur can be controversial, and I have not attended any high end, luxurious parties or events. The coat has sat in my closet, in a garment bag, all of these years... While attending Fashion Design College, I took the course, "Textiles for Fashion". I really enjoyed learning about the different types of textiles available, and the proper ways to use different textiles in various fashion projects. In addition, we were taught how to identify the fiber content in fabric! The Burn Test Method...  Image from a Vintage Zippo Advertisement One such method of identifying fabric fibers, is called The Burn Test (or Flame Test). To use this method, cut a fiber or thread from the garment in question. You will want to use tweezers to secure the fiber. Once you have the fiber held firmly with the tweezers, simply hold a flame, from a lighter, to the fiber. Depending on the type of fiber you are holding, you will notice a difference in the way the fiber burns and the way the fiber smells while burning. These tell-tale signs will help you to identify what type of fiber you may have. Protein Fibers:
Protein Fibers are fibers that are created using natural animal sources. These fibers include, but are not limited to, Wool, Silk, Mohair, Cashmere, or Angora. According to the web-site, TextileSchool.com, "In general, protein fibers are fibers of moderate strength, resiliency, and elasticity. They have excellent moisture absorbency and transport characteristics. They do not build up static charge." When using The Burn Test, if the fiber burns slowly, and smells of burnt hair, it is a Protein Fiber! Cellulose Fibers:
Cellulose Fibers are fibers that are created using plant based material. These fibers include, Cotton, Linen (made from Flax), Rayon (made from wood pulp), Hemp, or Bamboo (just to name a few). These fabrics are then used to create a wide range of fabrics, with a wide variety of usage. When using The Burn Test Method, if the fiber ignites quickly and smells of burnt paper or leaves, it is a Cellulose Fiber! Synthetic Fibers: 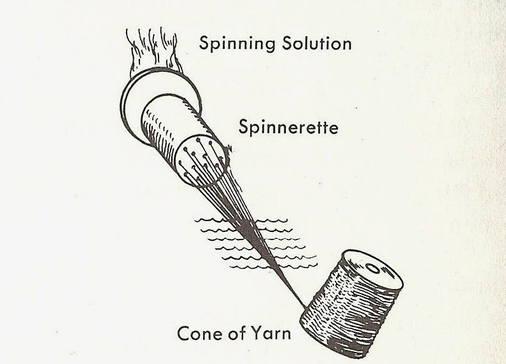 Synthetic Filament Fiber Spinning Besides, Protein and Cellulose Fibers, a third type of fiber is also readily available and widely used. Developed in the late 1800's, Synthetic Fibers are man-made, artificial fibers. Interestingly, some such fibers may be made using wood, but due to the manufacturing process, they are considered "Synthetic". Synthetic Fibers include Polyester, Nylon, Spandex, and Kevlar. The list of Synthetic Fibers continues to grow, as new methods and combinations of materials are developed constantly. Benefits of using Synthetic Fibers include its resistance to being eaten by bugs such as moths, which do consume Cellulose Fibers, or the absence of fungus and molds that can sometimes attack natural fibers. Synthetic Fibers also last many years if cared for properly. However, the durability of Synthetic Fibers cause these fibers to be non-biodegradable, which is a huge factor in environmental waste that is such a concern today. I own several Polyester blouses made in the 1960's and 1970's, that aside from a few seams being mended over the years, they are still in perfect condition to this day! When using The Burn Test, you will find that a Synthetic Fiber shrinks away from the flame and smells of burnt plastic! Here is a more detailed chart of common Burn Test results: 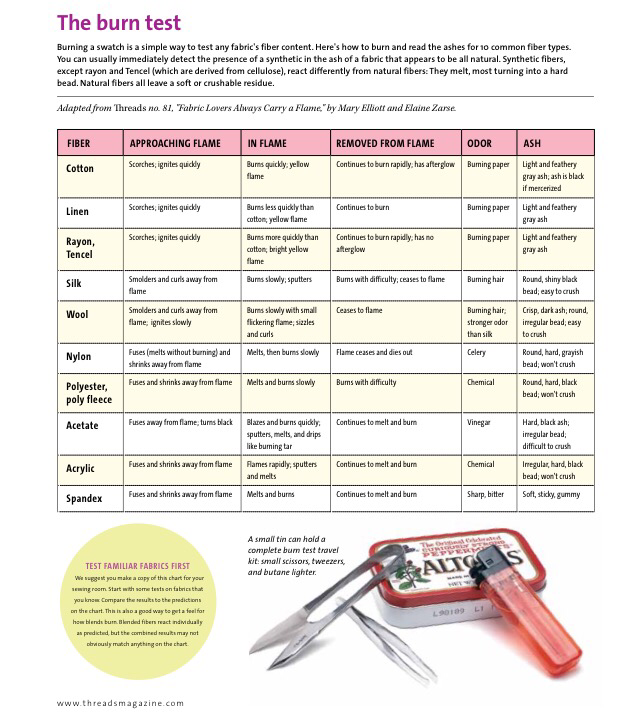 Here is a handy, detailed chart, that can help you identify various fabrics, using The Burn Test. (Source: www.threadsmagazine.com) I found that learning about The Burn Test Method of identifying fabric was very interesting and easy! While learning of this method in my college class, I decided to bring my Vintage Fur Coat, to test the fiber with my professor. I cut a small strand of fiber from the coat, and collar, and burned the fibers. The fibers immediately smelled of burnt hair, which we were then able to conclude that the coat was authentic animal fur! If you ever question the fiber content of your garment, particularly vintage finds, that may not have a fiber content label, try The Burn Test Method to verify what the garment is made out of. By knowing the fiber content, you can better care for the garment, and perhaps preserve it for many years to come! Thank you, for reading my blog! I hope that you have a fantastic day!  Related Links:
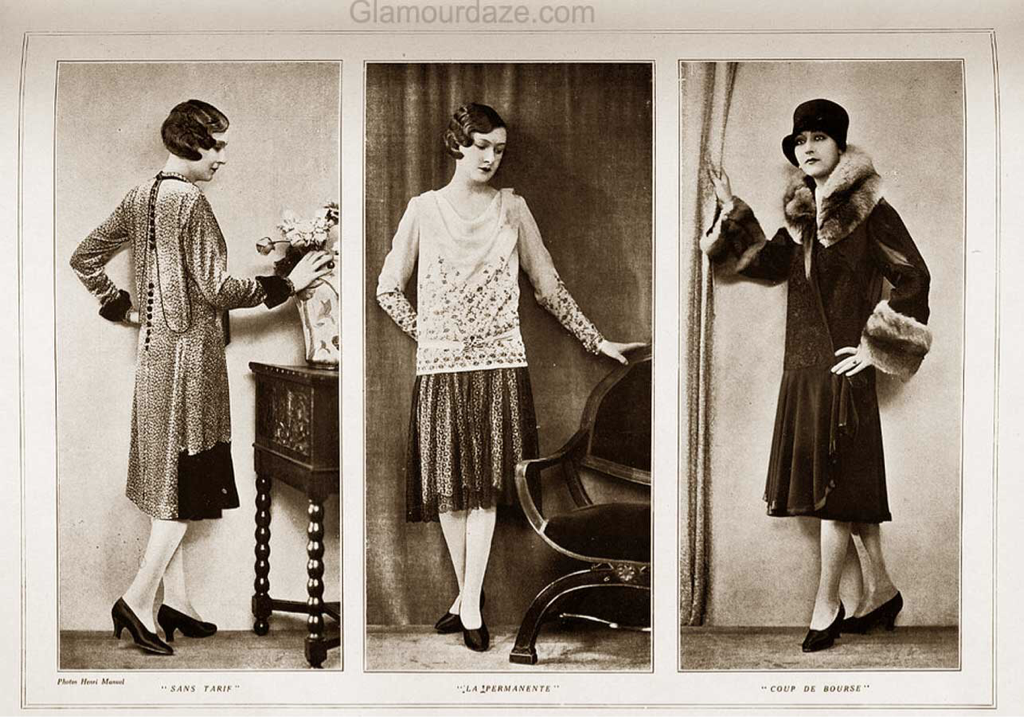 Photo of 1920's Women (1928), Glamordaze.com http://glamourdaze.com/2013/09/1920s-fashion-autumn-wardrobe-and-beauty-makeover-1928.html Recently, I started an additional side gig, as an Actress with the Murder Mystery Company, San Jose Troupe. (Currently, I am working three jobs: Fashion Designer for my own label, a Tailor Assistant & Apprentice with Oxford Way Tailoring & Men's Clothing, in Oakland, and now an actress... yes, I am always on the go, and rarely have a break from being so busy). Starting a job as an actress, where I could play several different roles, I am required to start building up a Make-Up Kit for my costume preparation, and performances.  I am no Make-Up Artist. Although I am very much into fashion, Make-Up is something I know little about. Like many women, I do wear Make-Up, but little more than foundation and eye liner, purchased from the local drug store, on most days. When growing up, my Mom was never much into Make-Up. She would wear mascara, and maybe lip stick, but that was all. She never taught me how to apply Make-Up, so I only dabbled in foundation to help cover my acne. Back then, Oil-Free Make-Up wasn't common place, and I found myself breaking out even more! During my junior year of high school, I discovered eye shadow. I went alittle crazy with my application, thinking it was very artsy to blend two colors that would match my outfit. My Dad hated it, and eventually restricted my eye shadow use all together. As I grew into womanhood, I didn't wear any Make-Up at all, finding my face had a clearer complection, and guys seemed to dig the "natural beauty" look. But as I grew into my late 20's and then 30's, I began to feel that a light application of foundation definitely helped my appearance, by evening the color of my skin tone.  Jewl-Rite Plastics 1947 http://1950sunlimited.tumblr.com Now, as I continually prepare for fashion shows, I wish I knew more about Make-Up, and even hair styling, since often times these services are not extended to designers for events. On some occasions, such as photo shoots, models may have to style their own hair and Make-Up. I find myself wishing I could assist more in this area. And, now... I will be creating various personas through Make-Up and Costume as a Murder Mystery Company Actress!  My first role for the Murder Mystery Company, was playing a character by the name of Amanda Lay in the Crime and Punishment production. This particular script is not based on the classic novel, Crime and Punishment by Fyodor Dostoevsky (great book by the way), but is a completely different twisted tale, set in a 1920's Speakeasy Lounge. The character, Amanda Lay, is a seductive jazz singer. To create an unforgettable Amanda Lay, I first consulted tutorials on trusty 'ol YouTube. I learned that the characteristics of 1920's Make-Up include: minimal brow arch, sad round eyes, exaggerated red Cupid's Bow lips, porcelain matte skin, and red blush. Next, I visited the web-site of Modesto Native Make-Up Artist, Paula Serrano. Mrs. Serrano and I met several years ago through her friend, who happens to be my sister, Desiree. We collaborated previously to create a Parrot Costume look for a mutual client: I designed and created the costume, while Mrs. Serrano created the Make Up Look, and provided the Make-Up Artistry services. To see my Parrot Costume, from concept to creation, click HERE. Mrs. Serrano is not only a local MUA, but also has created her own Make-Up brand, called Paula Serrano Make-Up. Her web-site, www.paulaserranomakeup.com, offers beautiful shades of Lip Sticks, Lip Lacquer, Lip Gloss, Eye Shadow, Highlighting Sugars, and Contour Powders.  I placed my Make-Up order, but I realized it might not arrive in time for my first show. Since I was anxious to practice my 1920's look before my performance, to guarantee it would look excellent on show night, I made a run to my local Sally Beauty Supply, and purchased a few items. I figured if I had any issues completing the look, I would have time to get it just right. I also began to look up YouTube tutorials, as well as pictures on Pinterest, illustrating Long Hair Styles for the 1920's woman. Most people, myself included, envision short flapper hairstyles with lots of finger waves when imagining the 1920's woman. However, at present, my hair is super long. Surly, many women also had long hair styles in the 1920's, didn't they? I found it difficult to style my own hair by myself, so I breaded my hair and coiled it into a loose bun, and than accessorized the look with a darling feather headband that my friend, Ms. Angela Neves, had made.
As I began to apply my make up, listening to Fergie's "A Little Party Never Killed Nobody" from the Great Gatsby (2013) Soundtrack, my face began to transform into one of that from a different era... I used my own mascara, foundation, and an eyebrow pencil that I found in an old cigar box, which I currently use as my personal Make-Up Kit. I also purchased a set of non-expensive Make-Up Brushes from Target.
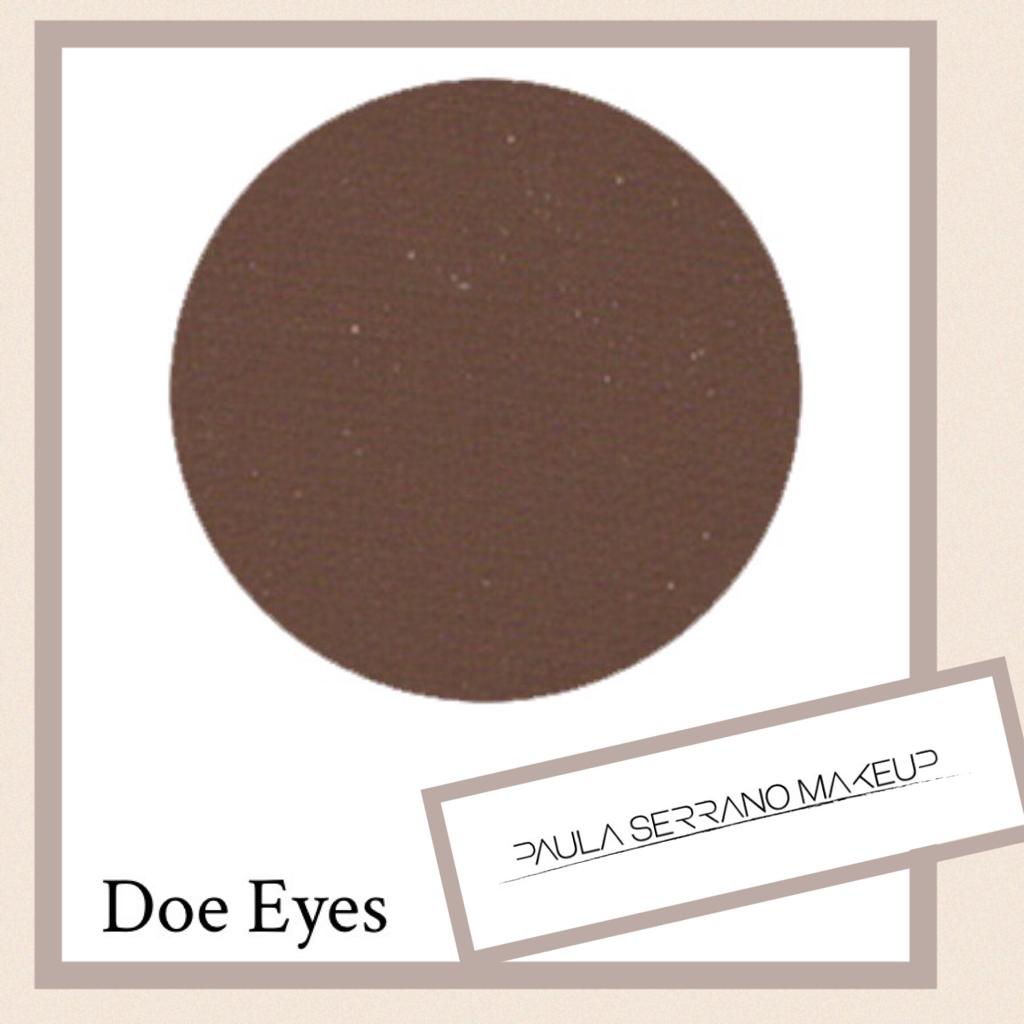
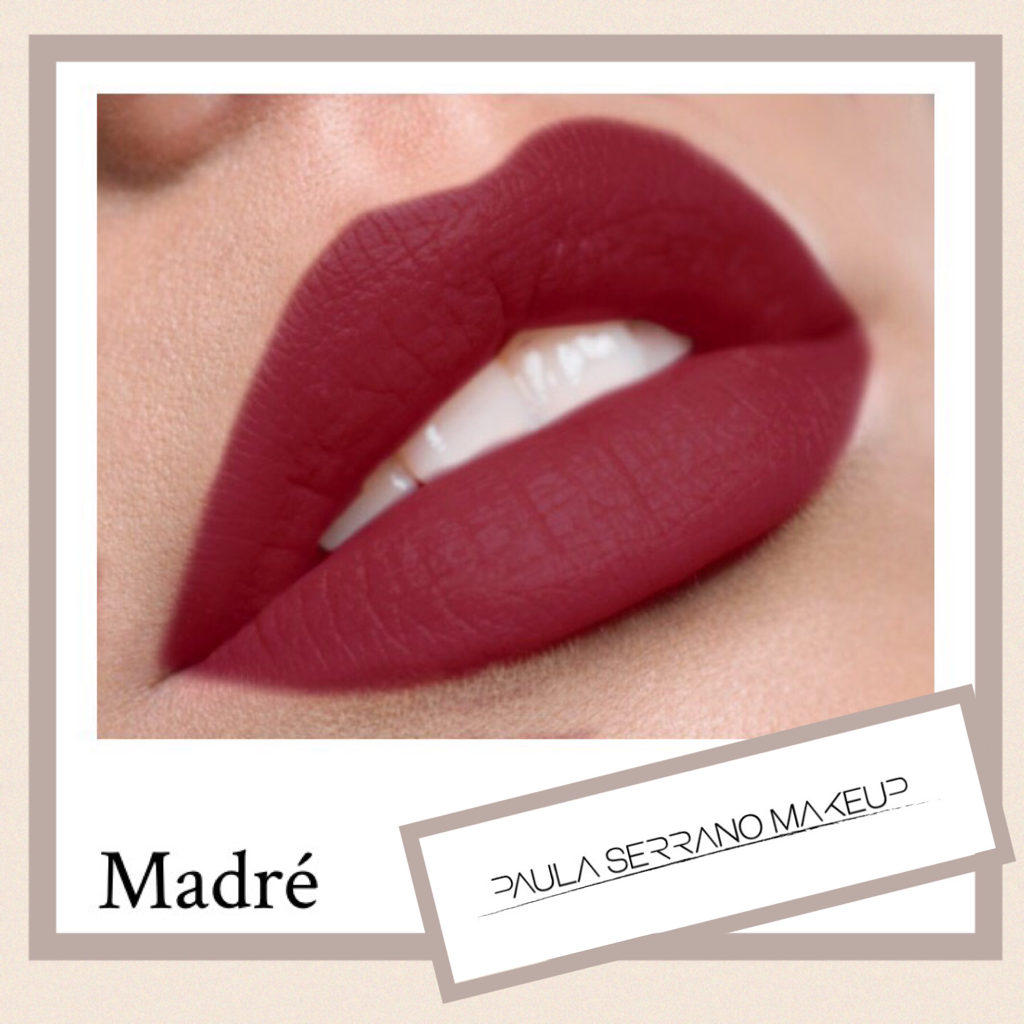
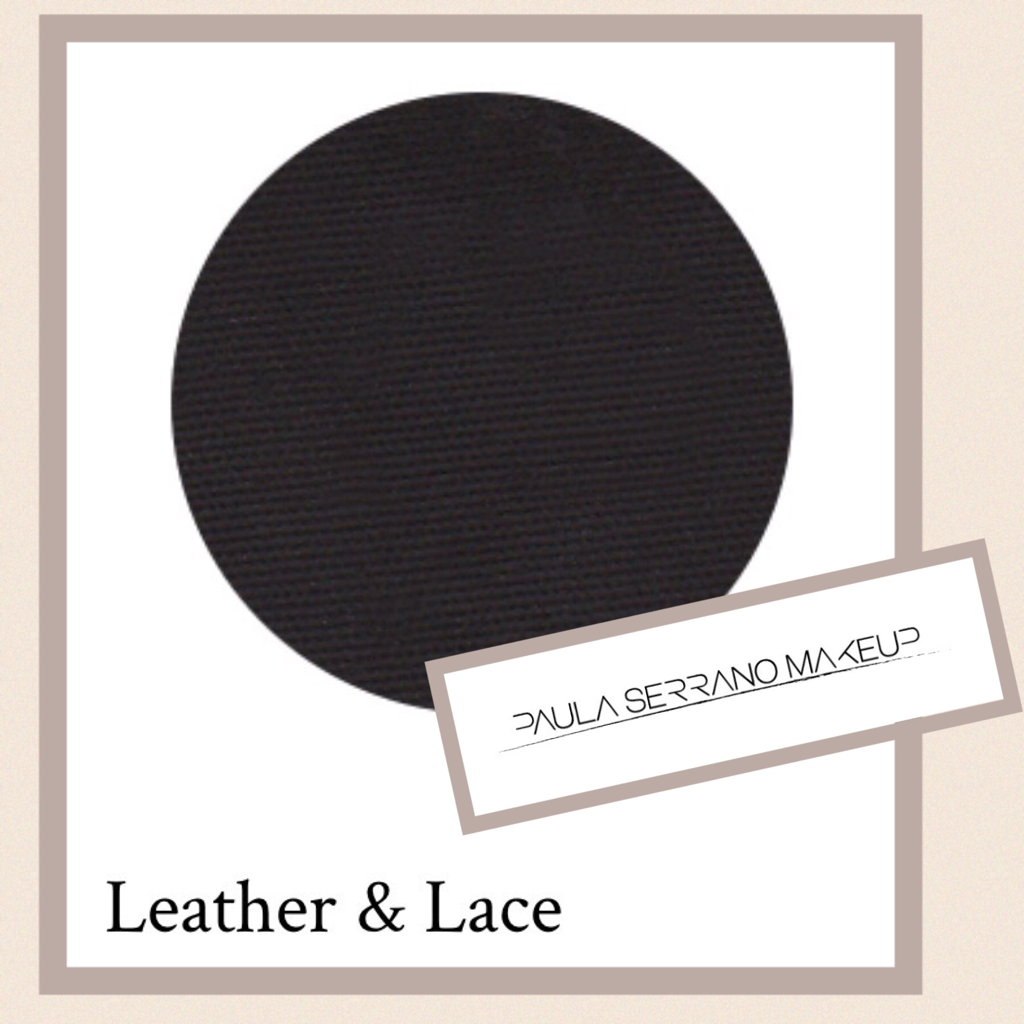
 After applying my 1920's inspired Make-Up, I tied my hair back in a braided bun, with a feather headband hairpiece. I mastered this "Quizzical Expression" long ago... Soon, my Paula Serrano Make-Up arrived! Based on the information I learned from the YouTube tutorial above, I ordered her Madre Matte Liquid Lipstick, Doe Eyes Eyeshadow, and Leather and Lace Eyeshadow. 
Here is the same 1920's inspired look, but this time using the Make-Up I had ordered from Paula Serrano Make-Up:  My 1920's look using Paula Serrano Make-Up (Madre Matte Liquid Lipstick, Doe Eyes Eyeshadow, and Leather and Lace Eyeshadow) www.paulaserranomakeup.com In addition to mastering 1920's Make-Up techniques, I also had a script to memorize, and 1920's slang to familiarize myself with in preparation for my performance as Amanda Lay. I read my lines over and over until I had them seared into my memory. I also had to practice my singing, since my role includes the singing performance of two songs...after all, "Amanda" is a Jazz Singer... did I mention that I am not that great of a singer? Now, take a moment to enjoy this song straight from 1928, by Helen Kane! I've also included a brief list of 1920's Slang for your enjoyment! 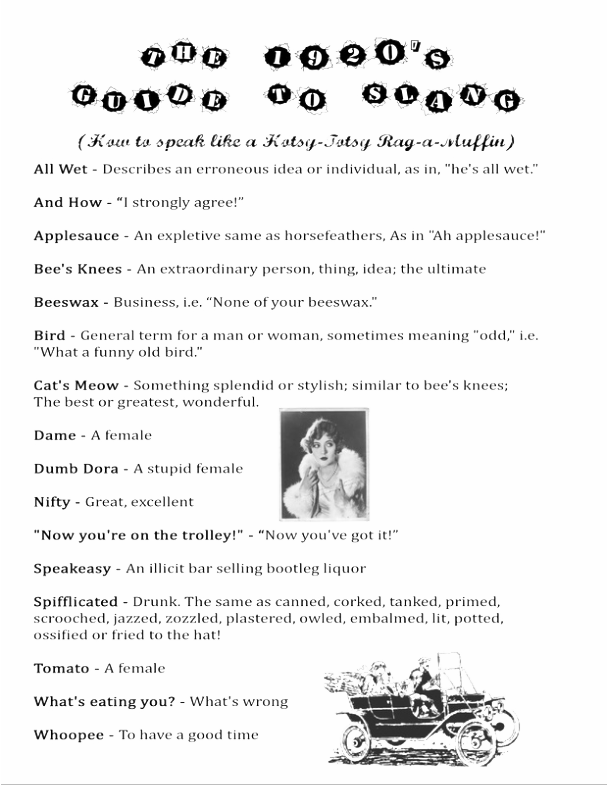 Before long, the day of my first performance arrived! I fixed up my hair and Make-Up earlier that afternoon, since I wanted to take my time applying my Make-Up, and I was still unsure of what type of preshow set-up I would be required to assist in once myself and a fellow actor arrived on location at the Private Party we would be performing at. I then made my way to the Murder Mystery Company Headquarters in San Jose, to meet up with my workmate, and to pick up my costume! 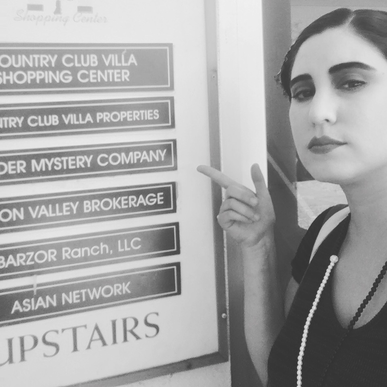 Prior to the show, I picked up "Amanda's" Red Fringe dress from the Murder Mystery Company Headquarters in San Jose, California. Now, off to the Murder Mystery Show! I hope you enjoyed my experience re-creating a 1920's look, with Make-up, for my Murder Mystery performance! If you would like to know more details about the Murder Mystery Show itself, join us for an upcoming show! Check out the web-site www.grimprov.com to purchase your Murder Mystery tickets to one of our Public Shows, or to book a Private Murder Mystery Event! Be sure to follow my Blog for more era-replicated Make-Up looks, and upcoming fashion events! "Have a Killer Day!"   Related Links:
|
AuthorHello Readers! Welcome to my Blog! I am Roxanne Rodriguez Rangel, a Fashion Designer from Northern California. I love all things Fashion, particularly historical fashion! Join me, as I take you around Northern California, covering fashion events and related topics! 
Categories
All
|


 RSS Feed