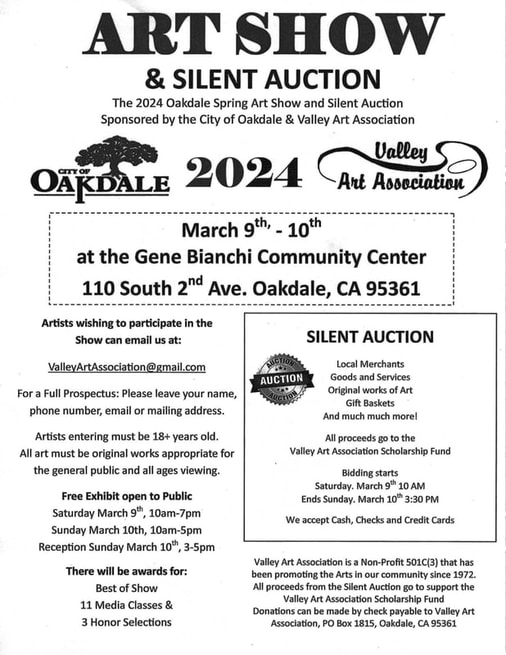
2023 Stanislaus County Fair: Participating in The Textile Arts & Literary Arts- Contest and Exhibits2/12/2024 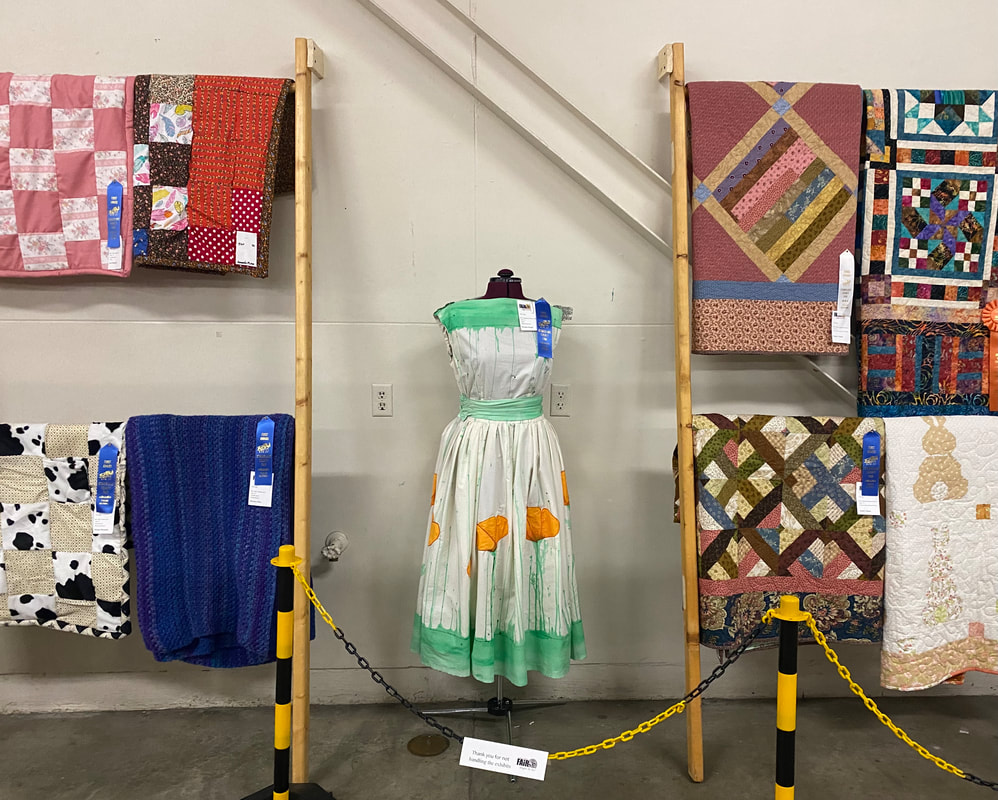 2023 Stanislaus County Fair; Textile Arts Exhibit. Photo: Roxanne Rodriguez Rangel Summer, Central Valley California Beautiful fields of fruit trees, towering stalks of corn, and twisting trunks of grapevines spread far out into the horizon. On the country roads and back highways, large trucks drive off the farmlands carrying loaded trailers overflowing with ripe tomatoes and ripe pumpkins. These trucks, filled with the fruits of California’s Agricultural Industry, are headed to nearby canneries ready to be steamed and canned, then shipped to grocery stores all over the world. It’s truly a sight to enjoy, one I admire each and every year. On this particular highway, trucks pull a different load. Disassembled carnival rides and attractions are folded up like mechanical origami, traveling to its next destination: The Midway of the county fair! 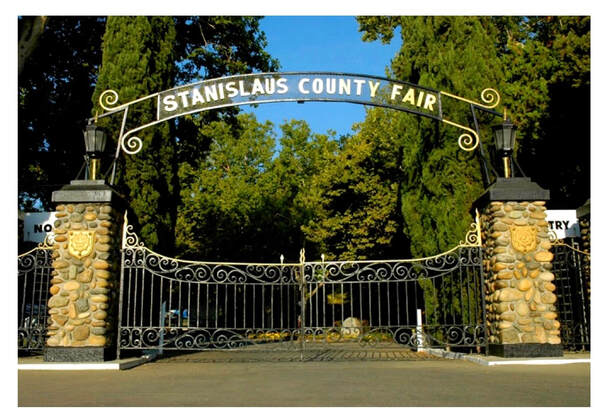 Stanislaus County Fair Gate. Photo: Roxanne Rodriguez Rangel, 2023 Each summer, Californian counties host an annual fair. The fair is a place where the local community can gather together to enjoy food, entertainment, agriculture, technology, share knowledge and expertise, as well as showcase local farmers, bakers, and artisans. Local businesses can set up vender booths promoting or selling their products and services, while the carnival lights up the night sky. The sounds of thrill induced shrieks fill the air as fair-goers are twirled and tossed about on their favorite rides.
Creating a California Day Dress: Poppy Inspired
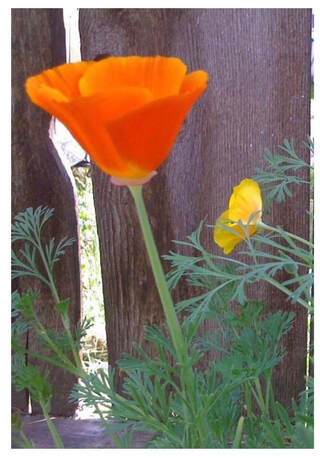
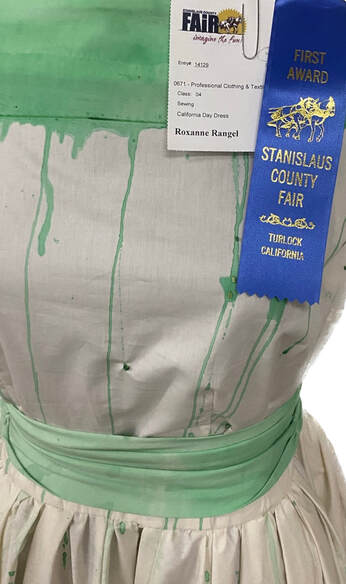
As I held the 2023 Stanislaus County Fair Contest and Exhibit Handbook, gazing at the numerous sewing and textile categories, I knew I wanted to create a day dress that reflected the very land it was made on for my exhibit entry. I chose the magnificent poppy, with a contrasting grassy green, as my subject, and began to conceptualize vintage dress silhouettes for this design. 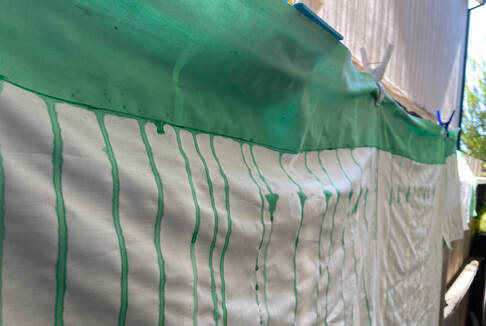 Behind the Scenes: Creating a Hand-Painted Textile. Photo: Roxanne Rodriguez Rangel When making artsy dresses, I love using a simple muslin fabric as the base. For this dress, I envisioned hand-painted techniques, as well as fabric appliqué and beadwork. I wanted the green paint to drip UP the dress, creating the illusion of wild poppy stems! I began to prepare my painted muslin fabric. 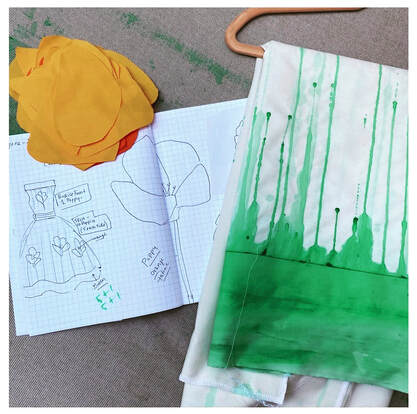 Behind the Scenes: Fashion Sketch and Fabric Preparations. Photo: Roxanne Rodriguez Rangel I painted my drippy paint design using diluted green fabric paint, then satin-stitched orange fabric shaped petals. I hand-stitched beads in both the poppies as pollen detail, as well as on the green dripped paint, like beads of morning dew… 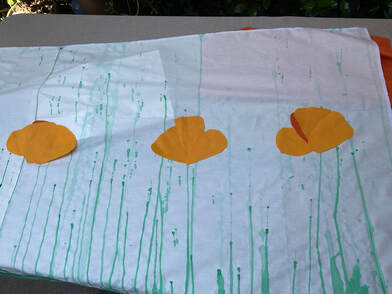 Behind the Scenes: Fabric Preparations: Applique. Photo: Roxanne Rodriguez Rangel 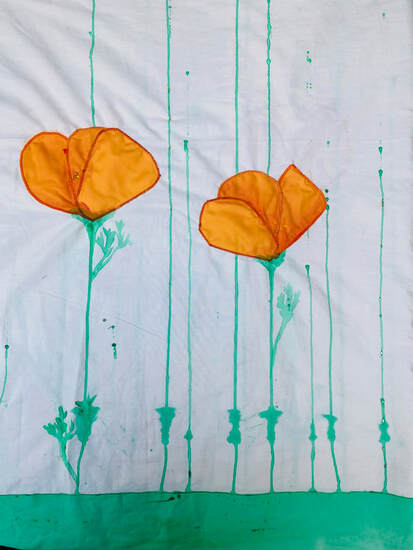 Behind the Scenes: Fabric Preparations: Applique and Other Details... Photo: Roxanne Rodriguez Rangel The result was exactly as I envisioned! Once the fabric had been prepared, I began cutting out and sewing together my Vintage Inspired Day Dress. 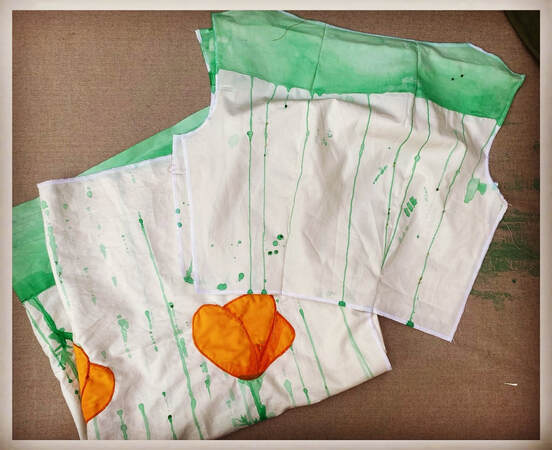 Behind the Scenes: Dress Construction Begins! Photo: Roxanne Rodriguez Rangel The Finished Dress! 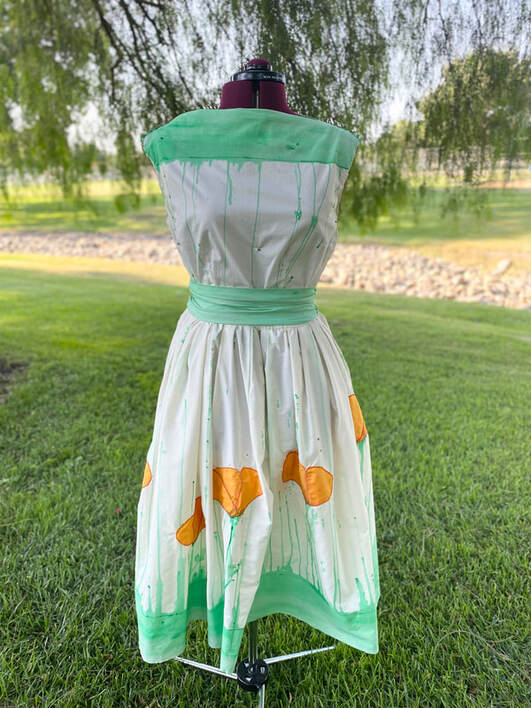 Roxanne Rodriguez Rangel California Day Dress, 2023. Photo: Roxanne Rodriguez Rangel 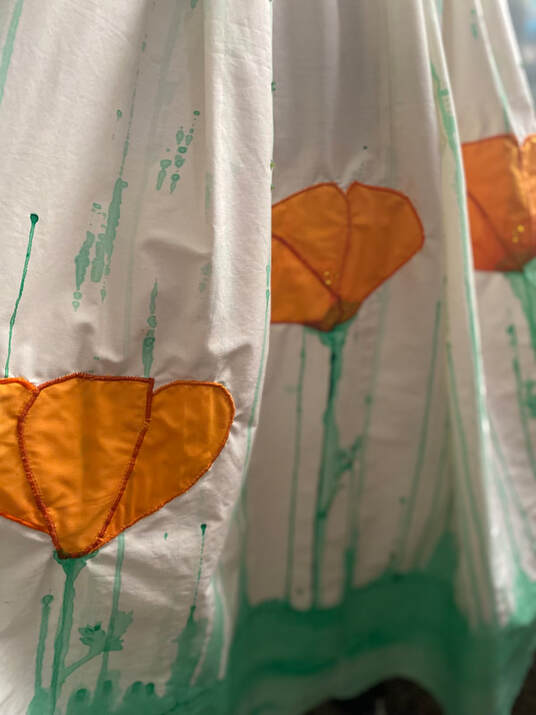 Roxanne Rodriguez Rangel California Day Dress, 2023. Photo: Roxanne Rodriguez Rangel 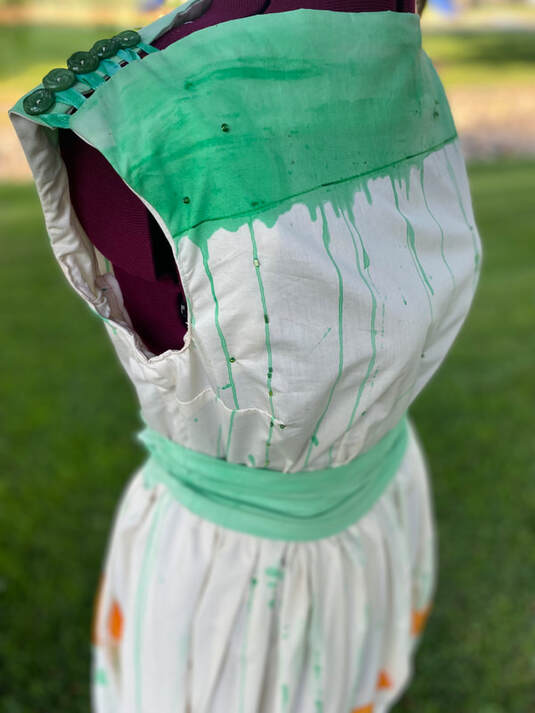 Roxanne Rodriguez Rangel California Day Dress, 2023. Photo: Roxanne Rodriguez Rangel At last, my dress is completed! Back At The Fair: Contest and Exhibits:
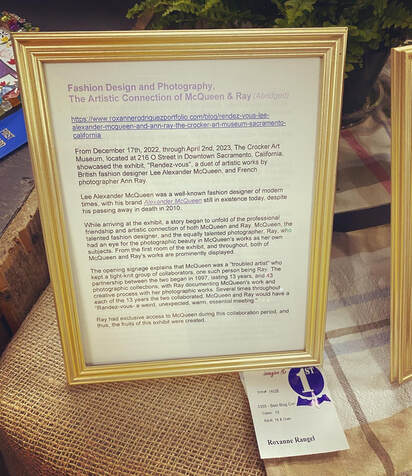
In addition to my dress, I also entered my Blog Article, Rendez-Vous: Lee Alexander McQueen and Ann Ray -The Crocker Art Museum- Sacramento, California, into the Best Blog Contest… I was amazed: Another Blue Ribbon!
 Thank you for reading my Blog! I hope to see YOU at the next Stanislaus County Fair, this upcoming July!  Dress Maker, Roxanne Rodriguez Rangel with Roxanne Rodriguez Rangel California Day Dress. 2023 Stanislaus County Fair- Professional Clothing and Textile Contest. Related Links:
0 Comments
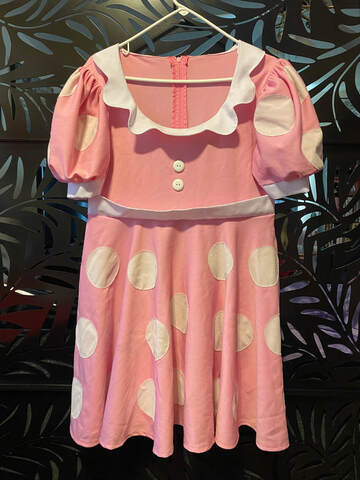
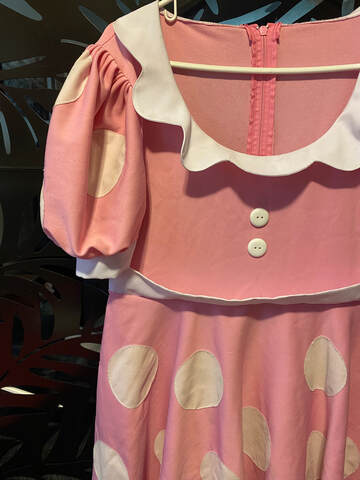
The Deconstruction and Reconstruction of a Costume: Creating a Dress Replica for Minnie Mouse4/13/2023 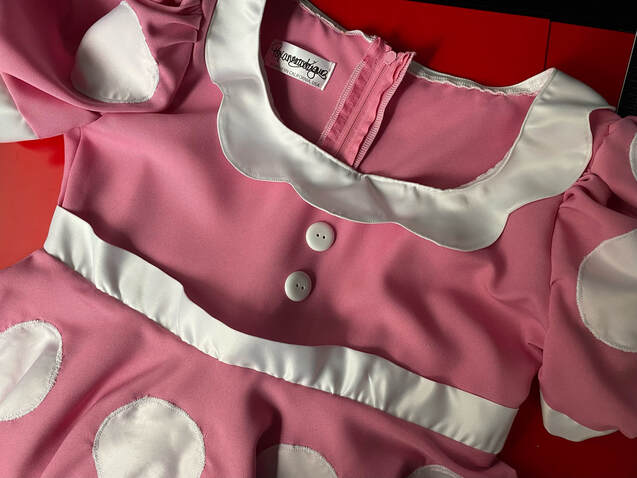 Minnie Mouse Dress Replica by Roxanne Rodriguez Rangel, 2023. Today I would love to share with you a recent project that I completed for a very special client… the fashionably famous, Mrs. Minnie Mouse! The Old Dress
The Minnie Mouse character at Princess Party People, had a lovely pink polka dot dress that had become too dingy and worn out for her to make appearances in. The dress was perfect in size and in color, but the fabric needed retiring. I was hired by the Princess Party People team to make a dress replica. The original dress was dropped off by their staff, and I then recreated a new dress, mimicking the old dress as precisely as possible! Here is a behind the scenes look at the process: Deconstruction 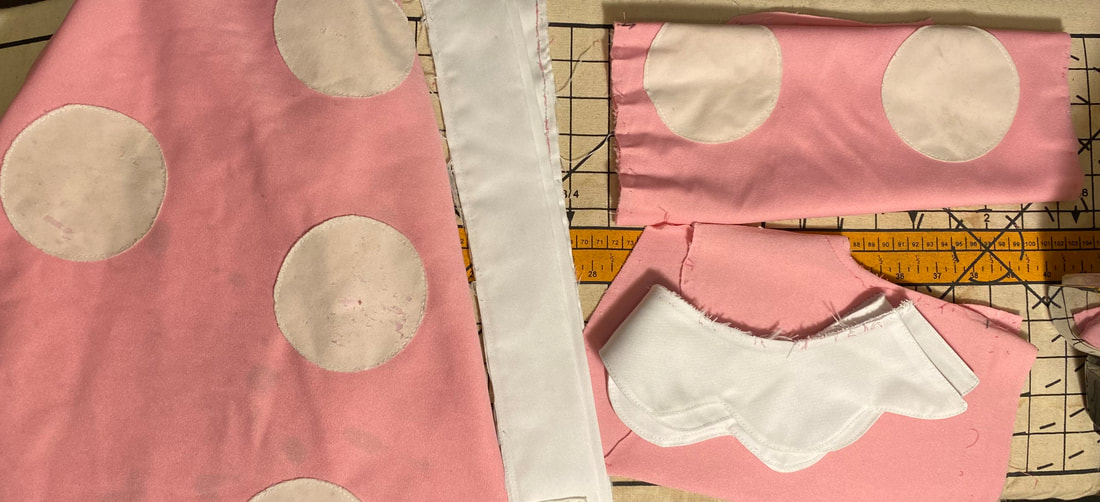 Deconstruction of a Costume: Pieces of the Old Minnie Mouse Dress To recreate a new dress using an existing dress as a template, I first deconstruct the old dress seam by seam. As I remove each portion, I make written notes and technical sketches in my workbook. These notes will be very helpful to me when I reconstruct the new dress! 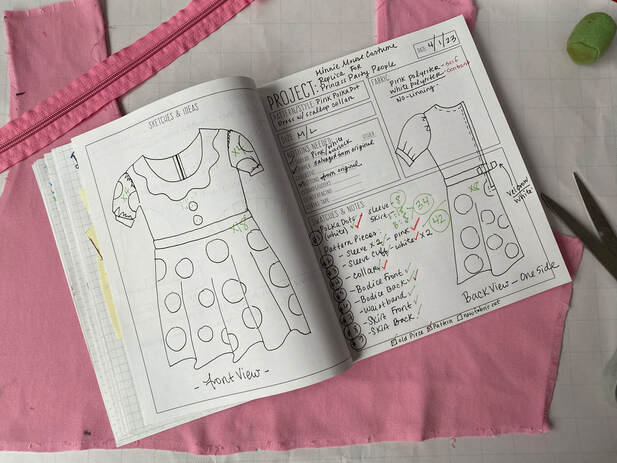 My Sewing Projects Planner is a great notebook to compile all of my notes and technical sketches. Pattern Drafting After the old dress is deconstructed, I trace the old fabric pieces onto paper for the pattern rough draft. I use rulers and measurements to create straight lines, crisp edges, and symmetry. Once the paper patterns are drafted, I can cut out the new material. 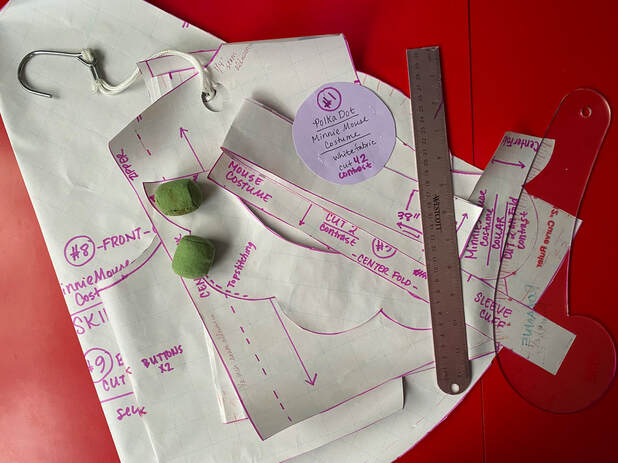 Drafted Patterns are the final outcome of tracing the old dress fabric onto paper. I then use rulers to straighten lines and curves, as well as to verify symmetry. 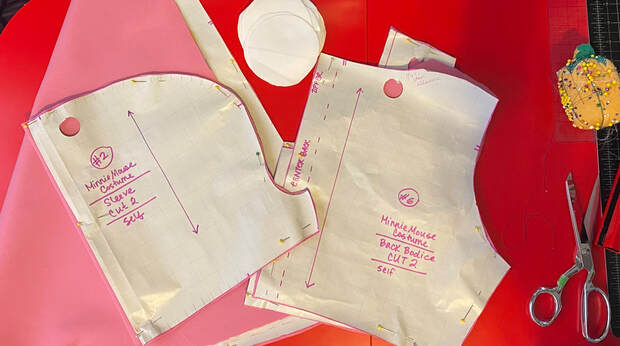 The new fabric is cut using the newly drafted paper pattern. Reconstruction 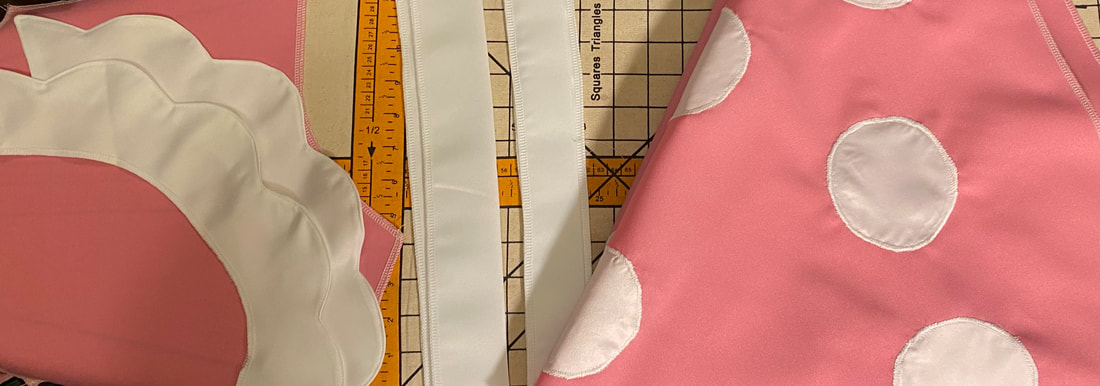 The new fabric: cut and prepped. Ready for assembly! Here are a few photos of the old dress pieces next to the new pieces as I begin the reconstruction portion of this project: 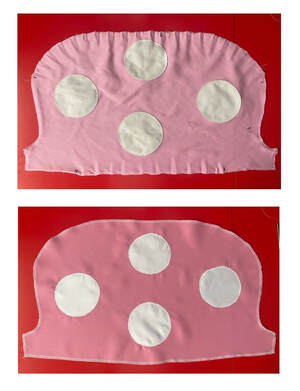 A sleeve of odd proportions! 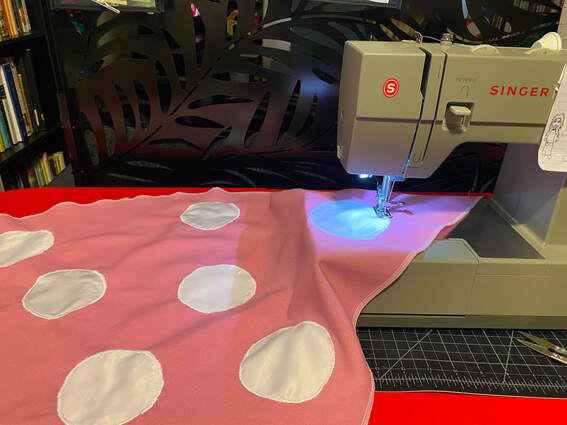 Polka Dots and Satin Stitching! The New Dress Like a puzzle nearing completion, the new Minnie Mouse dress begins to take shape. Before long, an old, tired dress is replaced by a new ready-to-mingle version!  The NEW Minnie Mouse Dress! 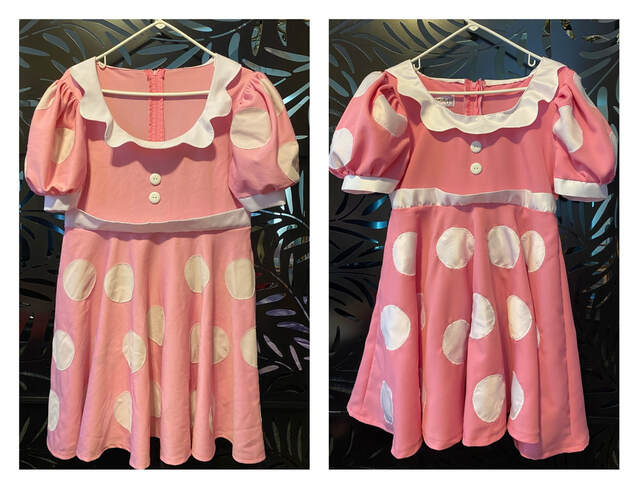 The Old Minnie Mouse Dress (pictured left) and The New Minnie Mouse Dress (pictured right). These types of projects are very fun for me, as I love using a variety of my skills when I am working! If you have any older clothes or costumes you would like to have reconstructed, send me a message with your ideas! You can read more about past costume projects of mine by clicking any of the article links below! Thank you for reading! Have a great day!  Contact Princess Party People to book your favorite character at your next event! Related Links:
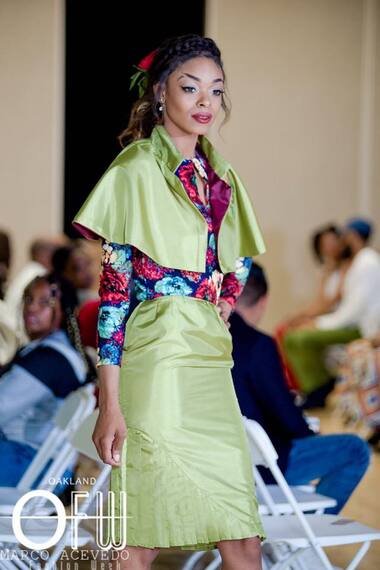
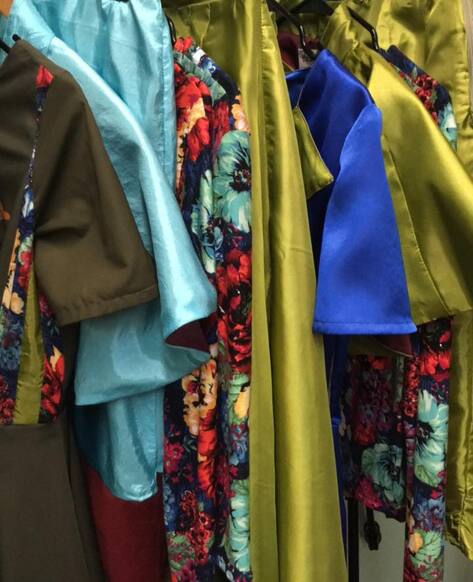
While preparing for my newest designs, I began to reflect on my last runway collection, my Fall 2018 Collection, titled, Midnight Muse. I would love to share with you my designs from this collection: from the uncut fabric, to the final runway looks! Hand Crafted Details When I begin to create original designs for a fashion collection, I start my design process with trend forecasting research, then I narrow down my silhouettes, color story, and design details. For my 2018 Midnight Muse Collection, I chose a color pallet of greens, blues, and a contrasting pop of red. The fabrics I selected included a mix of hues and textures, as well as a floral printed knit. I love to add artistic, hand-embellished design details to my creations to make them truly unique. For this collection, I hand-stitched embroidery, and beadwork, used a hand-crafted pleating technique, and I hand-painted a floral motif!
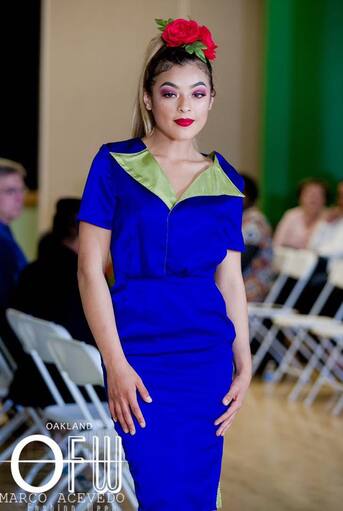
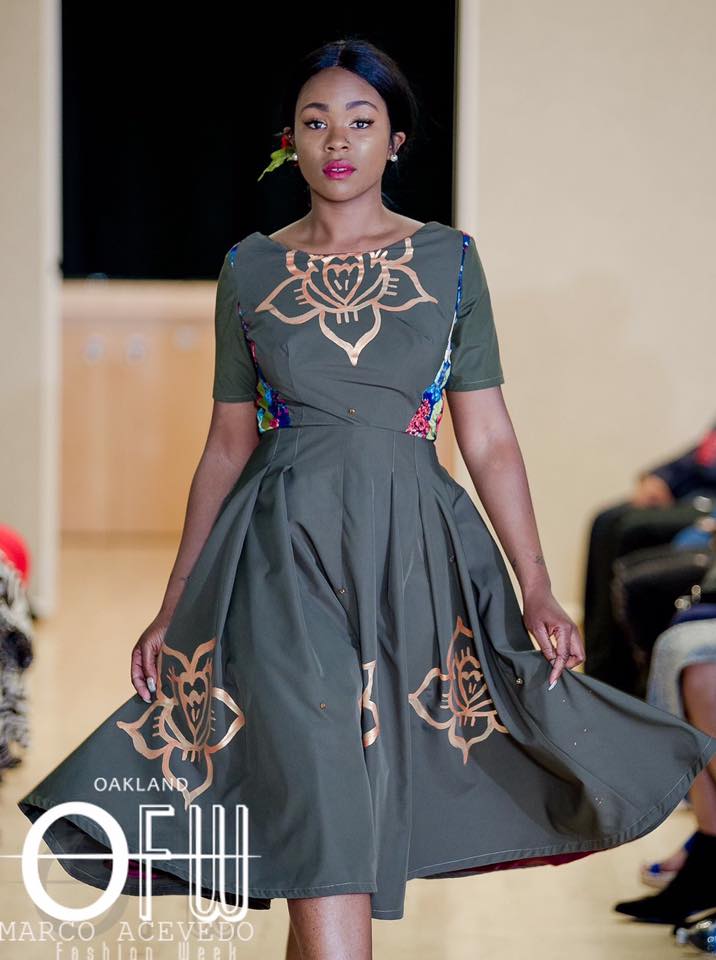
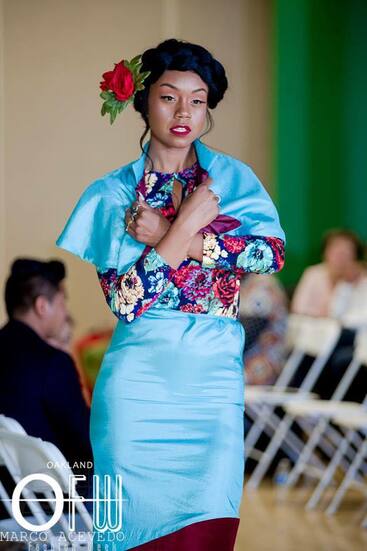
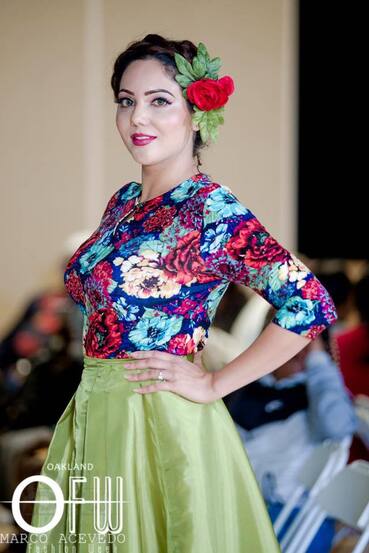
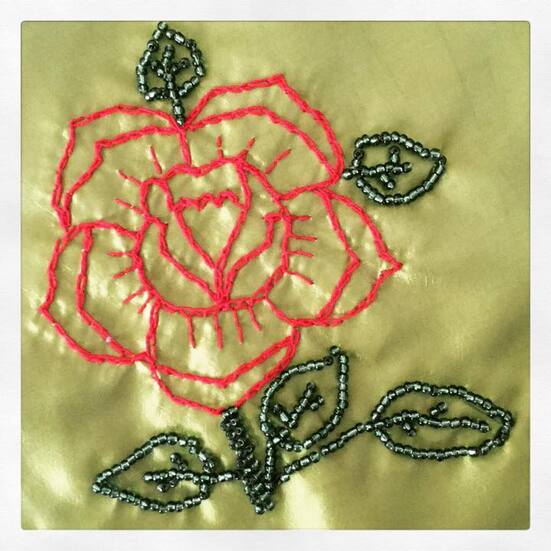 Close Up Photo of a Hand- Embroidered and Hand-Beaded Rose Design, featured on the Roxanne Rodriguez Fall 2018 Caplet. 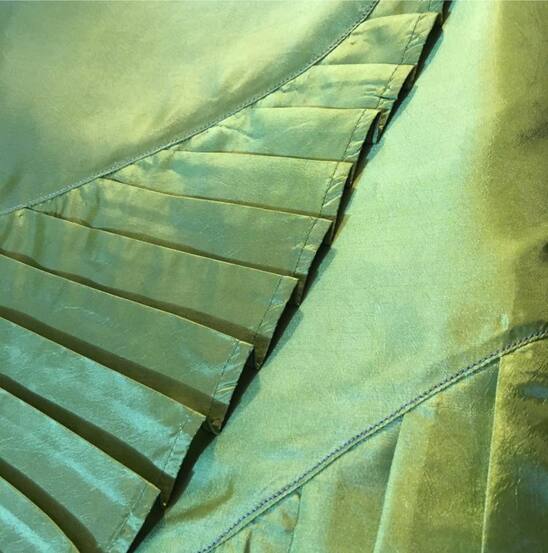 Close Up Photo of the Hand-Crafted Pleating featured on the Roxanne Rodriguez Fall 2018 Pencil Skirt. The Final Collection 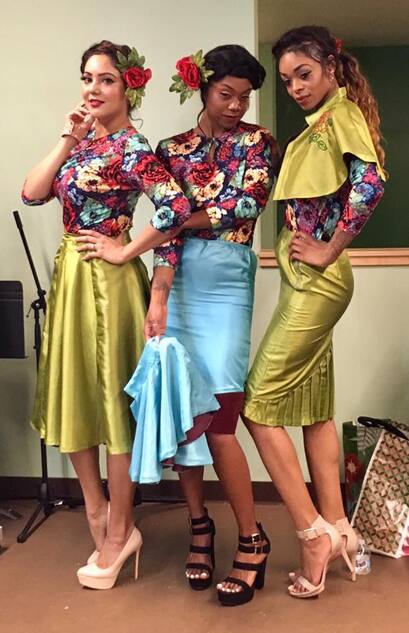 Oakland Fashion Week Runway Models, backstage at Oakland Fashion Week 2018, Day 4. After many long hours of creating and sewing, my Midnight Muse Collection was complete, and Runway Ready! This collection made it’s public debut at Oakland Fashion Week 2018’s Day Four, Ready-To-Wear Runway Event! Here are the final looks of my collection modeled by the lovely Oakland Fashion Week 2018 Runway Models, and photographed by Marco Acevedo Garcia.
 Roxanne Rodriguez 2018 Midnight Muse Collection
The Roxanne Rodriguez Fall 2018, Midnight Muse Collection, is by far my favorite that I’ve designed and constructed thus far! I am really looking forward to pushing my design creativity even further with my upcoming 2022 collection! Join me, and many other amazing fashion designers from the Bay Area, at Oakland Fashion Week 2022, on May 15th-May 22nd, 2022!  Thank you for viewing my work! Have a great day, my friends! 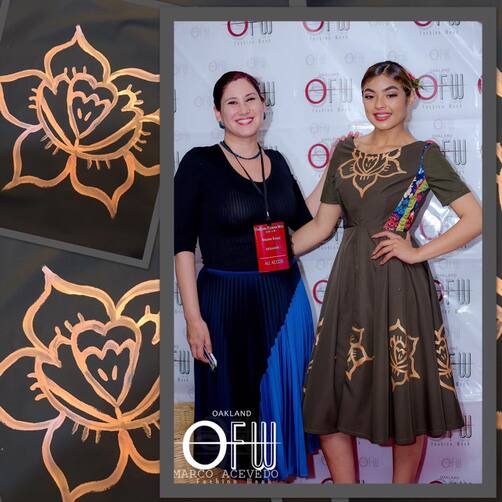 Designer Roxanne Rodriguez Rangel with Runway Model, Oakland Fashion Week 2018, Day One, Opening Night. Related Links:
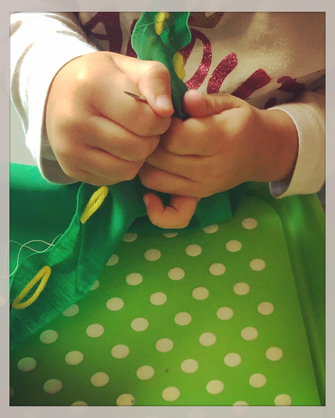
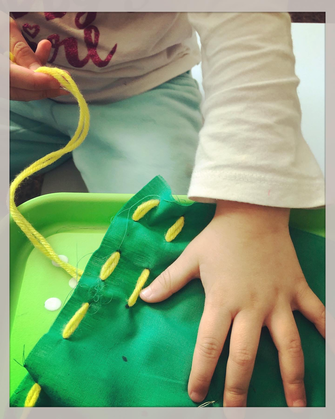
Hello my dearest darlings! I hope Springtime 2021 is finding you well! My Blog has been on my mind for sometime, as has about 20 personal sewing projects, that I have yet to even start. So, today, I thought I’d start somewhere, and get you an update on some recent happenings, and workroom photos of completed, and not-so-completed, projects! This is me, Roxanne, enjoying the fresh blooms of Spring, one of my favorite times of the year! 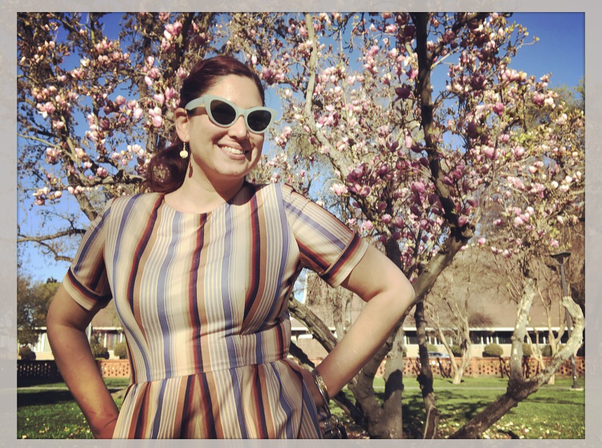 I recently found this lovely dress at The Salvation Army: It’s Vintage, a Perfect Fit, and... has Pockets! Since I Left You Last... I have been buzzing around like a pollinating bumble bee, juggling several side-hustles around my most important job: that of a Homemaker, Wife, and Mother. That may sound a bit old fashioned, but it is totally true, leaving me creatively drained with little energy for fashion design projects and sewing on most days! Although this past year has been spent mostly homebound for myself and children, we were able to safely travel to the Las Vegas/Henderson area of Nevada in January 2021, and we had a lovely time visiting our family there! Summer activities are already filling our schedule, including a camping trip this July! 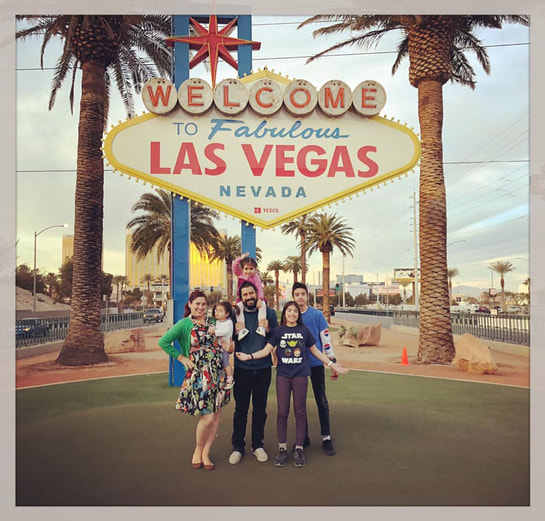 The Rangel Family- Las Vegas, January 2021 Work! I am still working Saturday’s as an Alterations Specialist with the clothier, The Buckle, and am currently creating a Blog Article all about Jeans, which I surprisingly found quite fascinating! I can't wait to share that soon! I am still busting out Alteration Services from my sewing room at home. My Dad’s Boat Upholstery Project was delayed due to fabric sourcing, but new fabric has arrived! Check out this photo of the old upholstery fabric, next to the new upholstery fabric, for one of my Dad’s boat chairs! I will be sure to continue to keep you updated on this project, in future Blog Posts, as I expect this project's completion to go fast at this point! 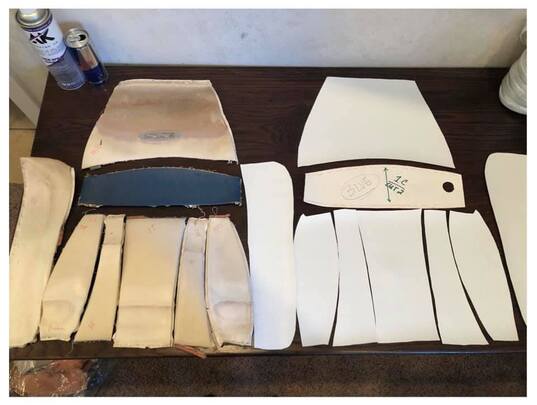 Adventures in Upholstery Project: side by side comparison of old and new fabric. Now, let’s get to even more SEWING! Toddler Sewing Time My two youngest daughters are no longer babies, and are now on their way to becoming capable young children. My second to youngest daughter, SkyLynne, is expressing interest in learning to sew! Since SkyLynne is almost 4 years old, I’m starting her with hand-sewing lessons. So far, I’ve been teaching SkyLynne to use a large embroidery needle and yarn to get used to hand-stitching. I draw dots on the fabric as a guide for her needle, and she is doing great! We also started another Sewing Project together...
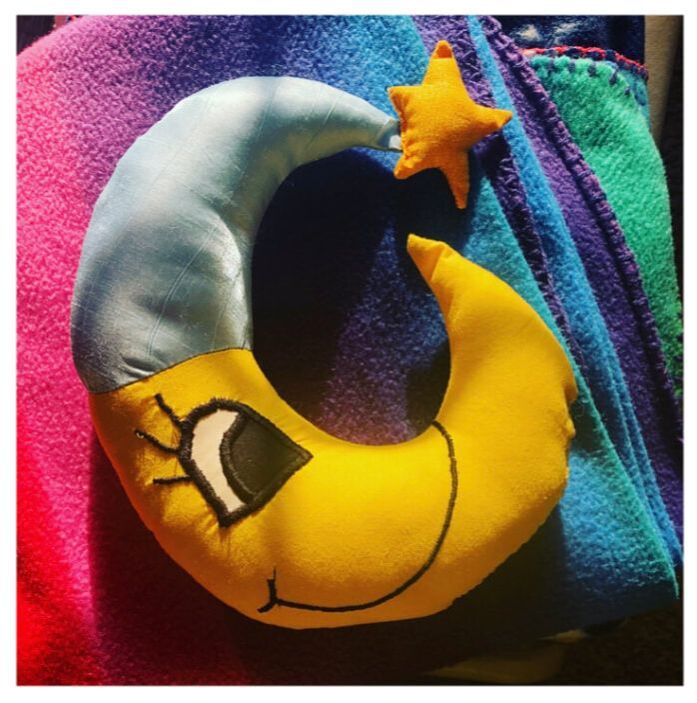
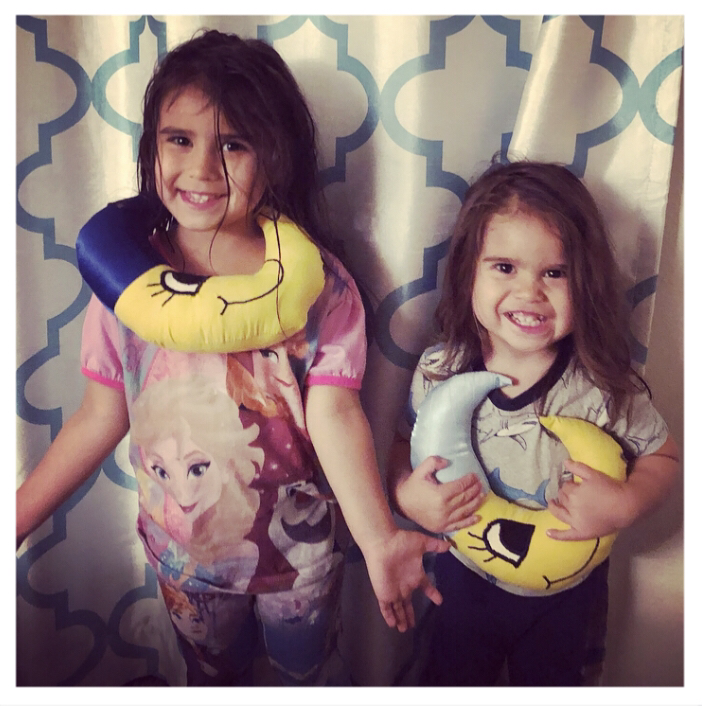
A Moon to Cuddle My two young daughters love the Moon (who doesn’t!). My youngest daughter, Minnie, is particularly obsessed, so when SkyLynne asked for “a Moon to Cuddle”, I decided to make a stuffed moon for each of them!
I have not made very many stuffed animals during my design/seamstress career, so these guys are definitely not perfect! Together, SkyLynne and I drafted a simple crescent moon pattern, with a night cap and star, as well as machine stitched face details! Although they could be better, I learned stuffed- toy-making tips & tricks for next time, and my girls now each have a cuddly moon to sooth them through the night! Priceless! Work in Progress... I love to visit thrift shops as often as I can. While shopping, I not only keep my eyes peeled for Vintage Clothing and Vintage Kitchen Wares, but also for... fabric! These recent acquisitions left me feeling inspired! Check out this yellow and green fitted sheet set, and lace curtains I bought for mere dollars! I will be creating something fantastic soon with these lovelies! Blog Post coming soon! 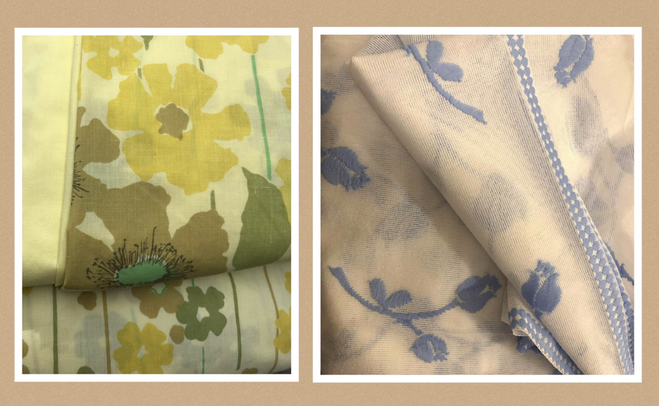 Vintage Bed Sheet Set (Left), and Lace Curtain (Right), that I will be using to create new dresses! 2021 Goals
I would love to hear your thoughts! What have you been up to this year? Do you Sew daily? What projects are you working on? Do you Sew with your children? What are your Creative Goals for the remaining 2021? Are there any Fashion or Sewing related topics that you would like me to write a Blog Article about? Leave me your comments below! I appreciate you! Have a fantastically fashionable day!  My beloved Grandma Minnie, San Francisco, California, April 2009 In Loving Memory of Mrs. Herminia “Minnie” Rodriguez 11/02/1941- 06/28/2020 Related Links:
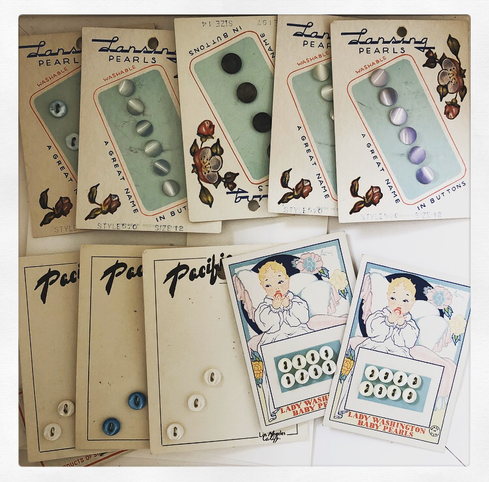
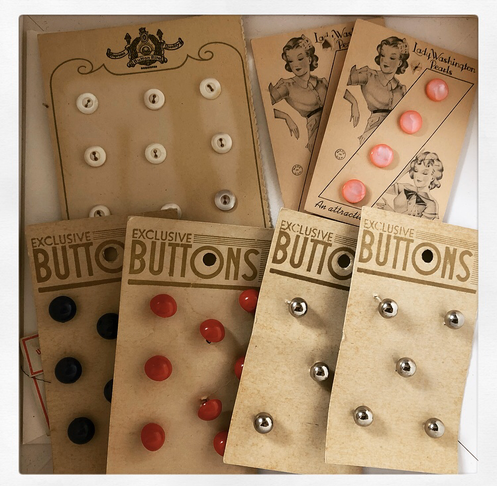
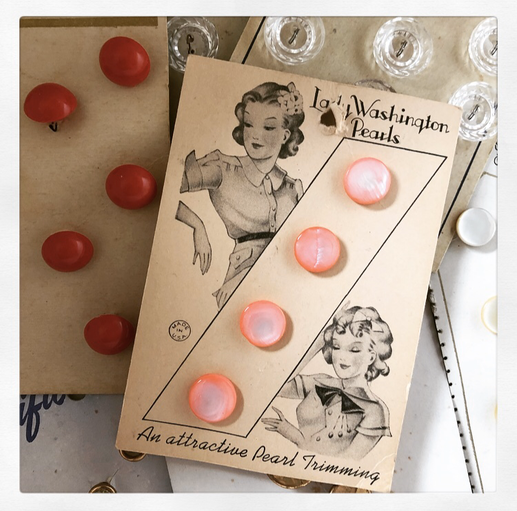 Close-up of carded Vintage Buttons that were my Grandmas! Photo: Roxanne Rodriguez Rangel I once sifted through hundreds of vintage buttons, that a dear friend of mine had collected over the years. Gazing upon the uniqueness of each button, the art and craftsmanship of something so small, with a purpose so simple, had me wondering, "Where had these buttons been, and where will these buttons go?" It seemed as if these precious buttons had such a long life before making it here, to this pile before me, and would continue to exist, long after my friend and I... Taking this photo of my friend's buttons, I began to reflect on the mysterious lives of buttons... 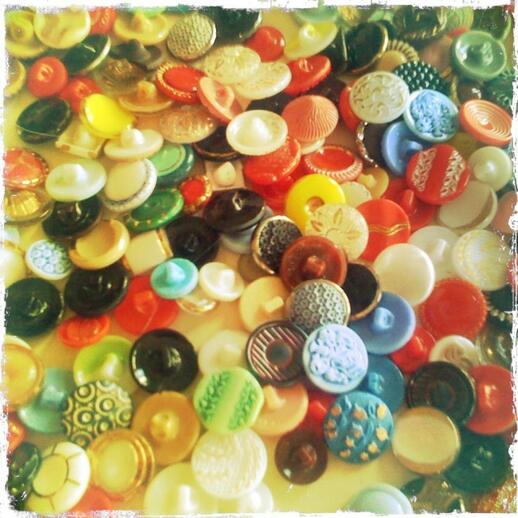 Vintage Buttons, photo by Roxanne Rodriguez Rangel Buttons are the oldest clothing fastener known to mankind! Ancient buttons, made of sea shells have been found that date back many centuries. In today’s clothing we have alternative clothing closures such as zippers, snaps, hooks & eyes, even elastic, but the classic button still prevails! 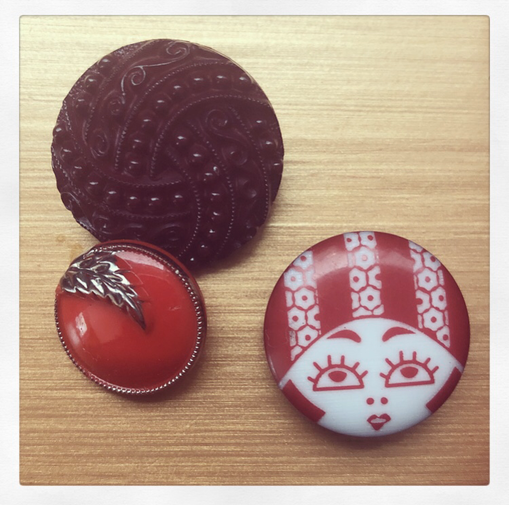 A few favorites from my Button Collection... Photo: Roxanne Rodriguez Rangel As I began to create clothing myself, I also began collecting buttons. If ever I am in a fabric shop purchasing fabric or notions, and I find some interesting buttons, I will most certainly buy them, even if I do not have an immediate use for them. In addition to solid colors of every sort and size, I now have a few jars full of buttons, both unique, and standard. Having this unique and quirky stash has proven fun when I need to fulfil the task of a button! Children too take delight in buttons! How fun it is to sit with my daughters and look through a poured out pile of color, design, and texture! My children love exploring the treasures stored within my button jars just as much as I do!  A few of my Button Jars! 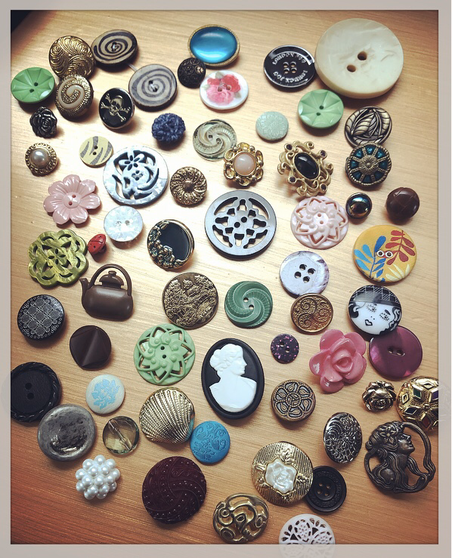 Selected Buttons from my Button Collection... Photo: Roxanne Rodriguez Rangel A few years ago, my dear Aunt Patty sent me a box of Sewing Notions that belonged to my Grandma Marcia. To a sewing enthusiast such as myself, it was exciting to find so many Vintage Buttons, still on their original packaging cards! Not only are the buttons delightful, but so are the lovely illustrations and graphics found on the cards! Here are a few of my favorites: 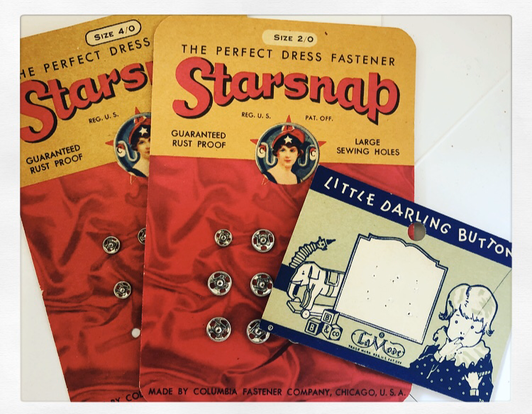 These Vintage Snaps and Button Card were once my Grandmas! Photo: Roxanne Rodriguez Rangel
Do you enjoy the unique designs of buttons too? How do you store or organize your button stash? I’d love to hear your experiences or button memories! Leave me a comment below! 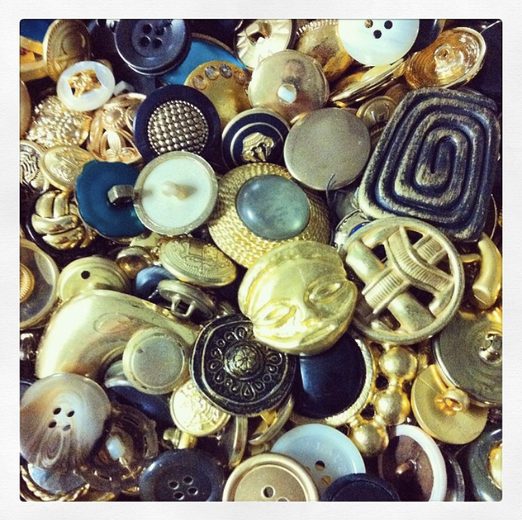 Tailor Shop Buttons, photo by Roxanne Rodriguez Rangel Thank you for reading my Blog!  A favorite button... Photo: Roxanne Rodriguez Rangel Related Links:
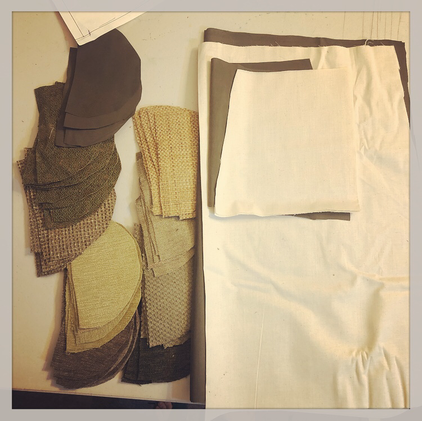
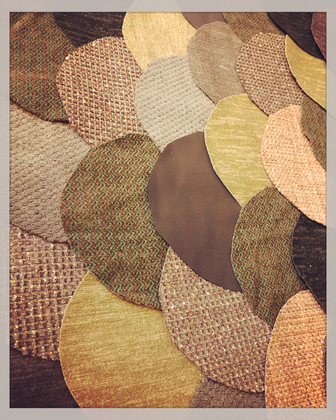
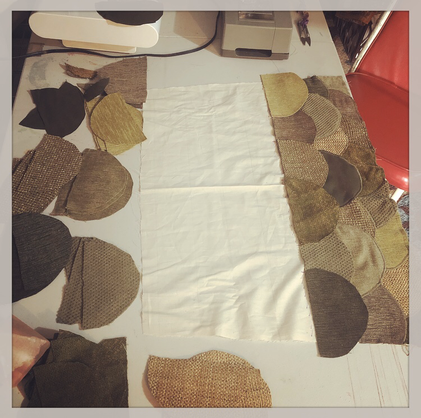
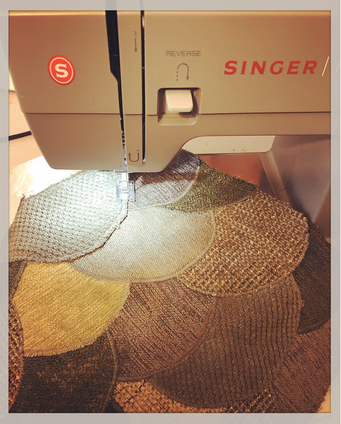
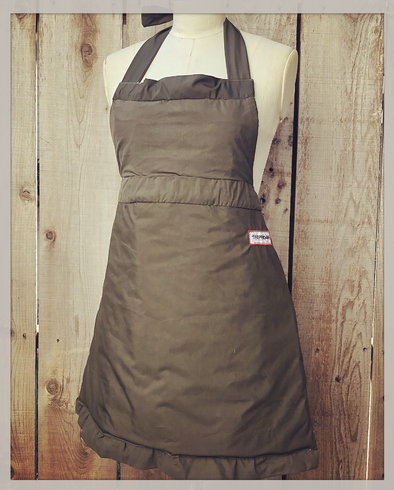
This week I finished a personal project for myself: A Heavy Duty Work Apron made with tons of applique and constructed primarily out of Upholstery Fabric Swatches! 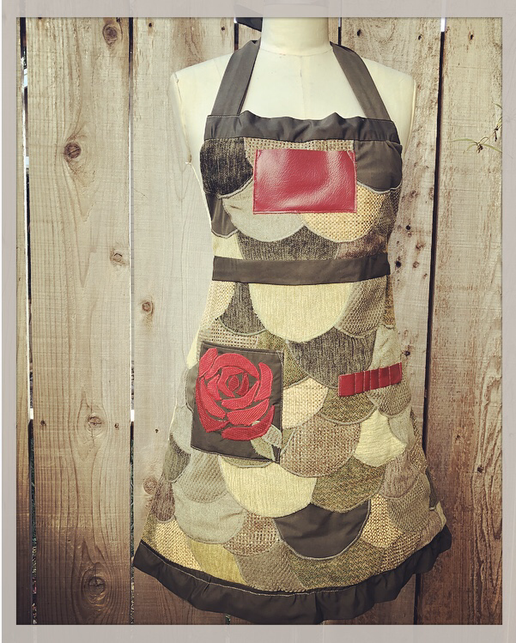 My finished Heavy Duty Work Apron! A while back, one of my friends, who is a retired Interior Designer, dropped off a huge box of large upholstery fabric swatches that she used in the past to show to her clients. Since she no longer needed the fabric swatches, she thought that I might have use for them sewing. I have used a few swatches here and there, but when I started a recent Upholstery Project, I thought how cool would it be to make a heavy duty apron for my upholstery work out of some of this upholstery fabric! While conceptualizing my new work apron, I wanted to create something functional, fashionable, yet heavy duty, for cleaning, removing, and re-upholstering, the old boat seat pieces that I am currently working on... I used an adorable kitchen apron that I have owned for years as inspiration for the work apron pattern... My Concept After making an apron pattern by tracing the dimensions of my existing kitchen apron, I then pulled out my large bin of upholstery fabric swatches. I decided to stick with earth toned colors for my textile design, and I choose several hues of green to work with. Because these swatches are not very large, I knew I would have to work with several to create my apron. I didn't want my design to look like quilted squared patchwork, I wanted to transform these swatches as much as possible, so I decided to create a new textile by piecing together large scallop shapes cut out of the various greenish colors I had chosen. I also had to use a few brown swatches to create enough scallops for the entire front layer of the apron. I used a lovely waterproof forrest green fabric as the lining, and for the straps, trim, belt and ruffle. 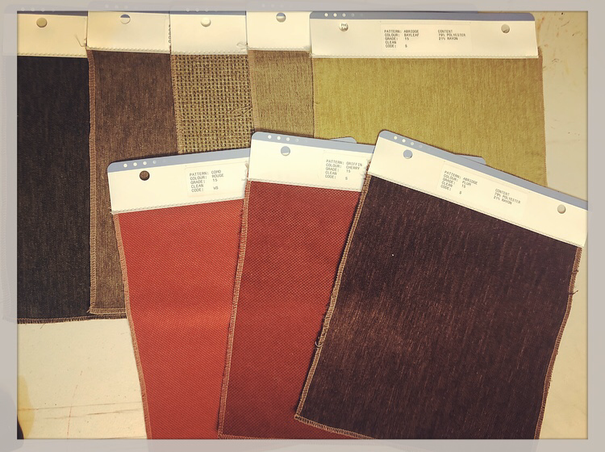 These are a few of the Upholstery Fabric Swatches that I used to create my Heavy Duty (yet fashionable) Work Apron. I literally have hundreds of these things! Using my New Sewing Project Journal, that I absolutely love, I began to draw out a quick illustration with construction notes, as well as a hand-drawn rose applique design that I would create on my apron's pocket by using red upholstery fabric swatches. While rummaging through my swatches I found a tiny swatch of 100% Leather also in red! I used the leather swatch for the apron pocket and a utility/pencil holder!  My new Sewing Project Journal! After my concept was decided upon, I began to cut out my pattern and upholstery scallop pieces. I sewed my scallops onto a muslin layer for stabilization, and then I used my Satin Stitch Presser Foot to secure each piece with Satin Stitching! Work In Progress... Check out these Designer Workroom Photos:
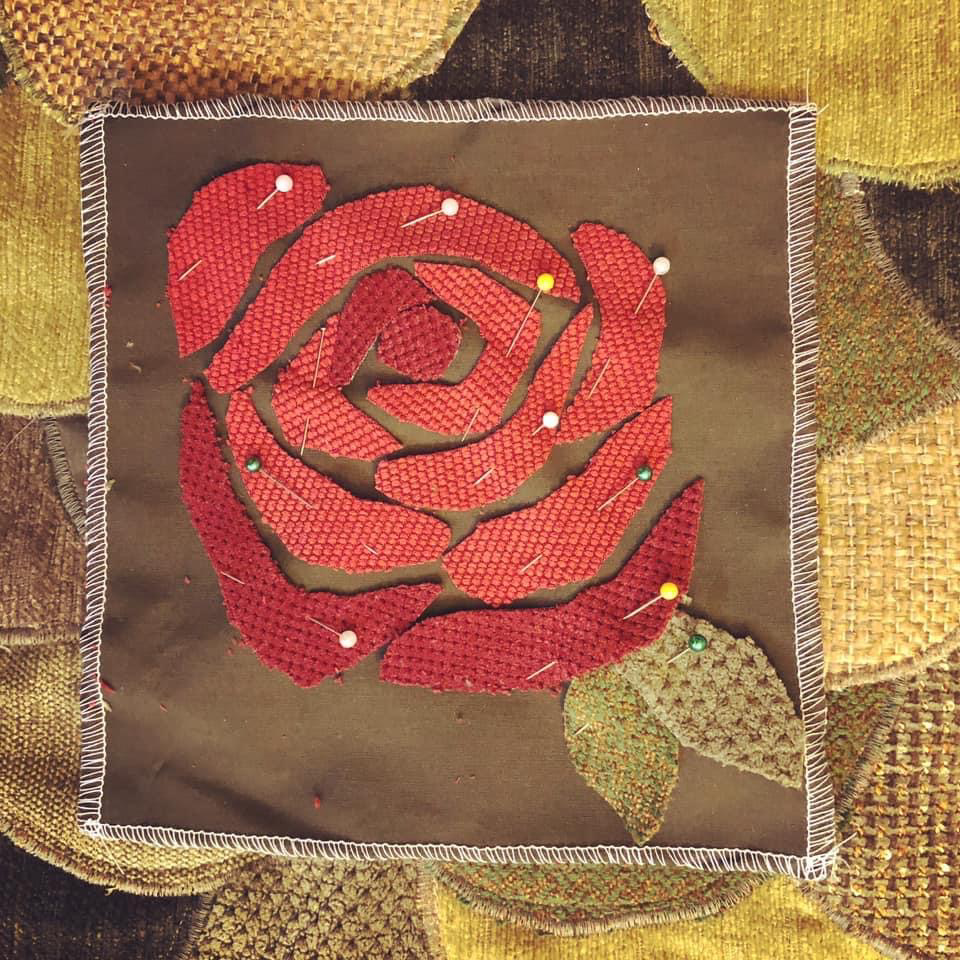 Work In Progress: Rose Appliqué on Pocket... I am having fun using the Satin Stitch Technique that I began to practice just a few weeks ago. After sewing on all the upholstery scallops, I then added the pocket details, the lining, the bottom ruffle, the waistband, the trim, and then the neck ties! Whew! All of these details were a lot of work! 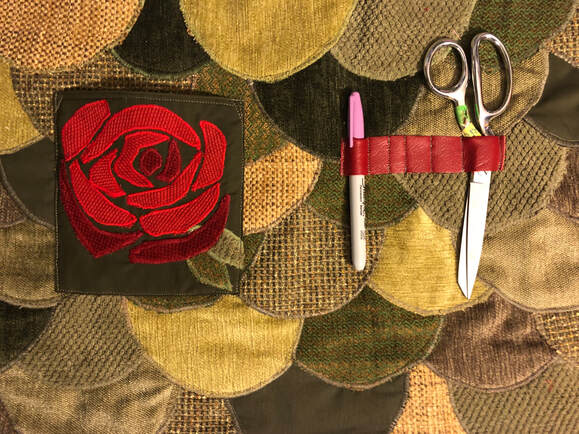 Finished Rose Applique Pocket and Utility Holder My NEW Work Apron is Ready!
Finally, after a few weeks from starting this project (I only worked on it when taking a break from my other projects), my Heavy Duty Work Apron is complete! I have so much fun creating projects for myself, especially projects that I can add even more creativity too, such as this one!  This is me, Roxanne, wearing my new Heavy Duty Work Apron at work! I love it! I’m looking forward to sharing with you even more upcoming projects! I have many concepts in mind, and I can’t wait to get started on them! Until then... 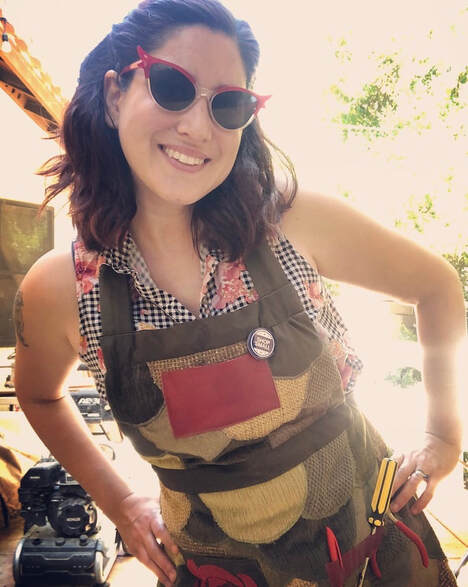 I’m loving my new Heavy Duty Work Apron! Thank you for reading! Have a great day! Related Links:
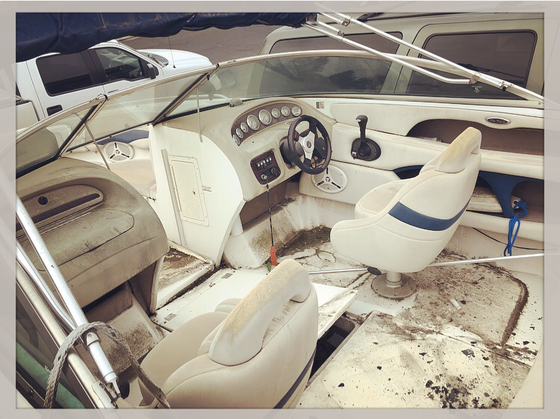
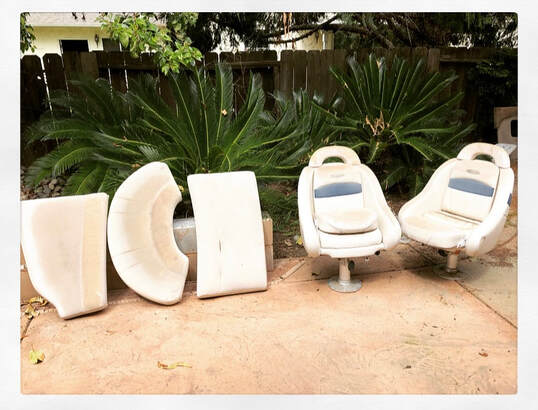
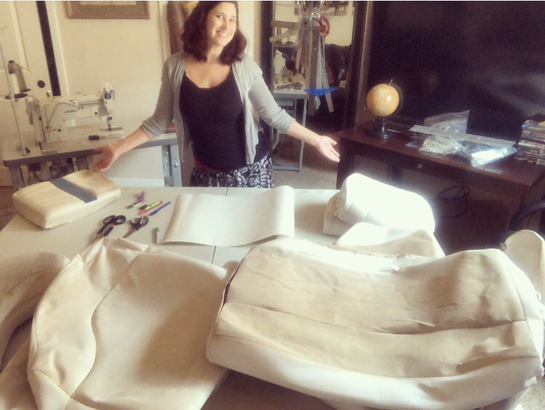 This is me, Roxanne, working on reupholstery as part of a boat restoration project! This month, after being temporary laid off from my Saturday Job, as an Alteration Specialist for the retail store, The Buckle, I began to use my Saturday Work Day (outside of the home) to start a large reupholstery project! I am working Saturday’s for my Dad, helping him with his boat restoration! I have never done this type of work on such a large scale before, so I’m really excited for the opportunity and experience. When my Dad offered me this job, and I accepted, he purchased a brand-new industrial Juki Sewing Machine, designed specifically for upholstery! My Dad set up a Sewing Workroom for me in his house, and every week, I work there!  My Dad's NEW Juki! This is the boat that I am working on prior to any repairs: 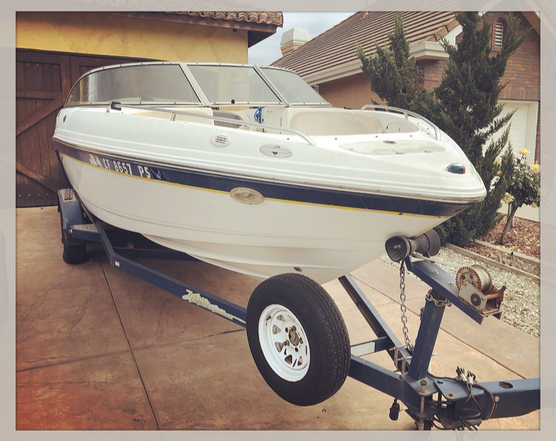 My Dad's Boat. It is a 2001 Model, we have had some great summers with this boat! Sadly, this lovely boat was left out in the elements, uncovered, for a few years. The upholstery and interior have been severely damaged. On my first day of work, my Dad pressure washed the interior, then began removing piece by piece of the seats, cushions, and side panels...
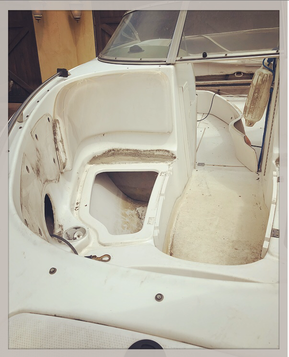
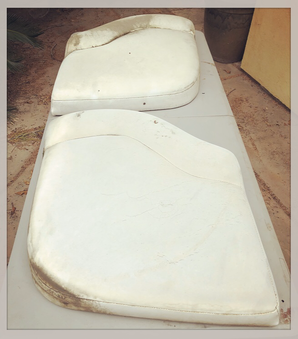
I began my upholstery task by taking each seat section and cleaning them as thoroughly as possible. I then began to remove the old upholstery, in preparation for my next step: Pattern Drafting!
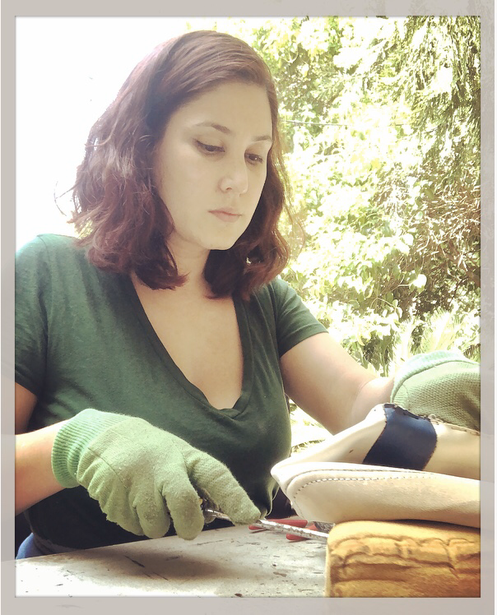 This is me, removing many many staples, so that I can remove the upholstery from the seats and panels 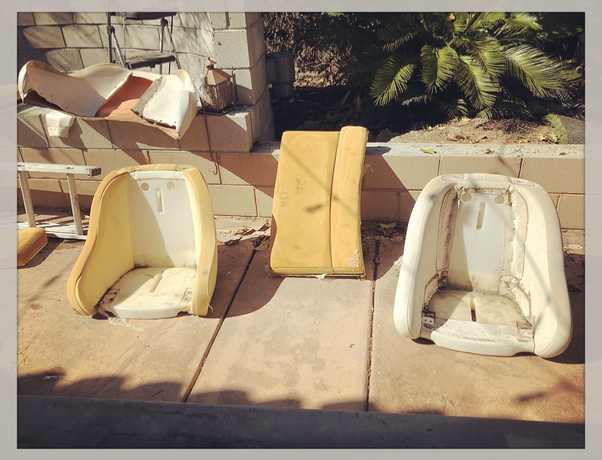 Progress! After cleaning and removing the old upholstery, I then took apart each individual upholstery piece by piece, such as I did here with this Captain Chair Backrest, I drew a rough technical sketch with any notes I might want to remember when reassembling the new upholstery pieces later. All hardware that has been removed is also labeled and bagged for re-attachment later. Each section of each fabric piece is marked, and labeled ready to be reproduced! 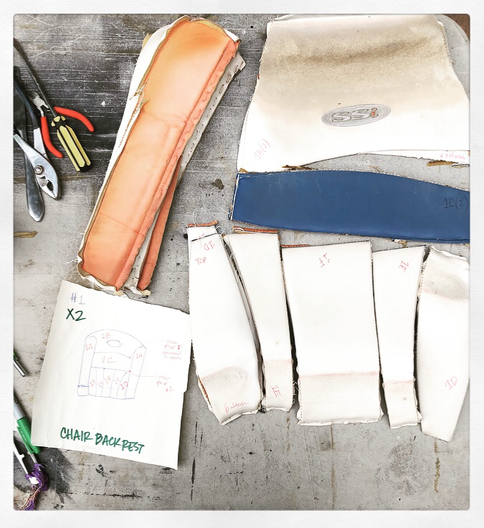 Pattern Drafting Prep for Reproduction of Upholstery Pieces! As you can imagine cleaning and taking apart each boat piece is taking some time to complete. Next Saturday I will start drafting the patterns! Then I will sew together the new upholstery! I will keep you updated on my progress! 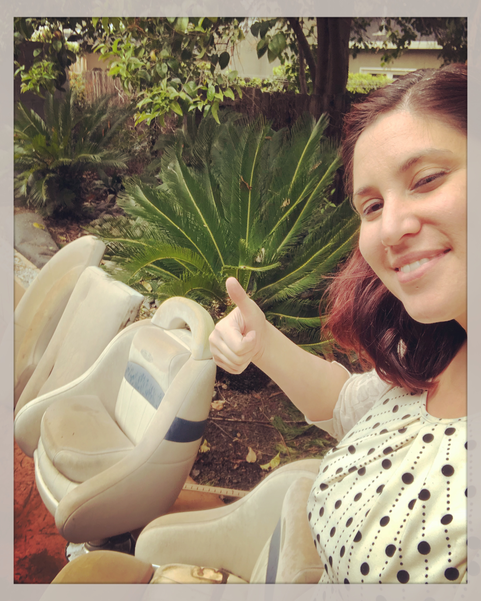 Thank you for reading! Related Links:
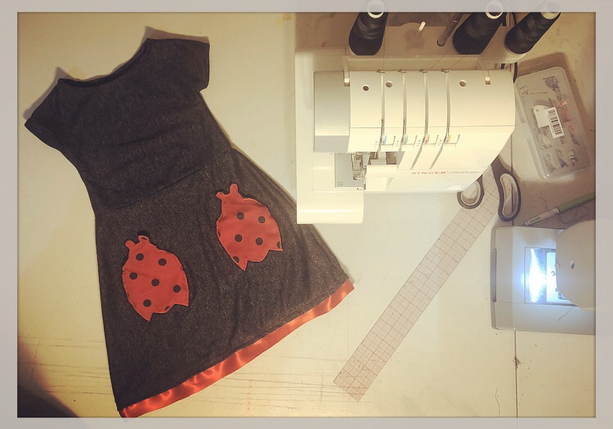
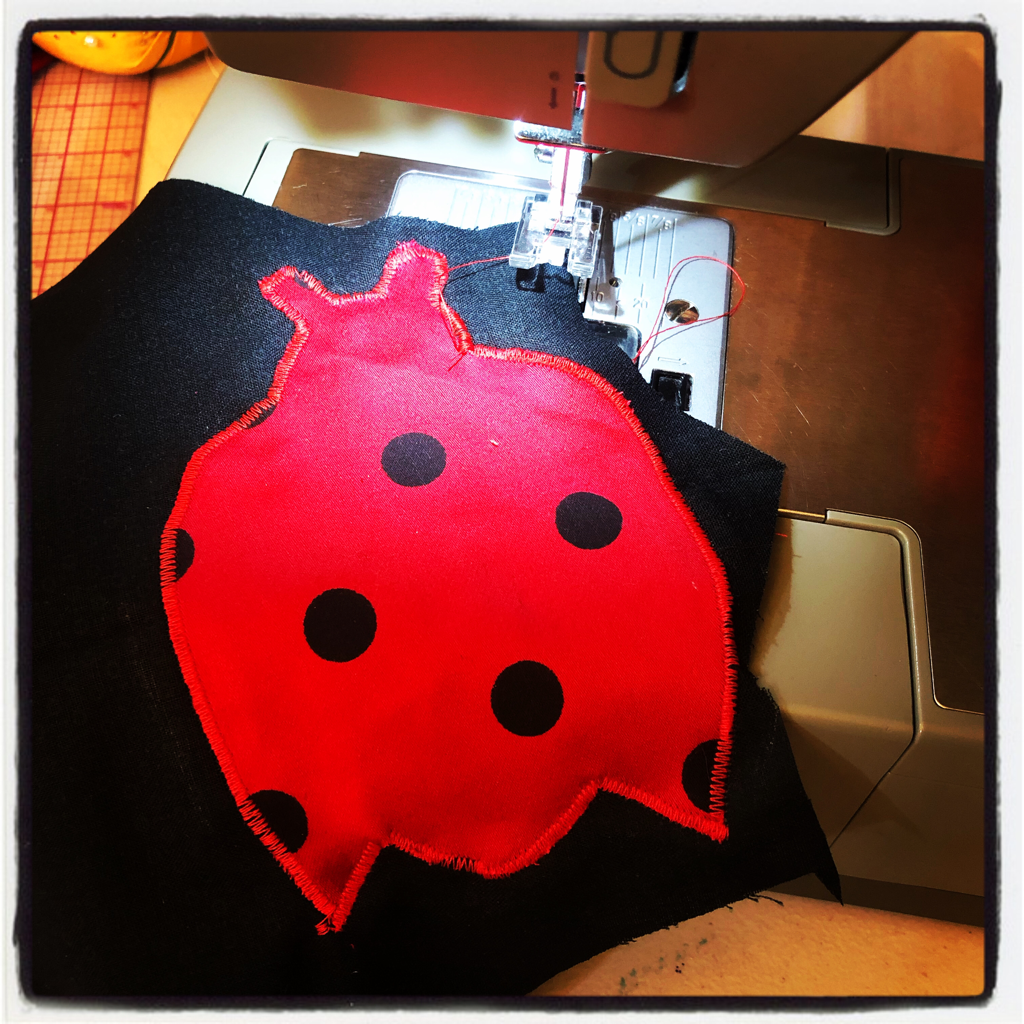
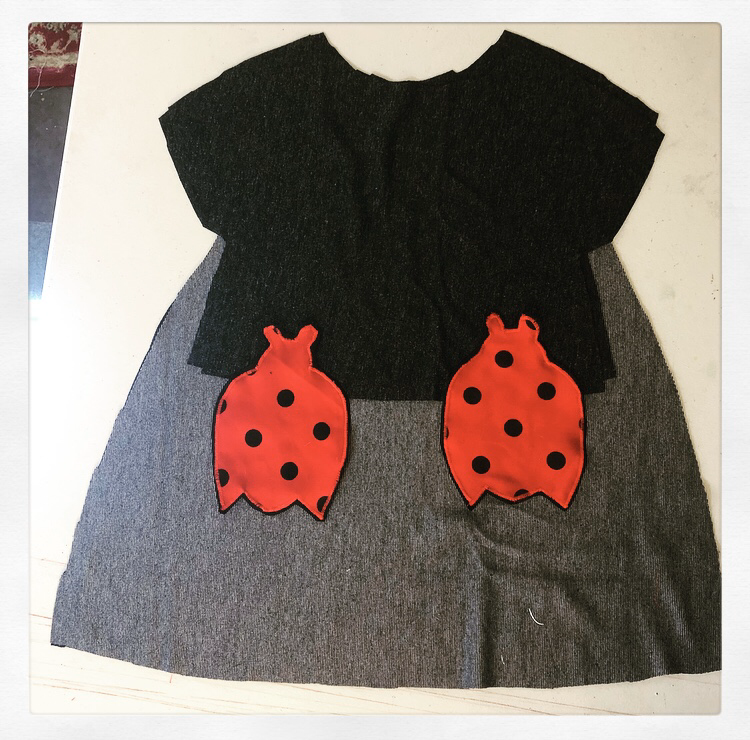
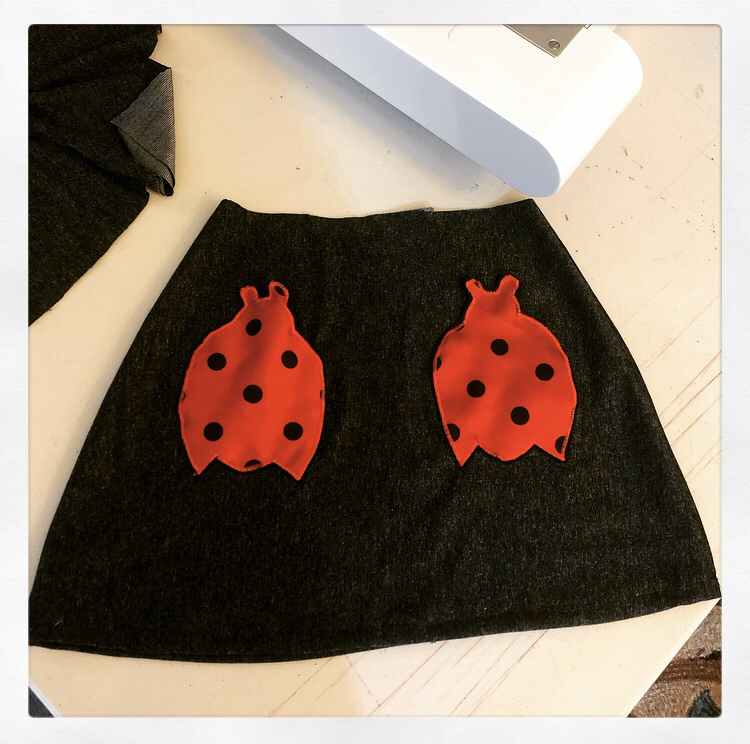
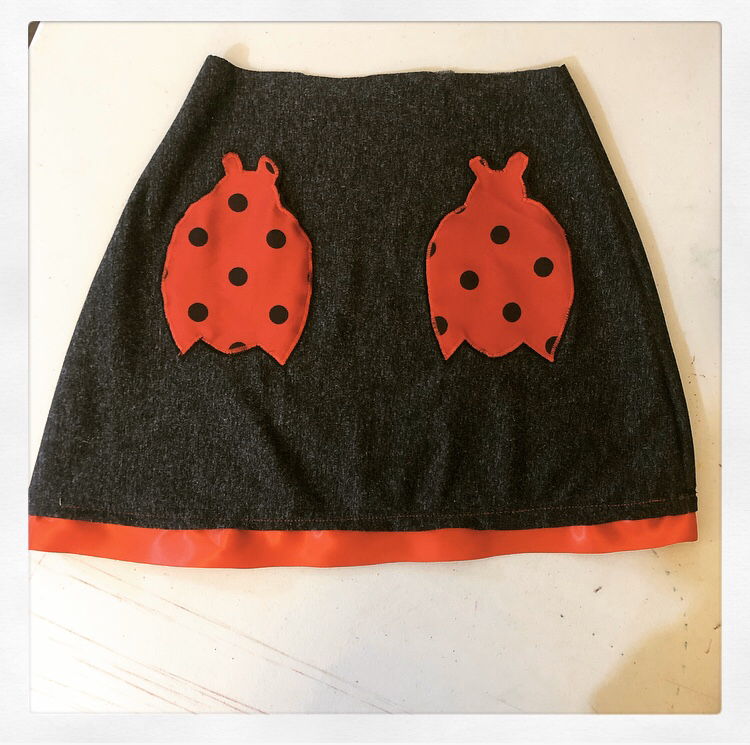
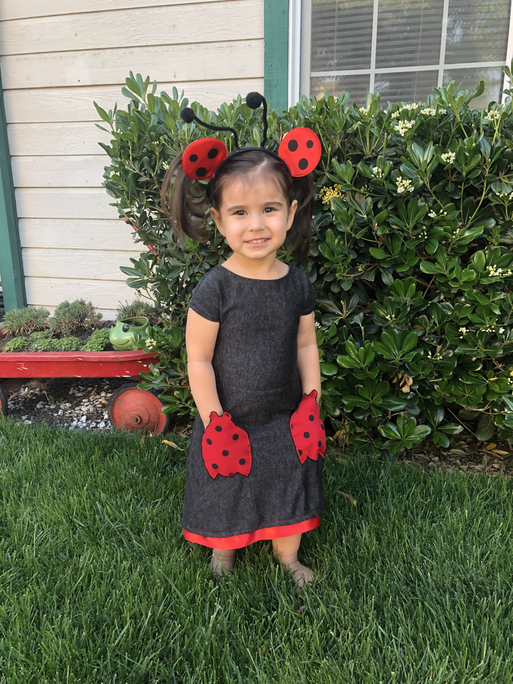
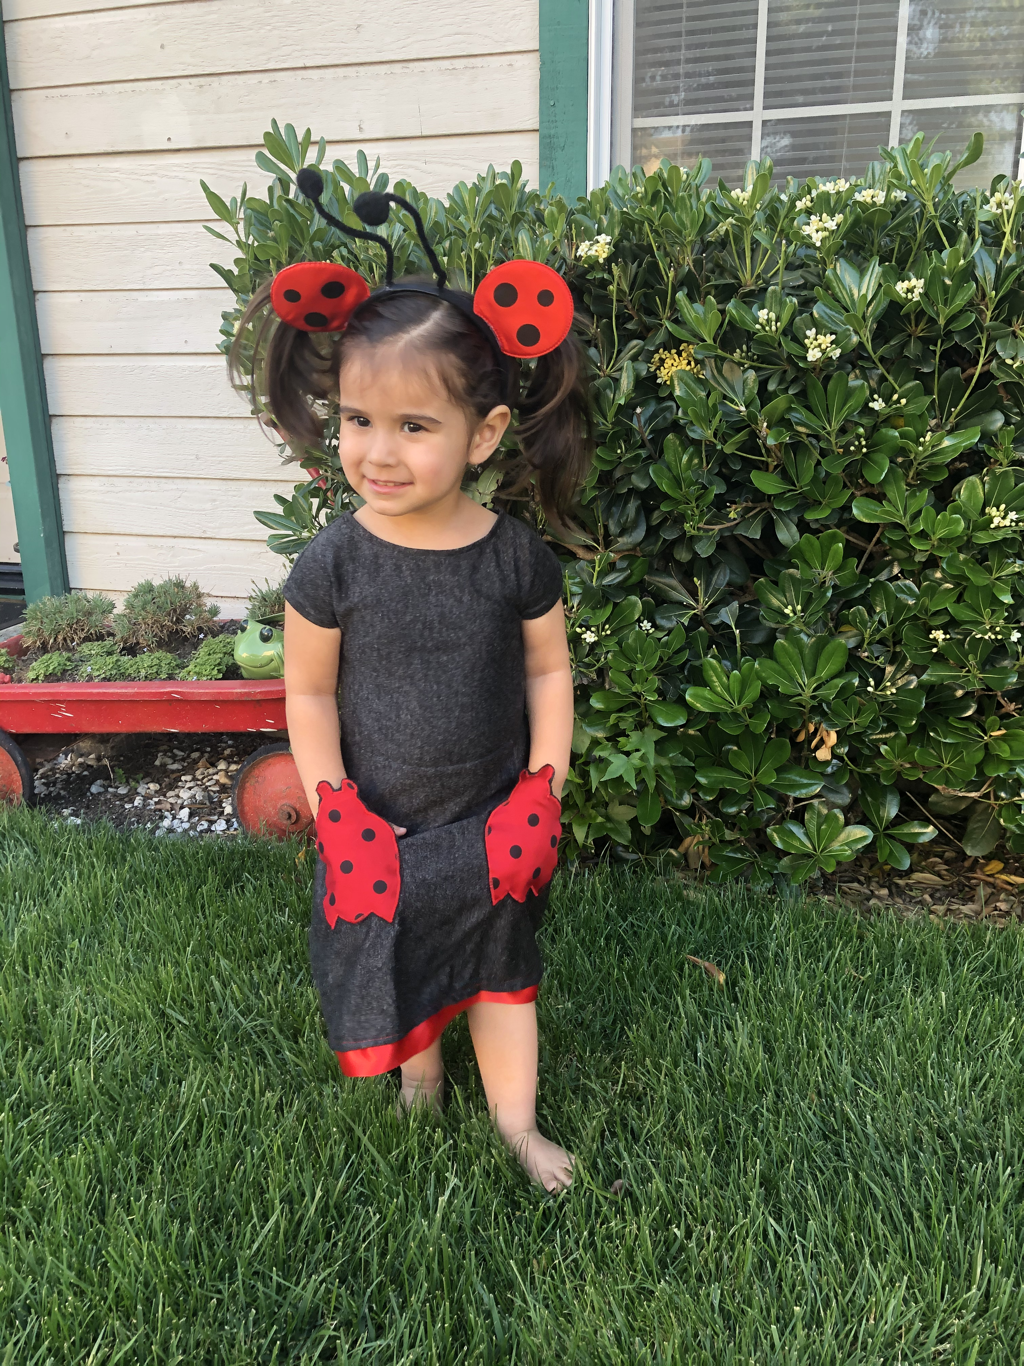
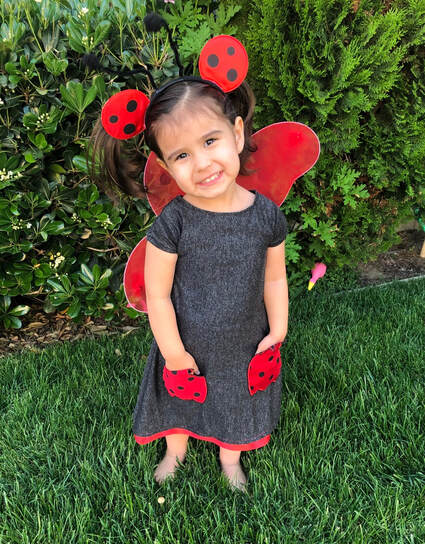 My 2 1/2 Year Old Daughter in the Ladybug Dress that I created for her! Her accessories include a Ladybug Headband and Ladybug Wings that we purchased last year at our local The Dollar Tree: Must haves for a little girls "Dress Up" Bin! For the last 2 1/2 Weeks, I have been sewing FaceMasks non-stop, every single day! Ok, maybe not exactly non-stop, but it sure feels like it! Over the last few weeks, my little darling daughter has seen me creating masks with a red and black polka dot fabric, that she calls "Ladybug Girl"! She has asked me several times if the fabric was for her, if the masks are for her, and if Mommy is making a dress for her... I told her that I would make her a Ladybug Dress sometime this week... As my FaceMasks orders have been coming in, more people are choosing the red and black polka dot fabric for their mask order, and it is adorable! I knew I had to make her something out of this darling fabric before I ran out! Today, I decided to take a short break from Mask Making, and create something for my little one. While she and my 1 year old baby were taking their afternoon nap, I made my toddler the cutest 3T Ladybug Dress! The dress took me about an hour and a half to make, and I love how it came out! 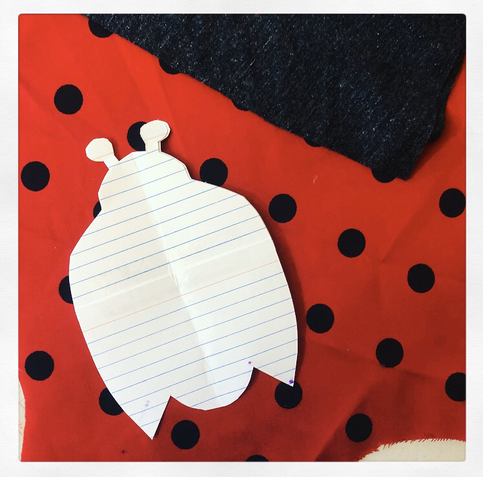 This is my Applique Template of a Ladybug that I drew freehand on an index card. I used this template to create applique Ladybug Pockets on my daughter's new Ladybug Dress. Earlier last week, I received my long coveted Singer Sewing Machine Accessory Kit, that I ordered from Amazon. This Presser Foot Kit has been on my Wish List for years! The Presser Feet included within this kit are: Blind Hem Foot, Cording Foot, Darning/Freehand Embroidery Foot, Even Feed/Walking Foot, Gathering Foot, Narrow Rolled Hem Foot, Overcasting Foot, Satin Stitch Foot, Straight Stitch Foot, plus a Twin Needle. Imagine the creative possibilities with these amazing accessories! In March, I found a fantastic book at my local library's annual used book sale, Encyclopedia of Sewing Machine Techniques, by Nancy Bednar and JoAnn Pugh-Gannon (1999). This book explains how to use all of the various presser feet along with step-by-step instructions! When I bought this book (for ONLY $1.00!), I knew for a certainty that I needed, absolutely needed, to buy the Singer Sewing Machine Accessory Kit that I had found on Amazon so long ago... So I bought it! I already love it! The Encyclopedia of Sewing Machine Techniques is a must have companion to the kit! 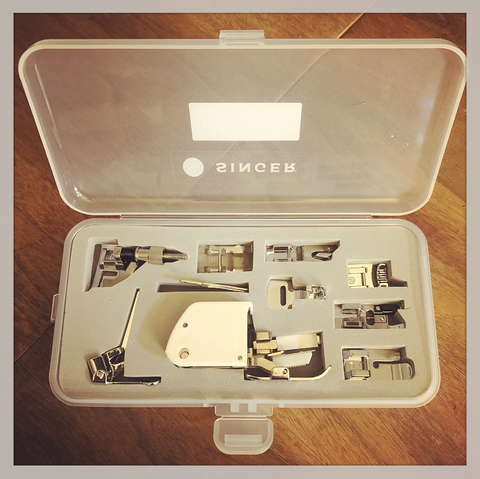 My NEW Singer Sewing Machine Accessory Kit that includes 9 Presser Feet! 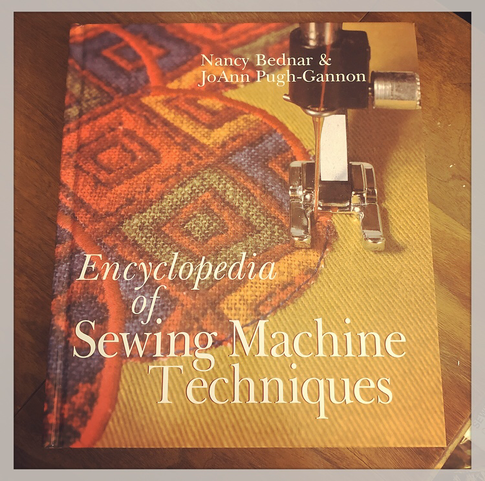 The Book, Encyclopedia of Sewing Machine Techniques, by Nancy Bednar and JoAnn Pugh-Gannon (1999). While on my sewing break from Mask Making, and with my babies peacefully asleep, I thought it would be fun to check out my accessory kit, by trying out the Satin Stitch Foot, and making my daughter her Ladybug Dress... I knew I could not make my daughter a dress entirely out of the red and black polka dot fabric, because I am running low. So I decided to make a Ladybug Applique out of the fabric, and attach it to a lovely charcoal grey stretch knit fabric that I had on hand. I was inspired by the design of a Carters Dress that I recently bought for my daughter online. The Carters Dress is a size 3T, fits her perfectly, and has little kitty cats as pockets on the front. I took the Carters Dress and traced the Skirt and Bodice on Pattern Paper, I added the seam allowances, then cut the new dress out of the charcoal stretch knit fabric. I also cut out the ladybug applique. With page 22, of my Encyclopedia of Sewing Machine Techniques open, I setup my new Satin Stitch Presser Foot following the Machine Set-Up Instructions on the "Applique, Basic Satin Stitch" Section of the book. How handy it is to have this tangible resource! 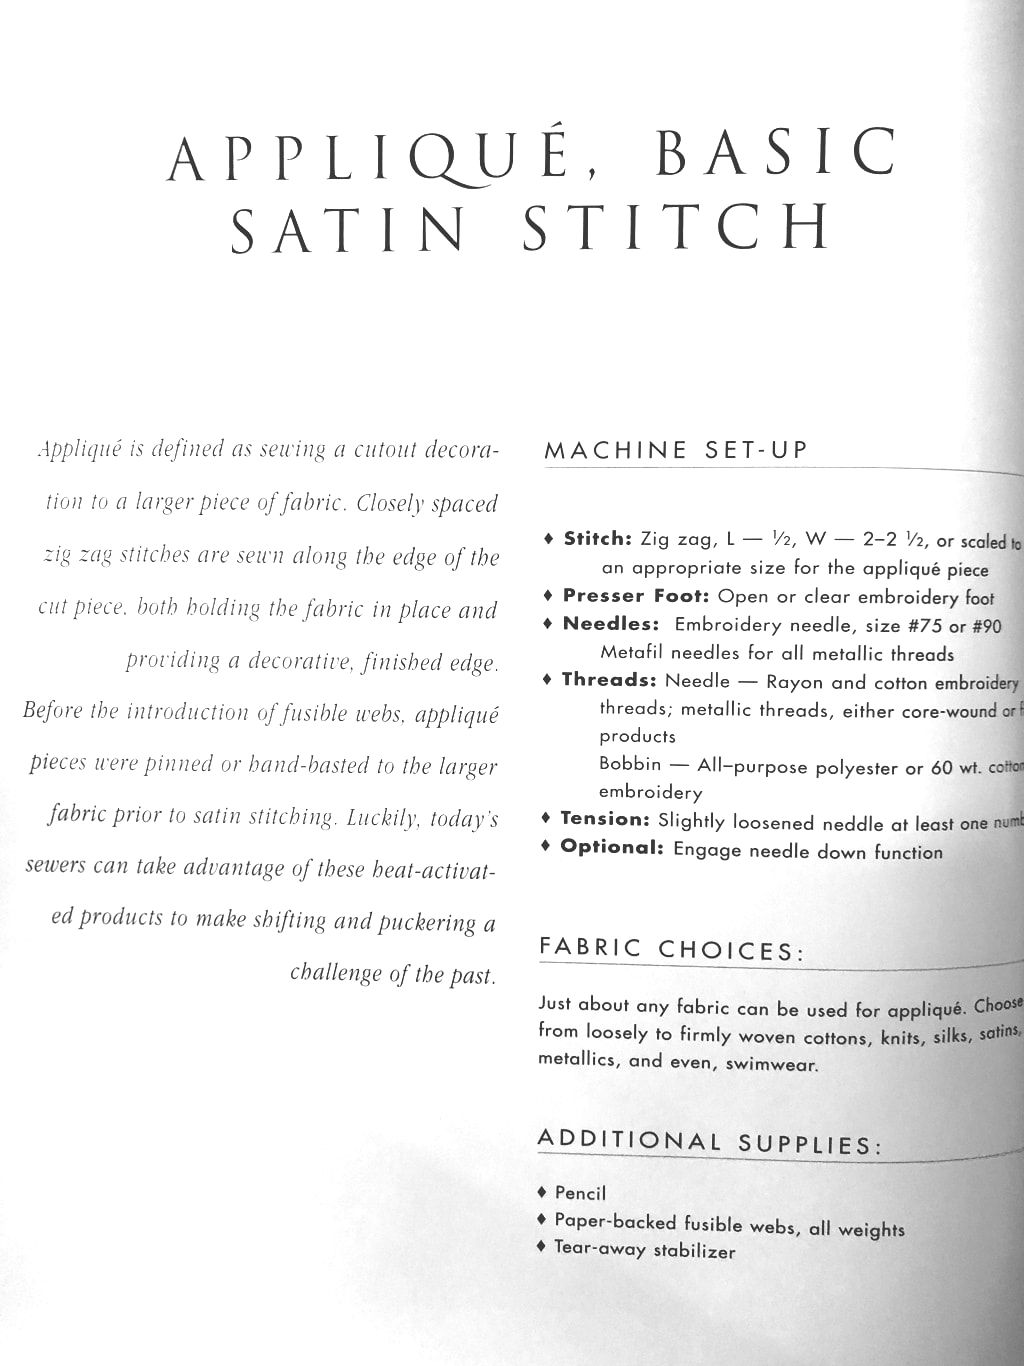 Page 22 of Encyclopedia of Sewing Machine Techniques. Check out my work in progress...
 After sewing the front and back of the bodice together, I finished the arm holes and neckline, then attached the dress bodice to the skirt. Finished! Nap Time is over, and the dress is ready! She loves it!
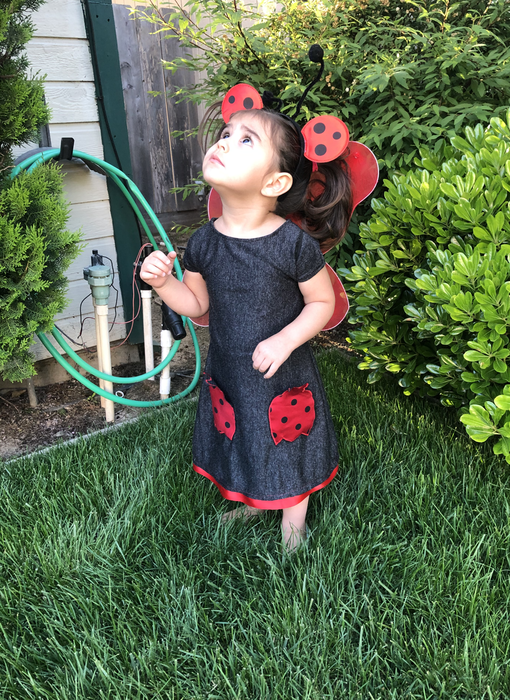 Here she is in her new dress, gazing at the bugs flying in the yard! Thank you for reading about my latest project! I am excited to try out the remaining 8 presser foot accessories in my accessory kit. I will be sure to tell you all about it once I do! GoodNight! Related Links:
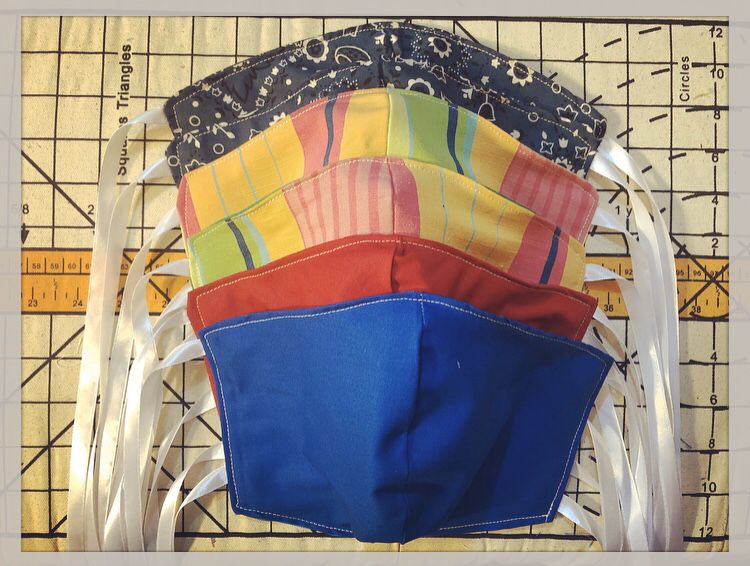
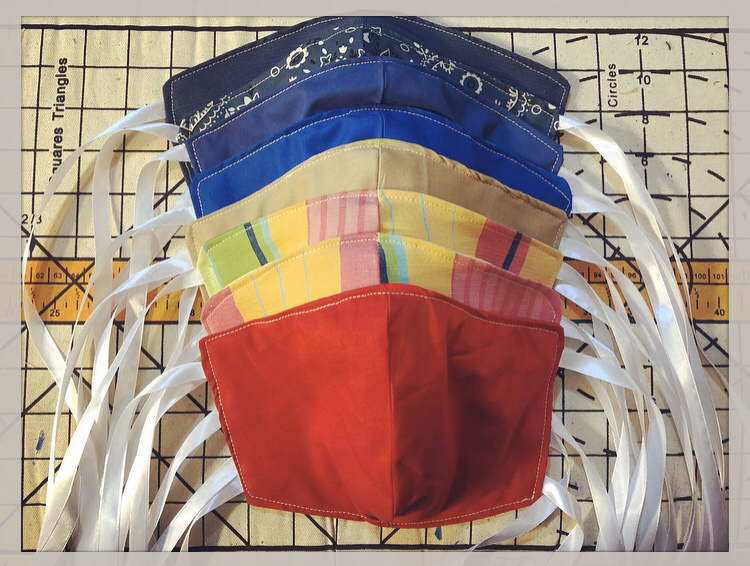
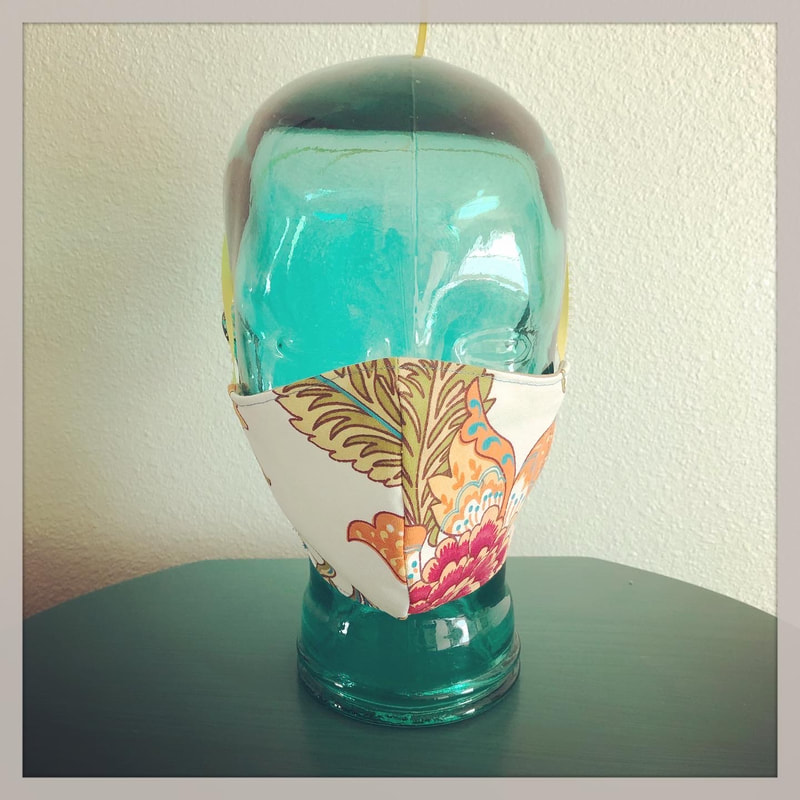
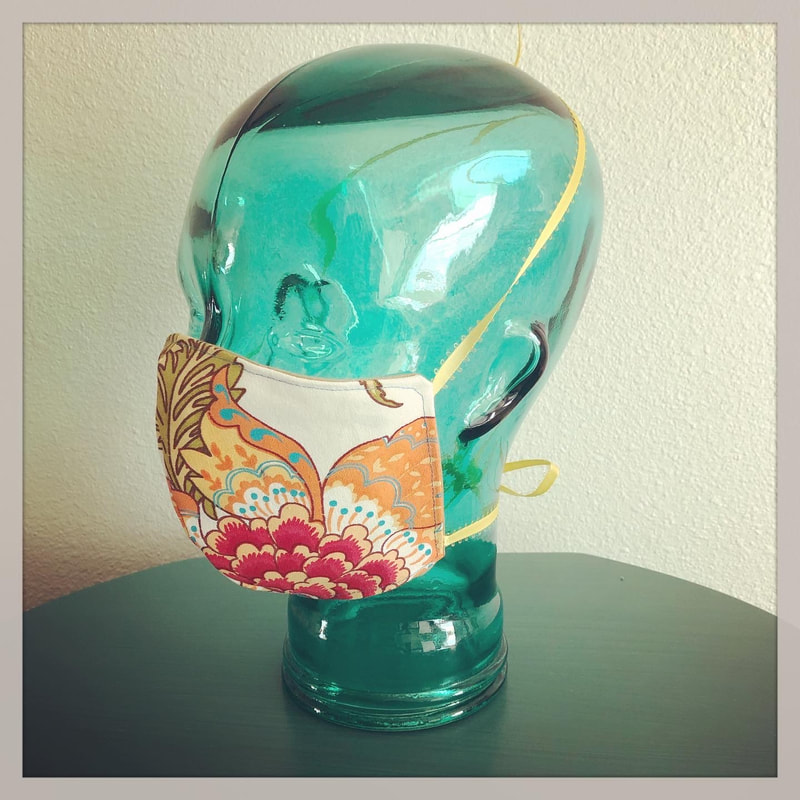
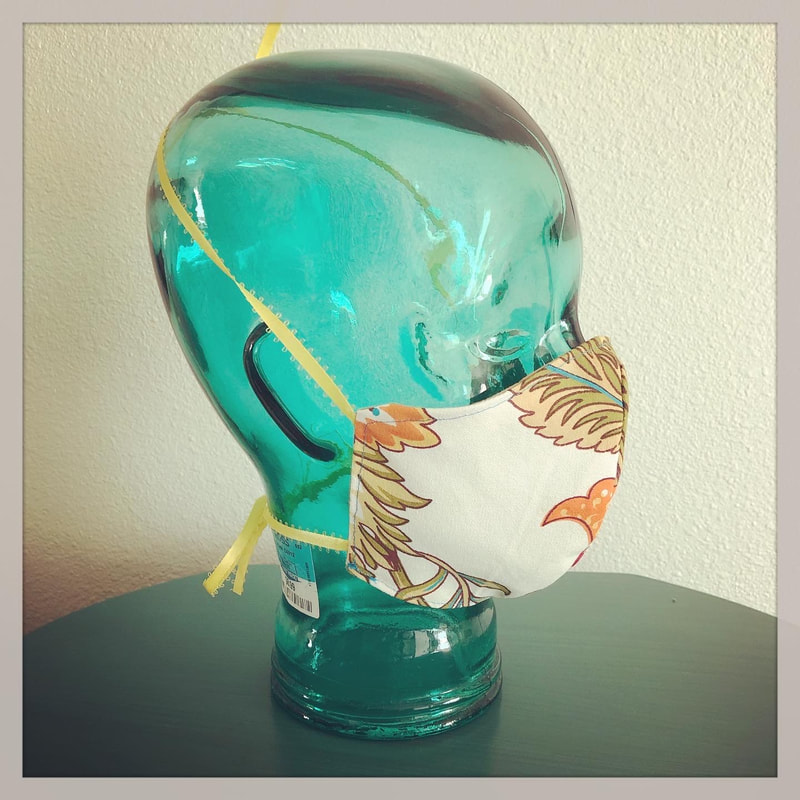
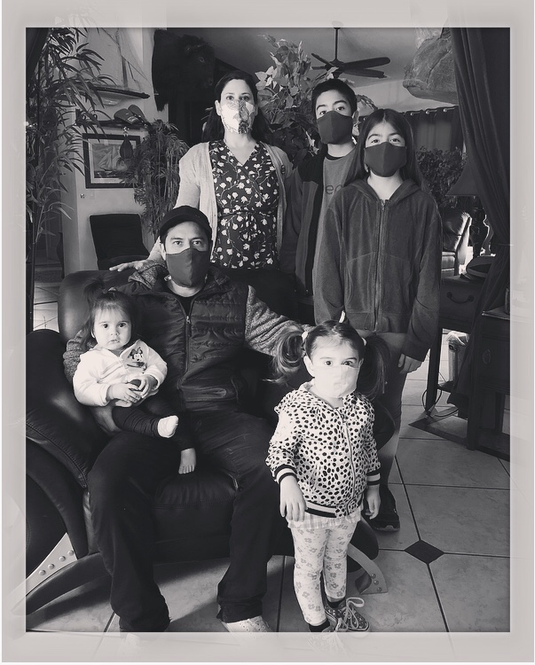 My FaceMask Wearing Family Portrait- The Rangel Family- Coronavirus Pandemic 2020 (My one year old baby wouldn't keep a mask on long enough for a photo!) Last week, my sister Desiree, tagged me in a Facebook Post that was created by her friend who works at UCSF. The post was searching for people who can sew in hopes that they could make Homemade FaceMasks for Hospital workers, who are running low on their supply. Currently, most of the world is on some sort of Shelter In Place or Home Quarantine requirements, due to the recent outbreak of the COVID-19 virus. Oddly, this is tale we’ve seen or heard so many times in futuristic, science fiction, or horror films, and novels... Schools and places of worship have shut down, more businesses continue to close, and home goods and groceries are flying off the shelves quicker than they can be re-stocked! For many of us, this is a surreal experience... Sadly, the shortage of supplies, especially Face Masks for Hospital workers, is all too real. In intense times as these, it is important that we continue to come together as a community, and do our part to help others when able. As a person who can sew, I decided to help these Front-Line Medical Workers as much as I can, by sewing Fabric N95 Style Facemasks to donate to those in need of them. My sister, Desiree, donated material, and ribbon, and I completed the sewing on 24 Face-Masks as a donation to the hospital at UCSF! 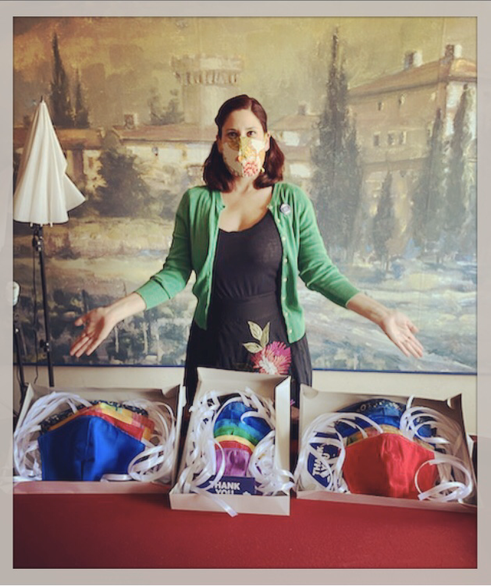 This is me, Roxanne, and my 24 FaceMasks that myself and my sister, Desiree, sent to UCSF for front line hospital workers.
Mask Making
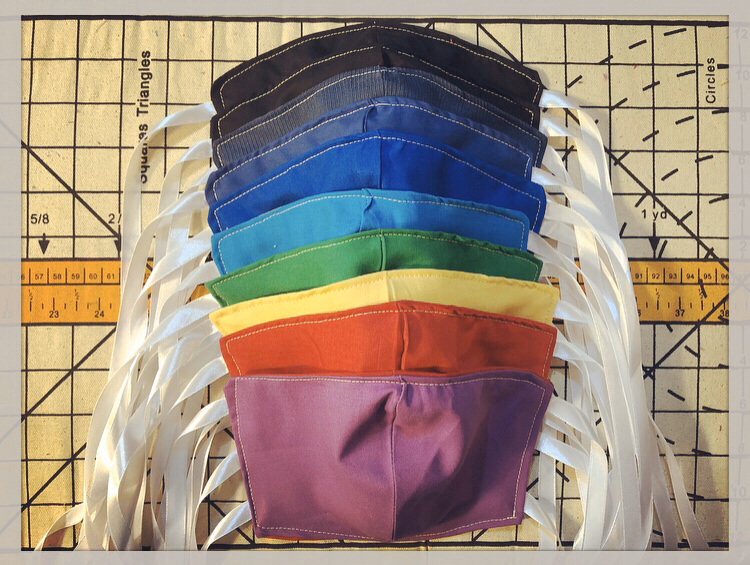
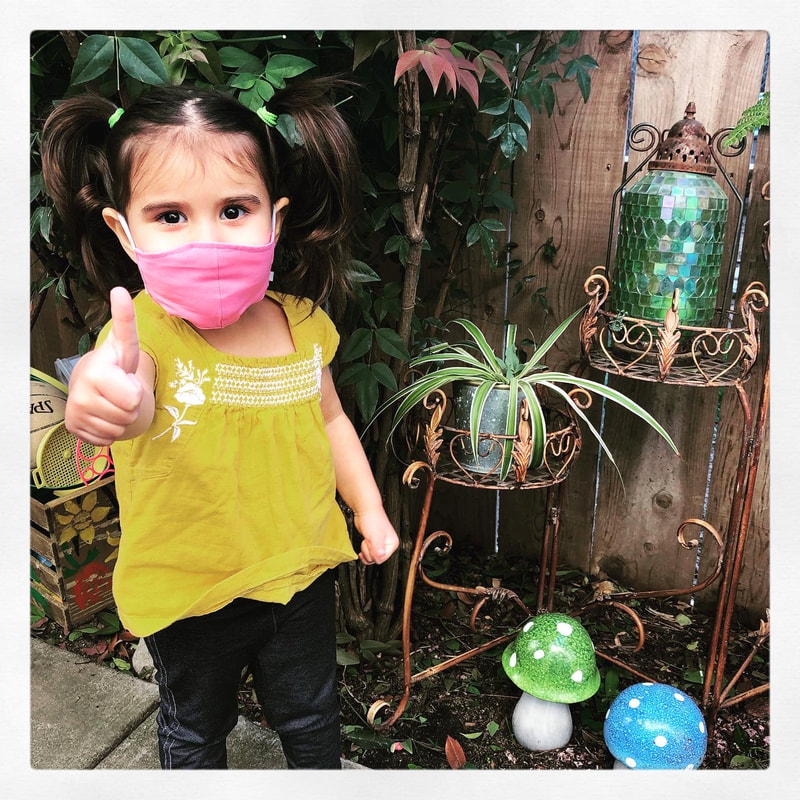
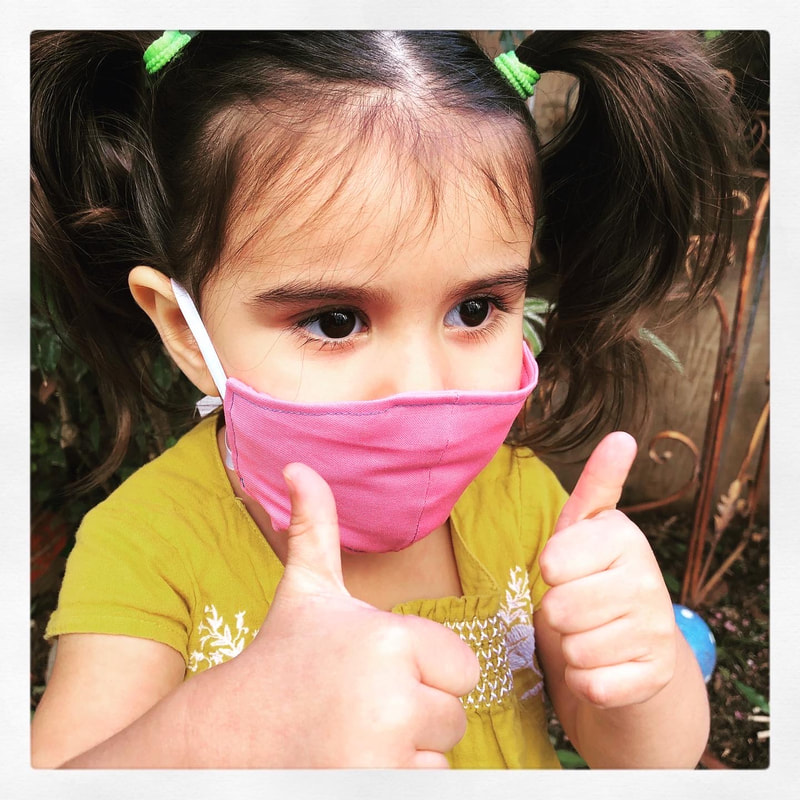
It's hard to believe that just a month ago, Face Masks were something I never would have imagined I would be producing in large quantities today. Just one month ago, I was consulting with one of my clients about creating a custom ball gown, for a now cancelled formal event. I was preparing an upcoming fashion collection for the now cancelled Oakland Fashion Week 2020. I was working Saturdays as an Alteration Specialist for the retailer, The Buckle, which is now temporarily closed... but then I posted a few photos of FaceMask Making... since then, I have received numerous messages, phone calls, and text messages, asking if I make FaceMasks, and if I sell them! The overwhelming need of the community has been keeping my sewing machine running non-stop! 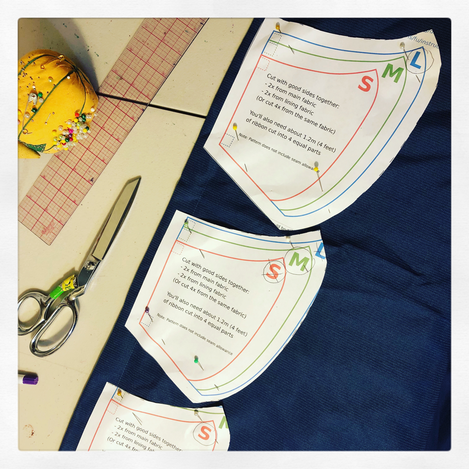 Work in Progress: Making Homemade N95 Facemasks As the past week continued, I have sold many FaceMasks! I have at least a dozen orders prepped and ready to be made as the next few days unfold. Everyday I have received more orders! Check out a few photos of some of my completed orders: 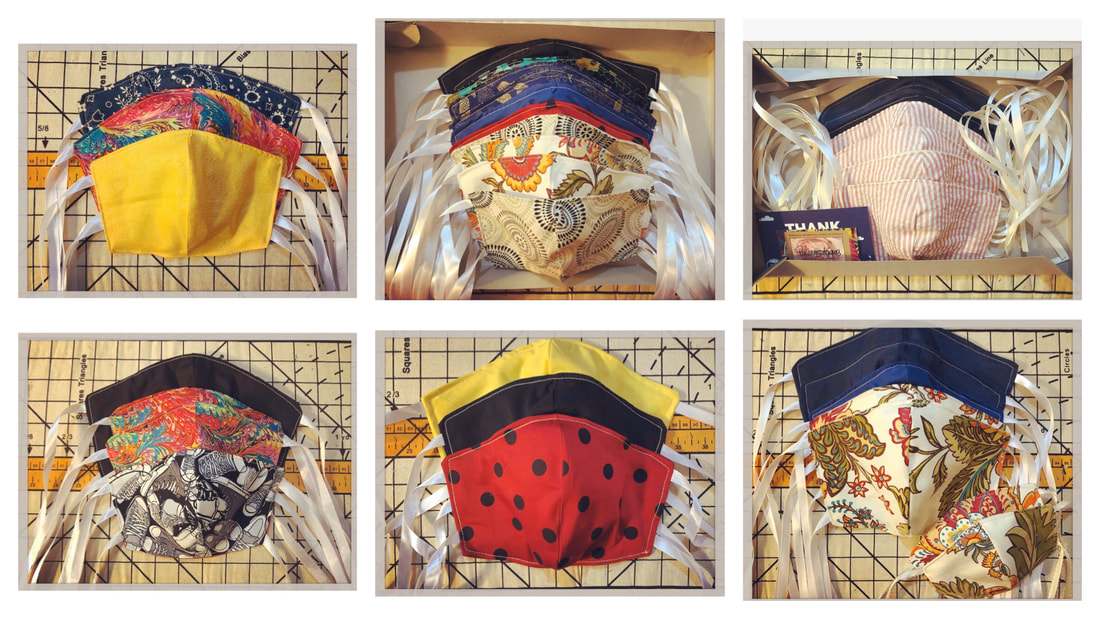 A few orders of FaceMasks that I made and delivered this week... Do Homemade Face-Masks Work? Over the past week, I have seen and read many articles and links posted on social media and news pages about the effectiveness of Fabric FaceMasks. Some of these articles will tell you that Fabric Face Masks are at least 50% effective against creating a barrier of germ protection, while other published statistics quote higher or lower effectiveness depending on the material used, and the amount of layers of fabric. Most Fabric Mask Making tutorials, or patterns, recommend use of 100% woven cotton. Other articles encourage everyone to wear FaceMasks, reasoning that wearing them protects others from your germs. If everyone in the community is wearing FaceMasks when conducting "Essential" business out in public, than it could, possibly, drastically reduce the spread of the virus. Regardless of what you might believe regarding the use of FaceMasks, I believe FaceMasks made of fabric is better than nothing. Some counties across the US are now requiring the use of FaceMasks when out in public.  This is my husband, who is an "Essential Employee" Here he is wearing the FaceMask that I made for him. I have made FaceMasks for a few of his co-workers, as well as many other "Essential Employees", such as those who work in grocery stores. #SewingTogether I follow many fellow Fashion Designers and creators on all the social media platforms... over the past week my newsfeed is post after post of photos and videos of everyone who can sew creating FaceMasks of various styles. It is amazing! I love that we have many talented and skilled persons who can sew right here in the US! I also love the support of the community in shopping from their local FaceMask Maker! In addition to the individual Mask Makers, there have been some big names who have began producing FaceMasks, such as Fashion Designer, Christian Siriano, as well as Nordstrom! How inspiring! Although these times are unexpected and kinda crazy, I strongly feel that this is the beginning of a new Zeitgeist: bringing Production back to the The United States! 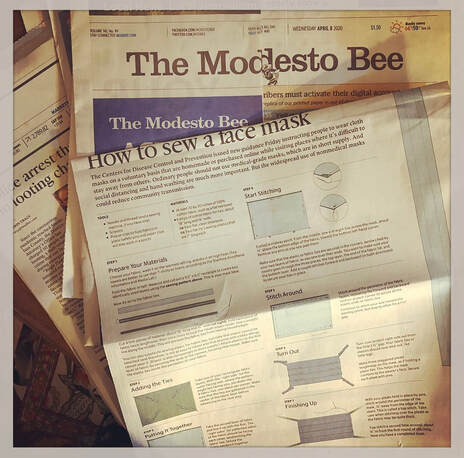 A full sewing pattern of a Pleated FaceMask as well as Sewing Instructions were printed in The Modesto Bee this week. If you are interested in joining the Sewing Production of FaceMasks too, You can Download this Free PDF Pattern for a Fabric N-95 Type Face-Mask HERE. HERE are the Pattern Sewing Instructions. If you would rather donate material to be sewn into FaceMasks, I am accepting donations of fabric, ribbon, or elastic, and thread. All donated materials will be used to sew donated masks that will be given to our front line workers locally. You can contact me many ways, so check my Contact Page, and send me a message in whichever way is most convenient to you! Sewing and Shipping
Each day I am working to finish my FaceMasks Orders, and am completing them in the order received. I am trying to get them out as quickly as possible, but because I am only one person, my production is limited. Every day, I am sending out the orders finished the day before. It has been crazy how many orders I have shipped out or delivered in just one week! I expect that in the following weeks I may even see a surge in orders, as more people need them.
I wanted to write this Blog Post as a continual series of articles documenting my FaceMask Making Memoirs! I expect that FaceMask Making will continue to be needed in the upcoming weeks or even months ahead, and this platform is a great way for me to combine my photos and experiences together for your reading pleasure! I appreciate all of your support! Whether you have purchased a FaceMask from me, or just shared a FaceMask Making Post that I have published, you all give me the energy I need to keep on keeping on! If you need me, I will be right here, at my sewing machine! 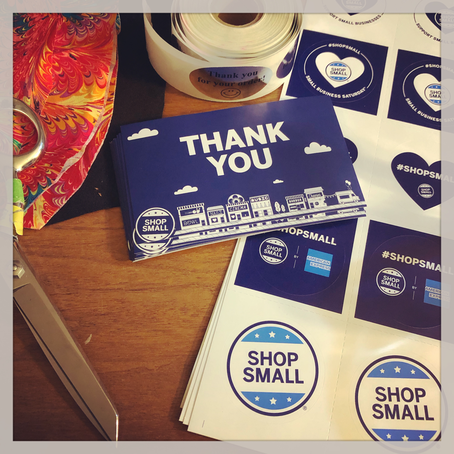 Thank you all for your support in my Face-Mask Production! Thank You for reading my Blog!  Some Face-Mask humor for my Movie Lovin’ Readers! Related Links:
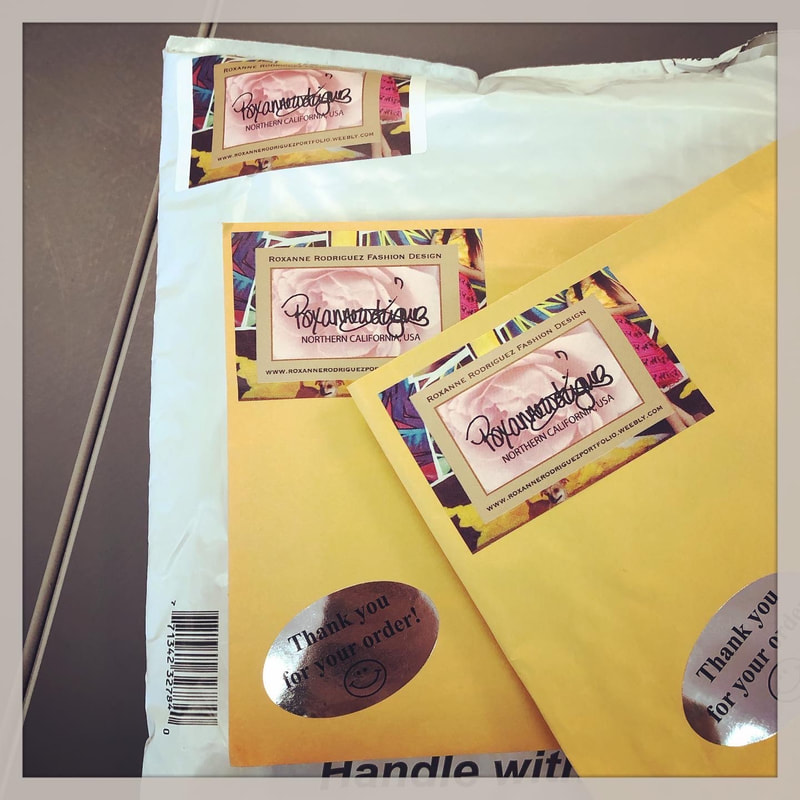
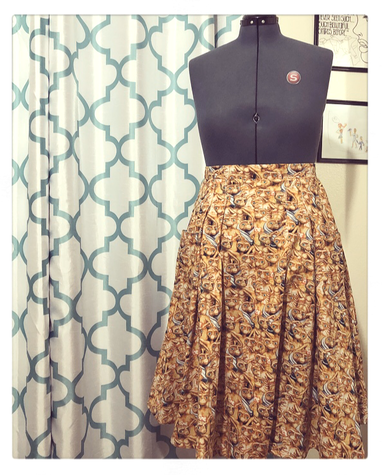
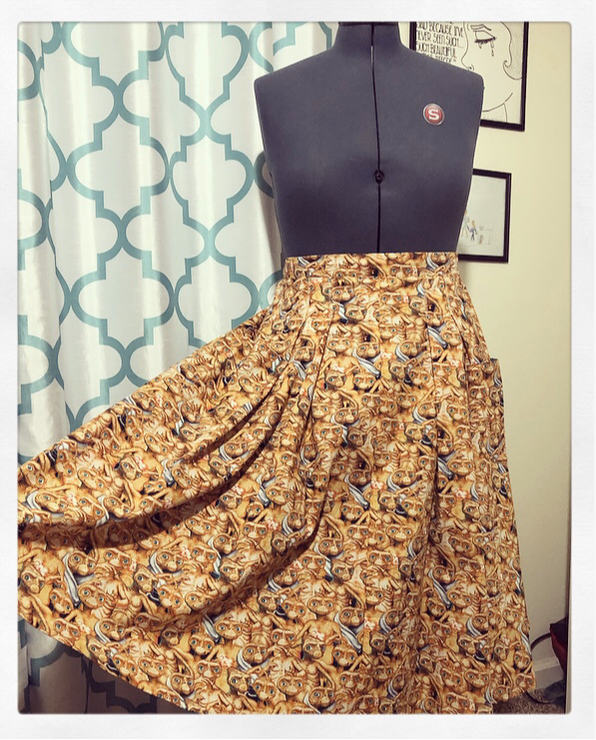
 This week I finally finished a Vintage Inspired Skirt for myself that I created with E.T. Novelty Fabric! 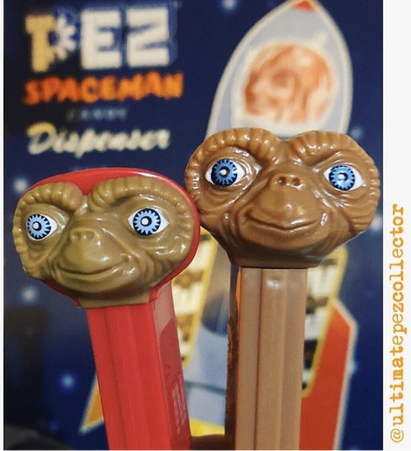 This is a photo of my E.T. PEZ Dispensers, posed in front of my PEZ Spaceman Metal Sign. I am a PEZ Dispenser Collector, and have an Instagram Account dedicated to my entire PEZ Collection! You can find me at www.instagram.com/ultimatepezcollector Ever since I was a child growing up in the 1980’s, I have loved all things E.T.! Over the many years, I have owned E.T. Dolls, E.T. Posters, E.T. PEZ Dispensers, an E.T. Watch, and a bar of E.T. Soap! Not surprisingly, when I spotted E.T. Fabric at Jo-Ann's Fabric, two summers ago, I couldn’t help but purchase several yards! I had planned to make myself a skirt with the fabric, but was delayed about a year and a half, due to finding out that I was pregnant with my youngest daughter. I had the skirt about half way made, when I decided to pause the project until after my baby was born, knowing I wouldn’t be able to wear it, with a growing baby-bump, followed by a post pregnancy body! Check out a close-up photo of the fabric that I found: (Isn't it bizarrely exquisite?!) 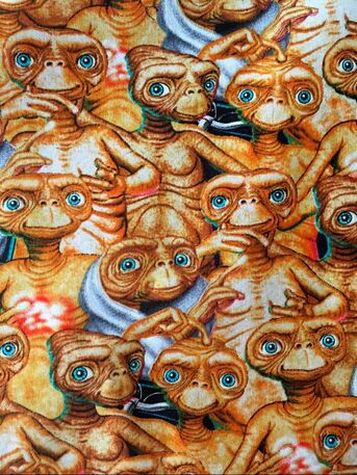 Novelty E.T. Fabric that I purchased at Jo-Ann Fabrics. Just recently, I found myself caught up on most of my ongoing projects... I pulled out my partially completed E.T. Skirt, and began to finish its construction! I rarely have time to make clothing for myself, so it is exciting for me when I finally do! I cut out contrasting lining, created a waistband to fit my current waist measurement, and I assembled the skirt to completion! I was very happy to find that I had just enough fabric remnants to add lined pockets! Check out the completed skirt:
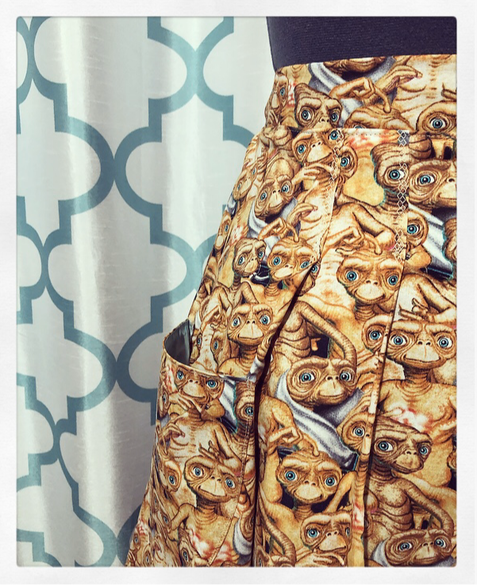 Close-Up photo of Lined Pocket and Pleats I absolutely love the design of this High-Waisted Full Skirt! To create this look, I used the skirt pattern pieces of Butterick Retro '56 Dress Pattern, B5813, and then created my own customized waistband, and pockets. I also love how this fabric isn’t instantly recognizable as an E.T. Print until one looks a little more closely! Check out a few more photos:   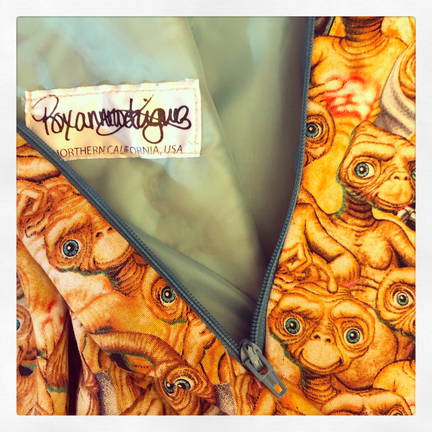 Close-Up photo of back zipper, and contrasting lining. Thank you for reading about my latest creation, my Vintage Inspired E.T. Skirt! I am looking forward to creating several more skirts and dresses for myself in the near future, as well as a 1930's Girdle! More Blog Posts coming soon!  Related Links:
|
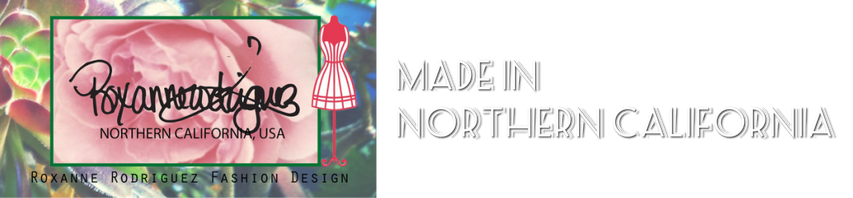
AuthorHello Readers! Welcome to my Blog! I am Roxanne Rodriguez Rangel, a Fashion Designer from Northern California. I love all things Fashion, particularly historical fashion! Join me, as I take you around Northern California, covering fashion events and related topics! 
Categories
All
|

 RSS Feed